Key Takeaways
- To create a local user account, head into Settings > Accounts > Other Users, click “Add Account,” choose “I Don’t Have This Person’s Sign-In Information,” select “Add a User Without a Microsoft Account,” and enter the account details.
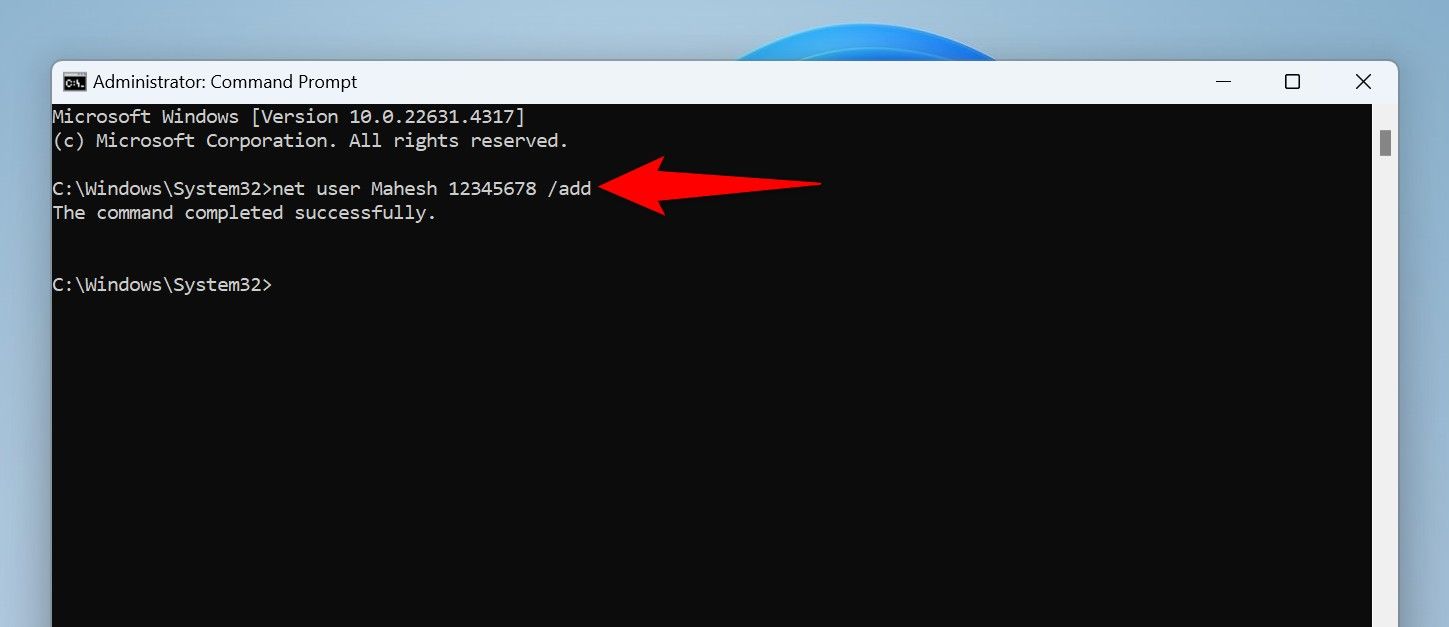
- Make an account from Command Prompt by running the “net user NewUser NewPassword /add” command.
- You can turn the account into an admin account using all these methods.
Creating a local user account on Windows 11 is as easy as clicking a few options in Settings or running a command. I’ll show you multiple ways to add standard or admin users to your computer.
Using Settings
The easiest graphical way to make a local user account in Windows 11 is by using the Settings app. You can choose whether you want to make an admin account or a standard account with this method.
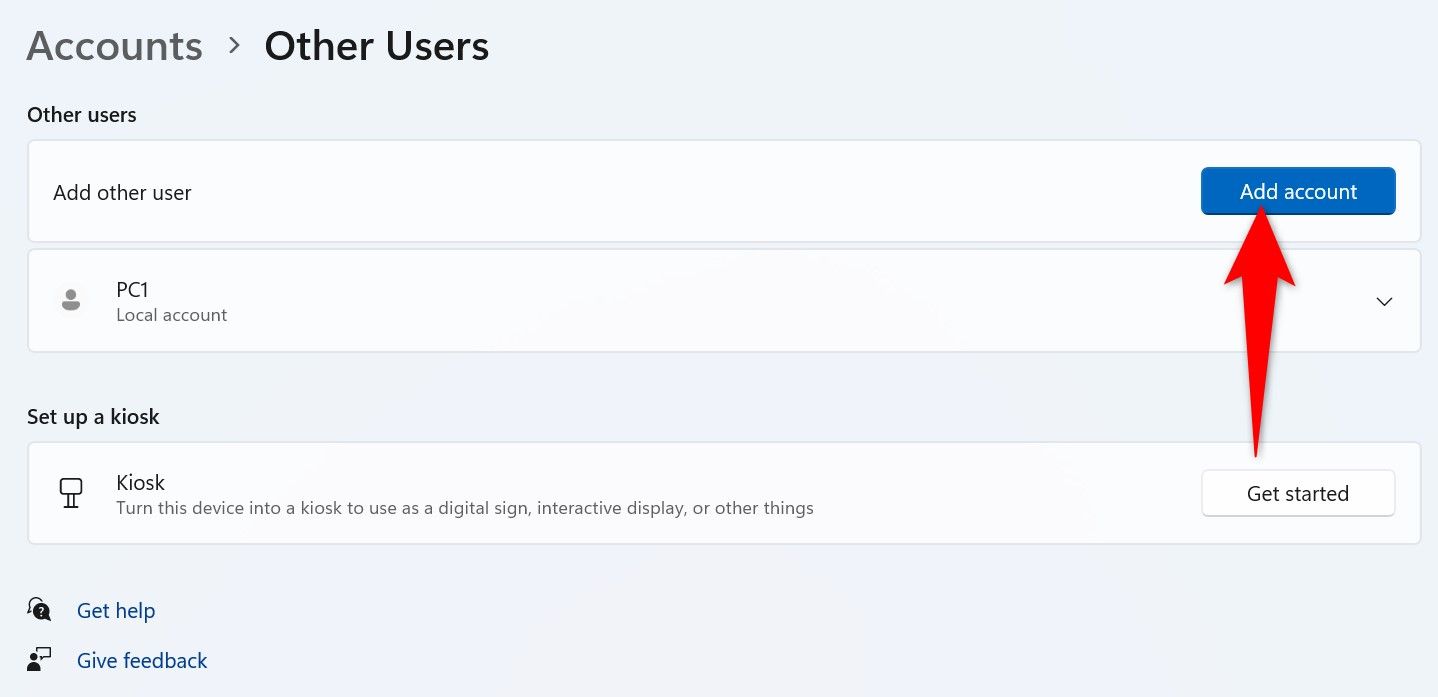
Start by launching Settings using Windows+i. From the left sidebar, select “Accounts.” On the right pane, scroll down and choose “Other Users.”
On the following page, next to Add Other User, click “Add Account.”
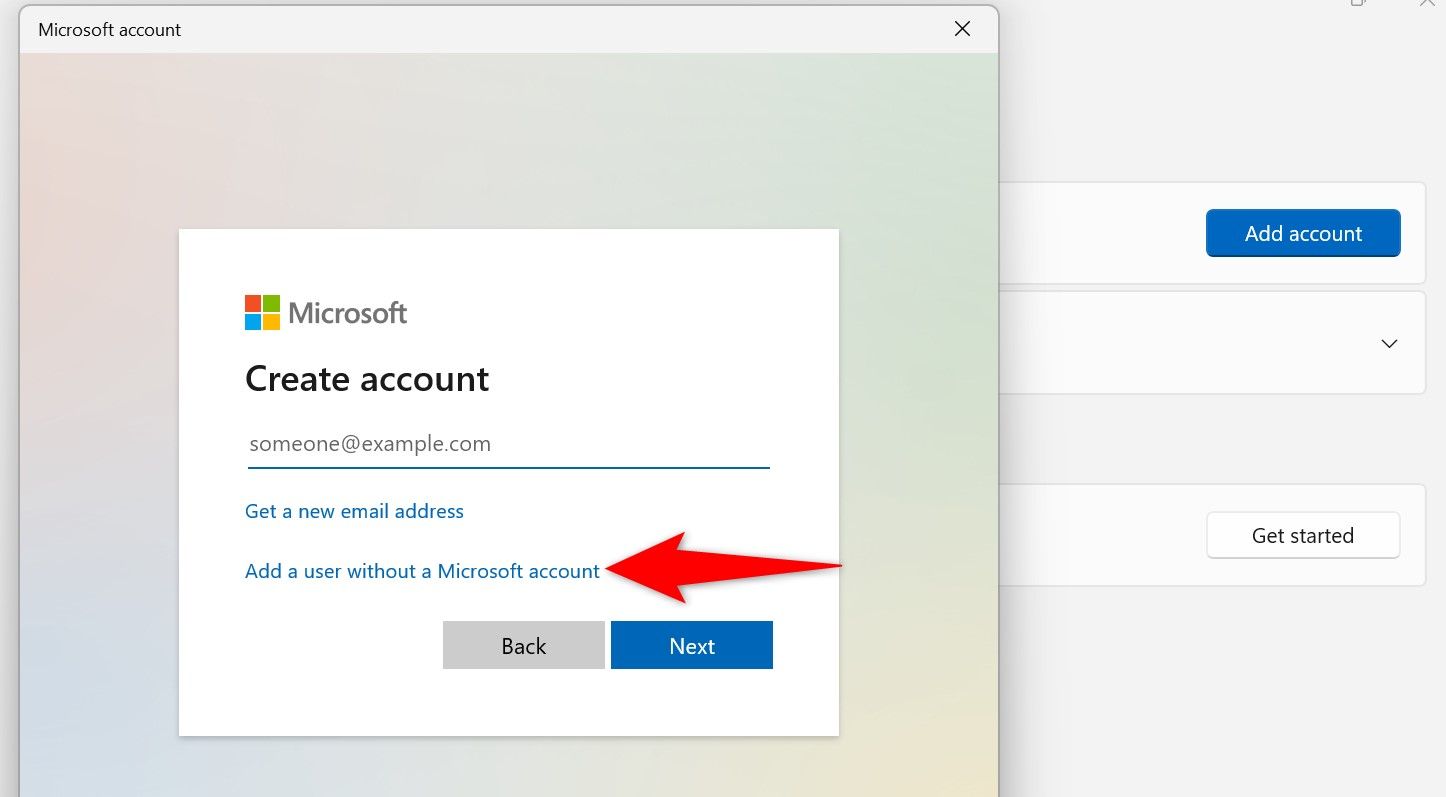
You’ll see a Microsoft Account window. Since you want to create a local account, on the open window, click “I Don’t Have This Person’s Sign-In Information.” Then, on the following page, choose “Add a User Without a Microsoft Account.”
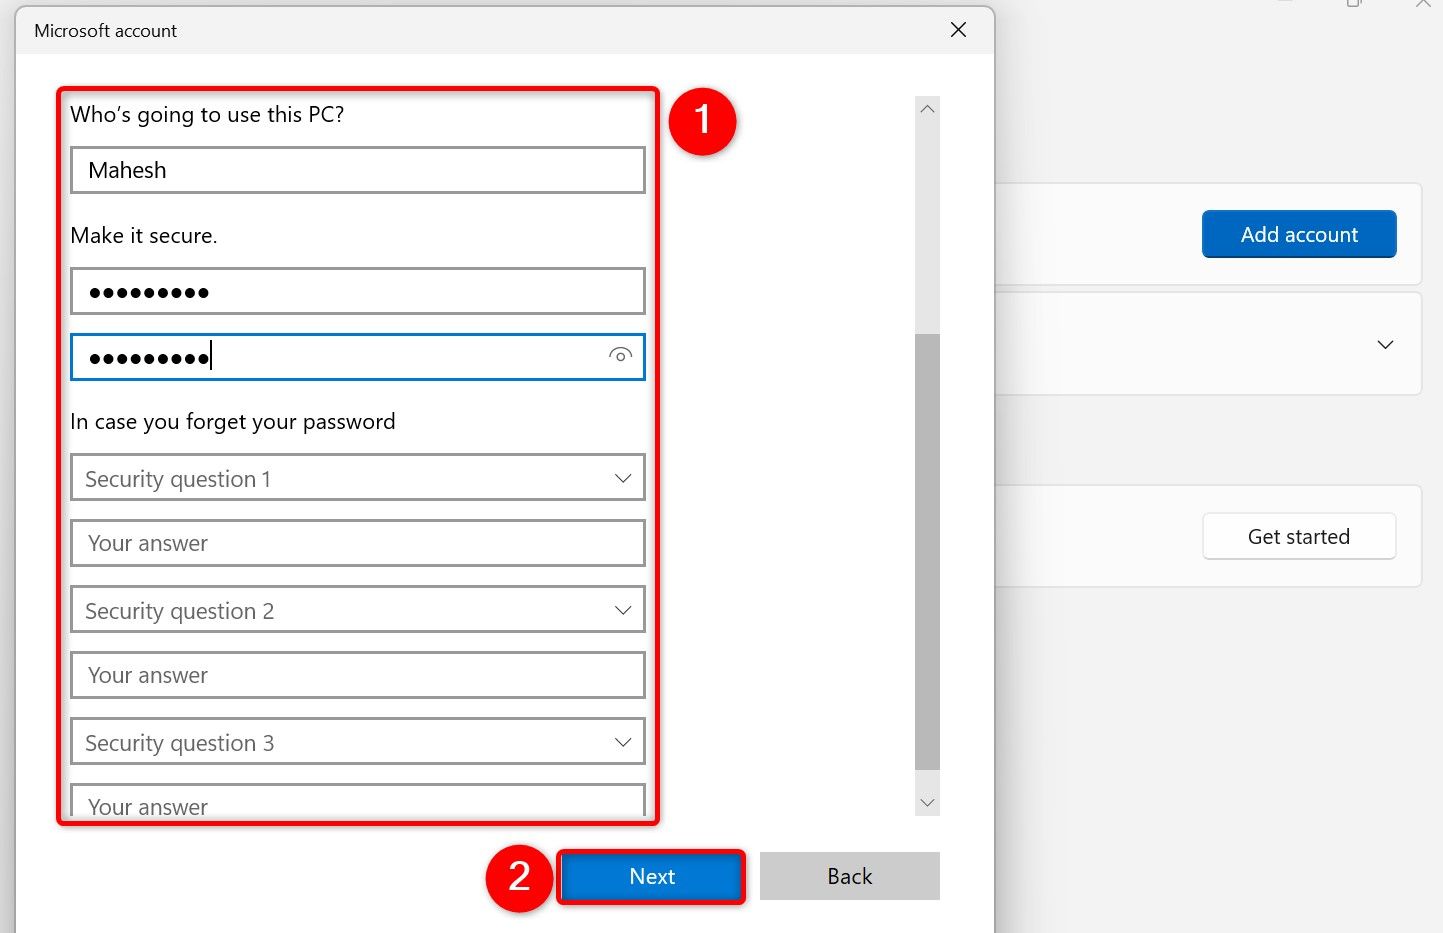
Click the “Who’s Going to Use This PC?” field and type the username for the new account. In the “Make It Secure” section, select the first field and type the password for the new account. Click the second field and re-type the same password. In the “In Case You Forget Your Password” section, select the security questions and provide their answers. These questions will help you reset your password when you’ve forgotten it.
Then, choose “Next.”
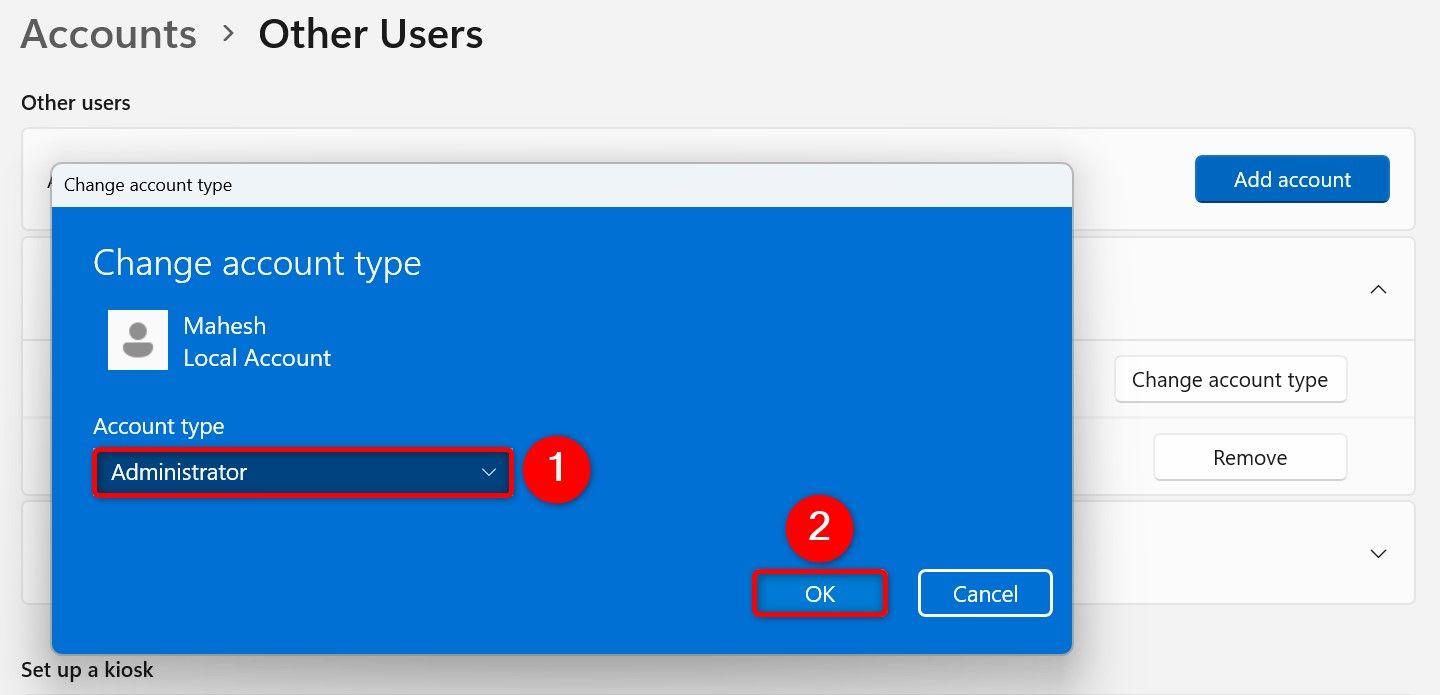
Settings has created the account, and you’ll see it on your screen. It’s a standard account, but you can turn it into an admin account. To do that, select the account, choose “Change Account Type,” click the “Account Type” drop-down menu, select “Administrator,” and click “OK.”
That’s it. You can now log out of your current user account and log in to the newly created account.
From Command Prompt
To add a local user account using the command line, open Windows Search (by pressing Windows+S), type Command Prompt, and select “Run as Administrator.” In the User Account Control prompt, select “Yes.”
On the Command Prompt window, type the following command. Replace NewUser with the username for the new account and NewPassword with the password to use for the new account. Then, press Enter.
net user NewUser NewPassword /add
The above command will create a standard user account. To turn the account into an admin one, run the following command. Here, replace NewUser with the username of the account you created.
net localgroup Administrators NewUser /add
This command adds the specified user to the Administrators group, which makes the account an admin account.
Using PowerShell
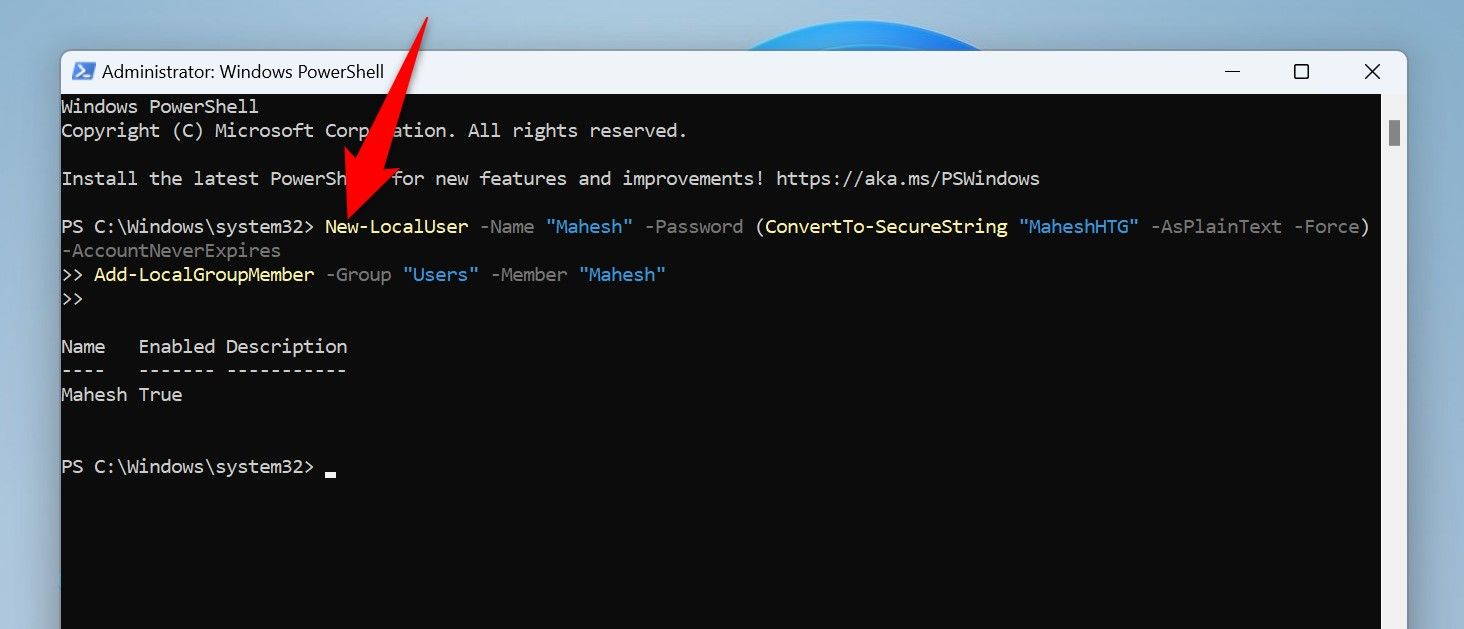
PowerShell is another command-line method to create local accounts on Windows 11. To use it, open Windows Search, type PowerShell, and select “Run as Administrator.” In the User Account Control prompt, choose “Yes.”
In PowerShell, type the following command (called a cmdlet). Replace NewUser with the username you want for the new account and NewPassword with the password you want to use. Then, press Enter.
New-LocalUser -Name "NewUser" -Password (ConvertTo-SecureString "NewPassword" -AsPlainText -Force) -AccountNeverExpires
Add-LocalGroupMember -Group "Users" -Member "NewUser"
The above cmdlet has created a standard account. To make the account an admin one, use the following command. Replace NewUser with the username of the account you created above.
Add-LocalGroupMember -Group "Administrators" -Member "NewUser"
You’re done.
From Computer Management
Computer Management is a built-in graphical utility that you can use to list user accounts, manage accounts, and even add new accounts. Note that you can only use this utility to add accounts on Windows 11’s Pro edition; you won’t see the option to add accounts if you’re running the Home edition.
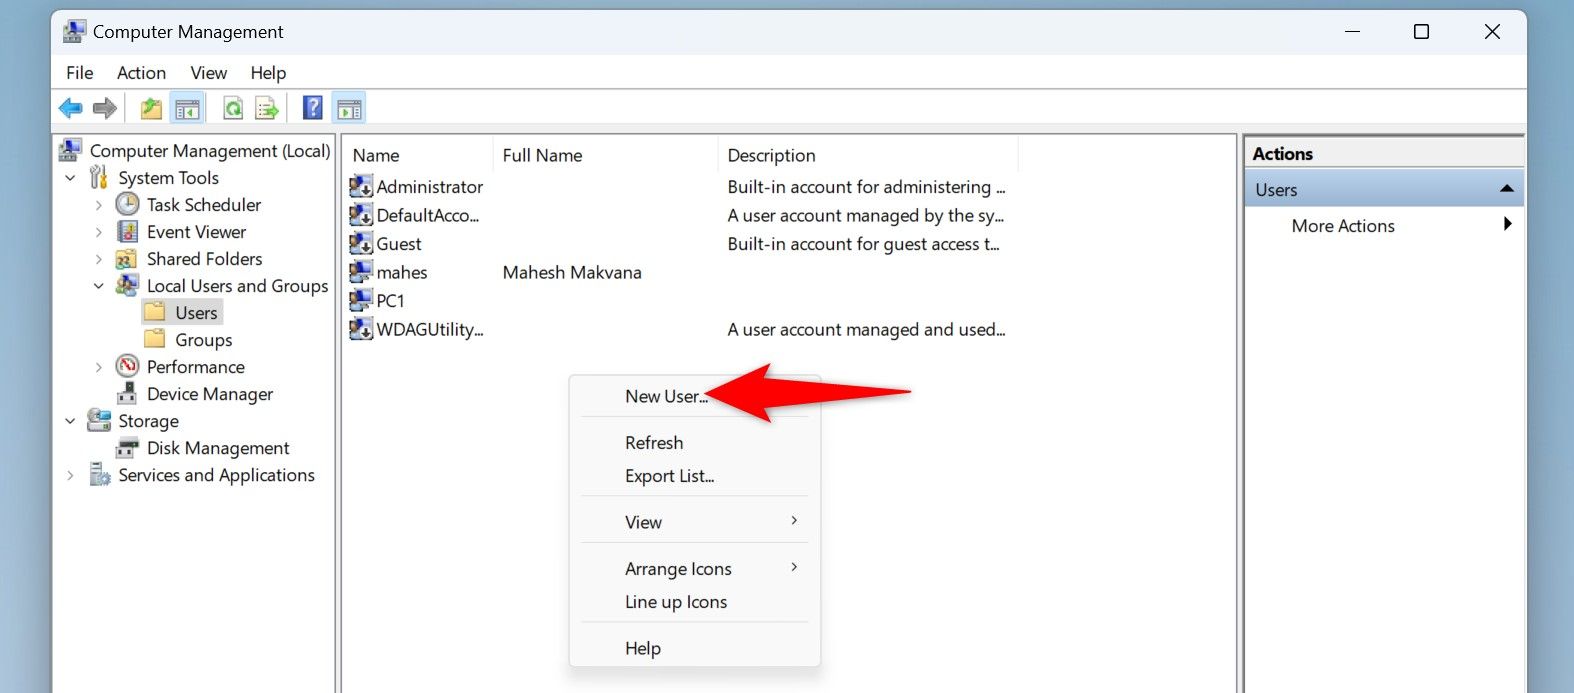
To use it, launch Windows Search, type Computer Management, and launch the tool. From the left sidebar, select System Tools > Local Users and Groups > Users. On the right pane, right-click anywhere blank and choose “New User.”
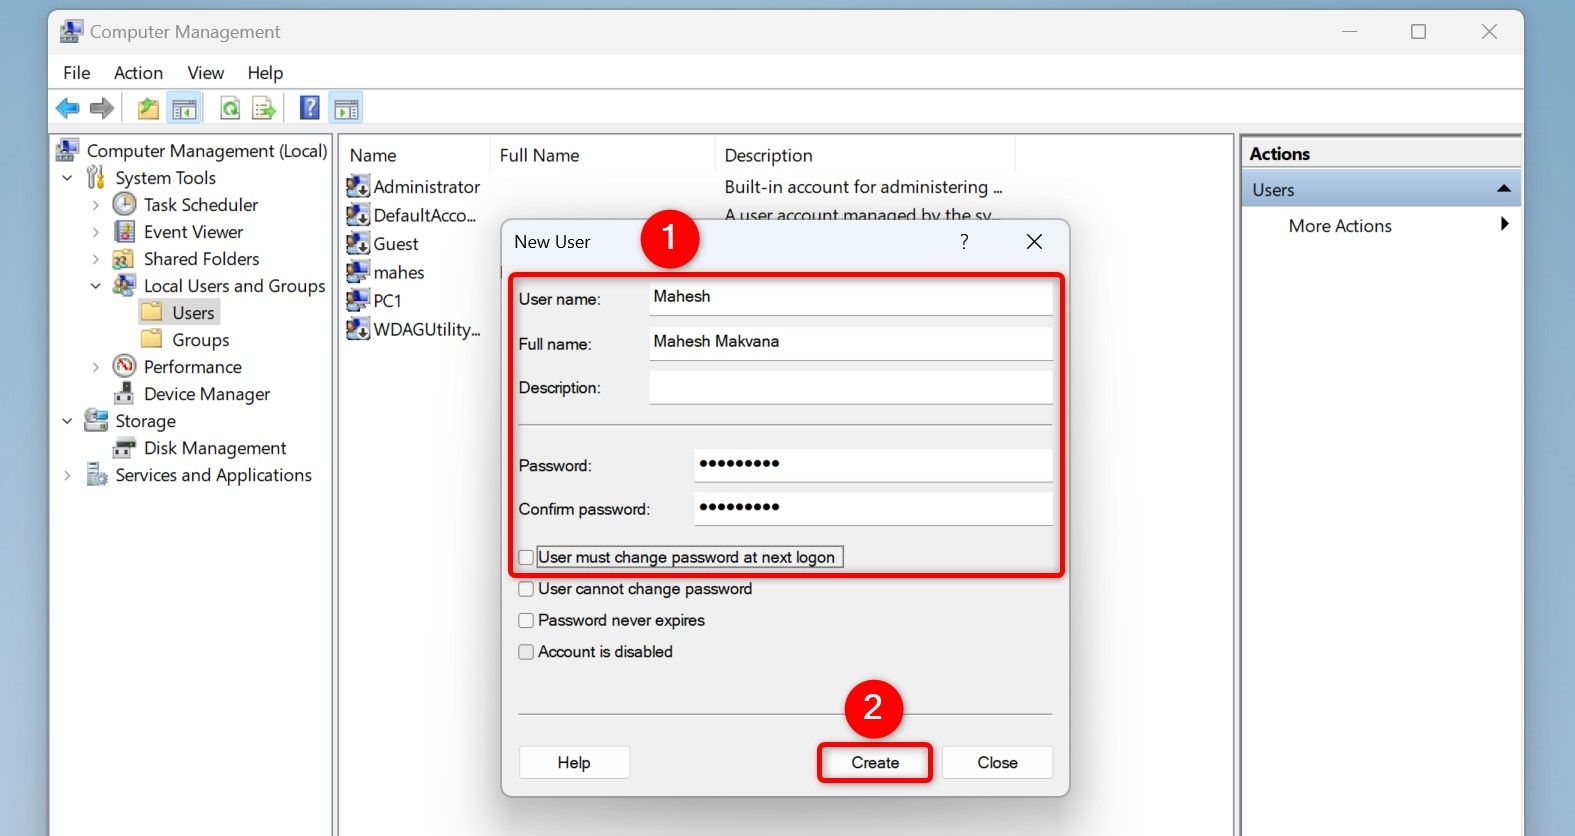
On the New User window, click the “User Name” field and type the username for the new account you want to create. Optionally, fill in the details in the “Full Name” and the “Description” fields. Click the “Password” field and type a password for the account. Select the “Confirm Password” field and re-type the password. Turn off the “User Must Change Password at Next Logon” option, and click “Create.”
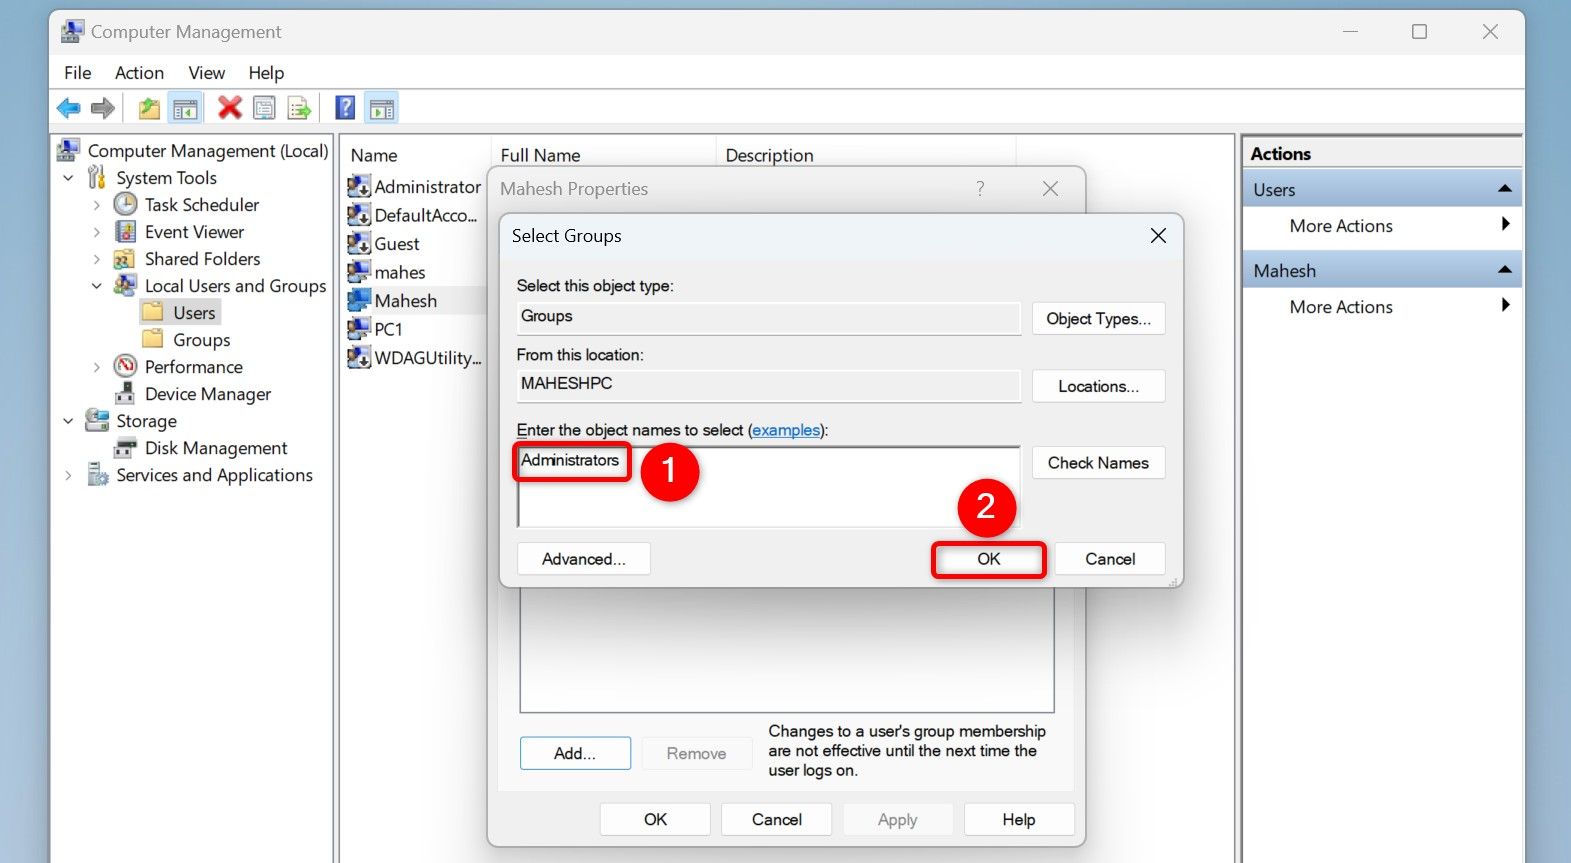
The account is now created. To make it an admin account, right-click the account and choose “Properties.” Access the “Member Of” tab, click “Add,” select the “Enter the Object Names to Select” field, type Administrators, and choose “OK.” Then, select “Apply” followed by “OK.”
You’re all set.
Using Netplwiz
Netplwiz is a handy utility to view all user accounts on your PC. You can use this utility to create accounts as well. To do that, open Run by pressing Windows+R, type the following in the open box, and select “OK” or press Enter.
netplwiz
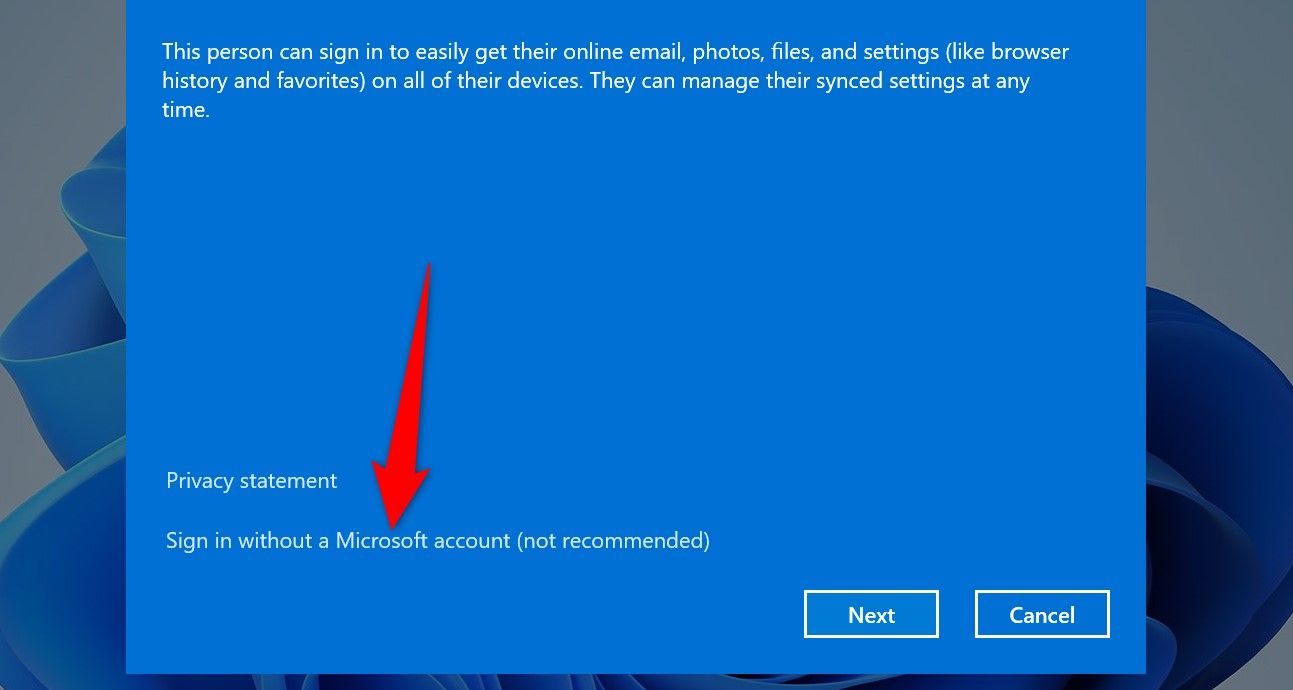
On the User Accounts window that opens, choose “Add.” Then, select “Sign In Without a Microsoft Account (Not Recommended).”
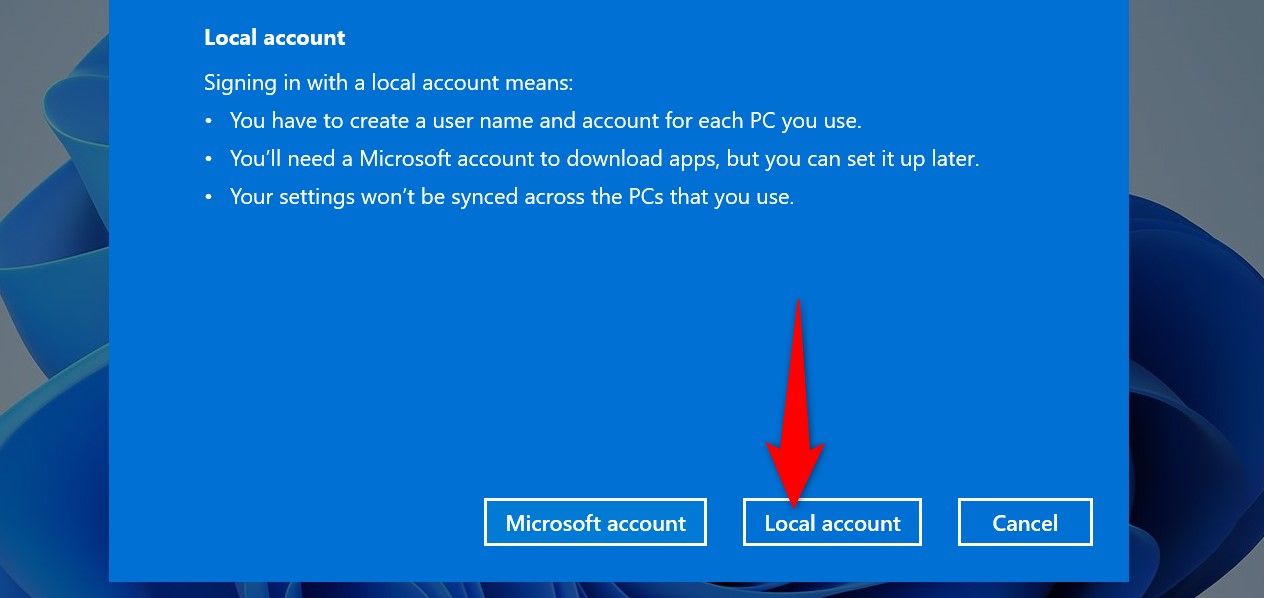
Select “Local Account” since you want to add a new local user account.
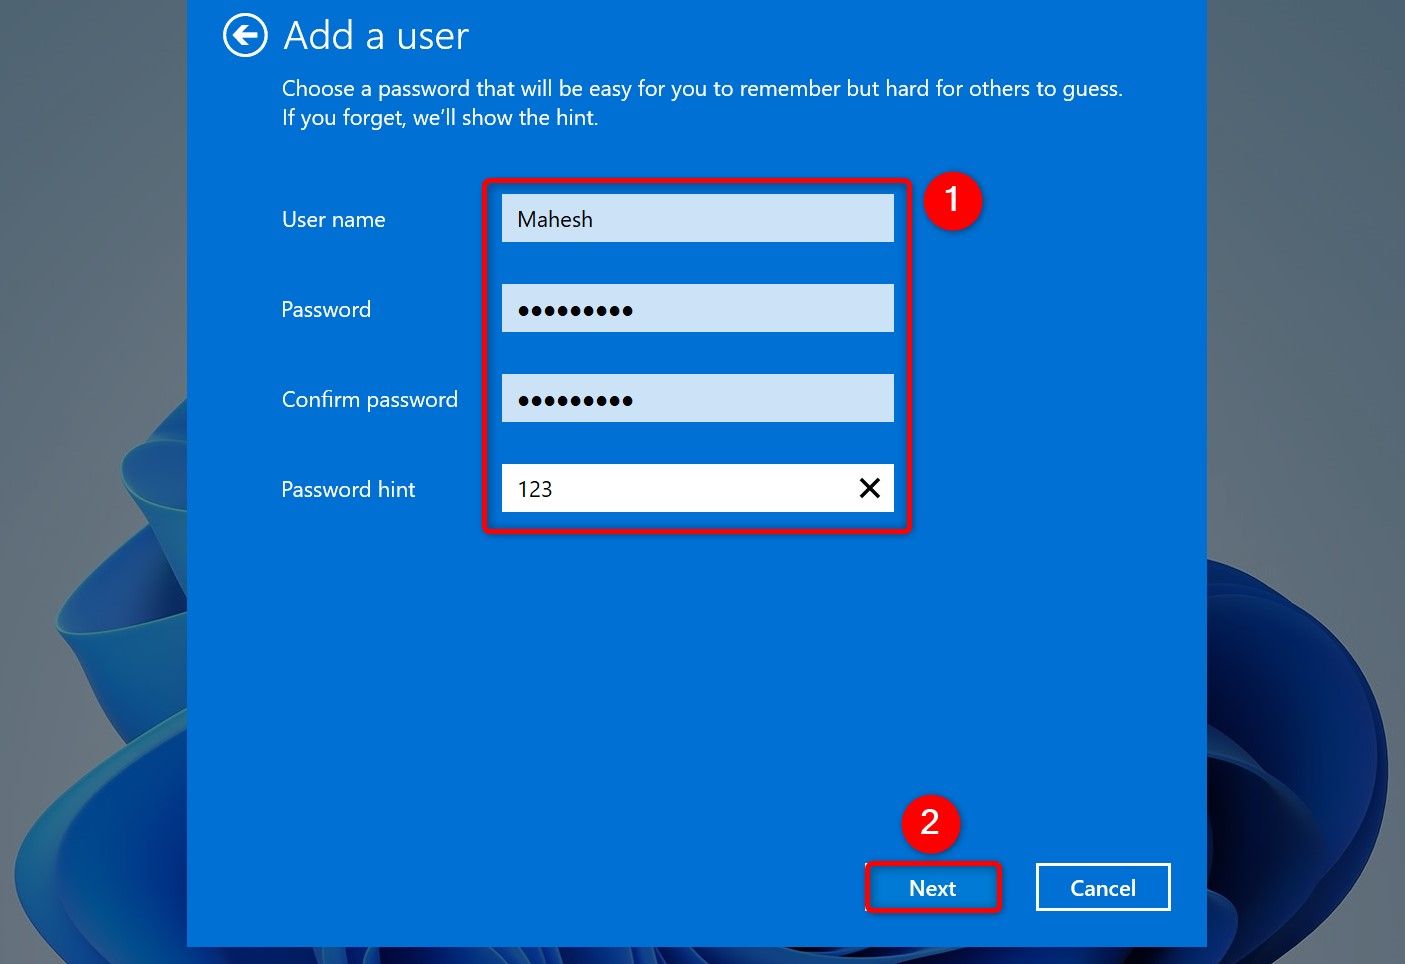
Select the “User Name” field and type a username for the account. Choose the “Password” field and type a password for the account. Click the “Confirm Password” field and re-type the password. Select the “Password Hint” field and type a hint that helps you recall your password.
Then, select “Next” and choose “Finish” on the following screen to finish creating the account.
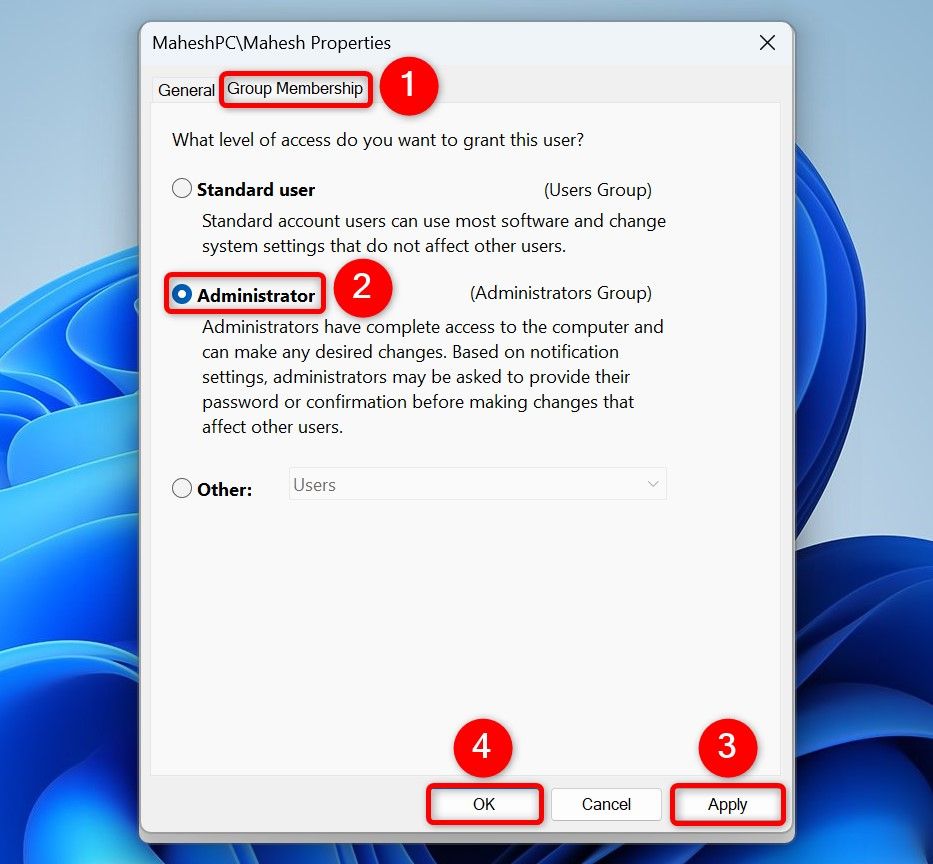
If you want to turn the account into an admin account, select the account on the list, choose “Properties,” access the “Group Membership” tab, select “Administrator,” and choose “Apply” followed by “OK.”
You’re all done.
And that’s how you make local user accounts to allow other people to use your computer. These other users can tweak their account settings, change their personalization options, and so on, without affecting your account. Happy using your computer!
Source link


