5 Ways to uninstall an update manually on Windows 11 (2025)
- To uninstall updates on Windows 11, open Settings > Windows Update > Update history, click the “Uninstall updates” option, and click “Uninstall” for the update to remove.
- You can also uninstall an update using Command Prompt, PowerShell, WinRE, and Safe Mode.
UPDATED 2/3/2025: On Windows 11, you can uninstall updates manually through the “Windows Update” settings, by running commands in Command Prompt or PowerShell, or by booting into the Windows Recovery Environment (WinRE) or Safe Mode, especially if an update is preventing your computer from starting correctly.
While Microsoft designs Windows 11 updates to fix bugs and enhance system performance, they don’t always work as intended. It’s not uncommon for a monthly update to introduce new problems, such as broken features, driver conflicts, or compatibility issues that degrade the user experience.
Fortunately, whether the system was updated automatically or you installed the update manually, you have multiple ways to remove it and restore Windows 11 to a stable, working state.
In this guide, I will teach you the steps to uninstall updates on Windows 11.
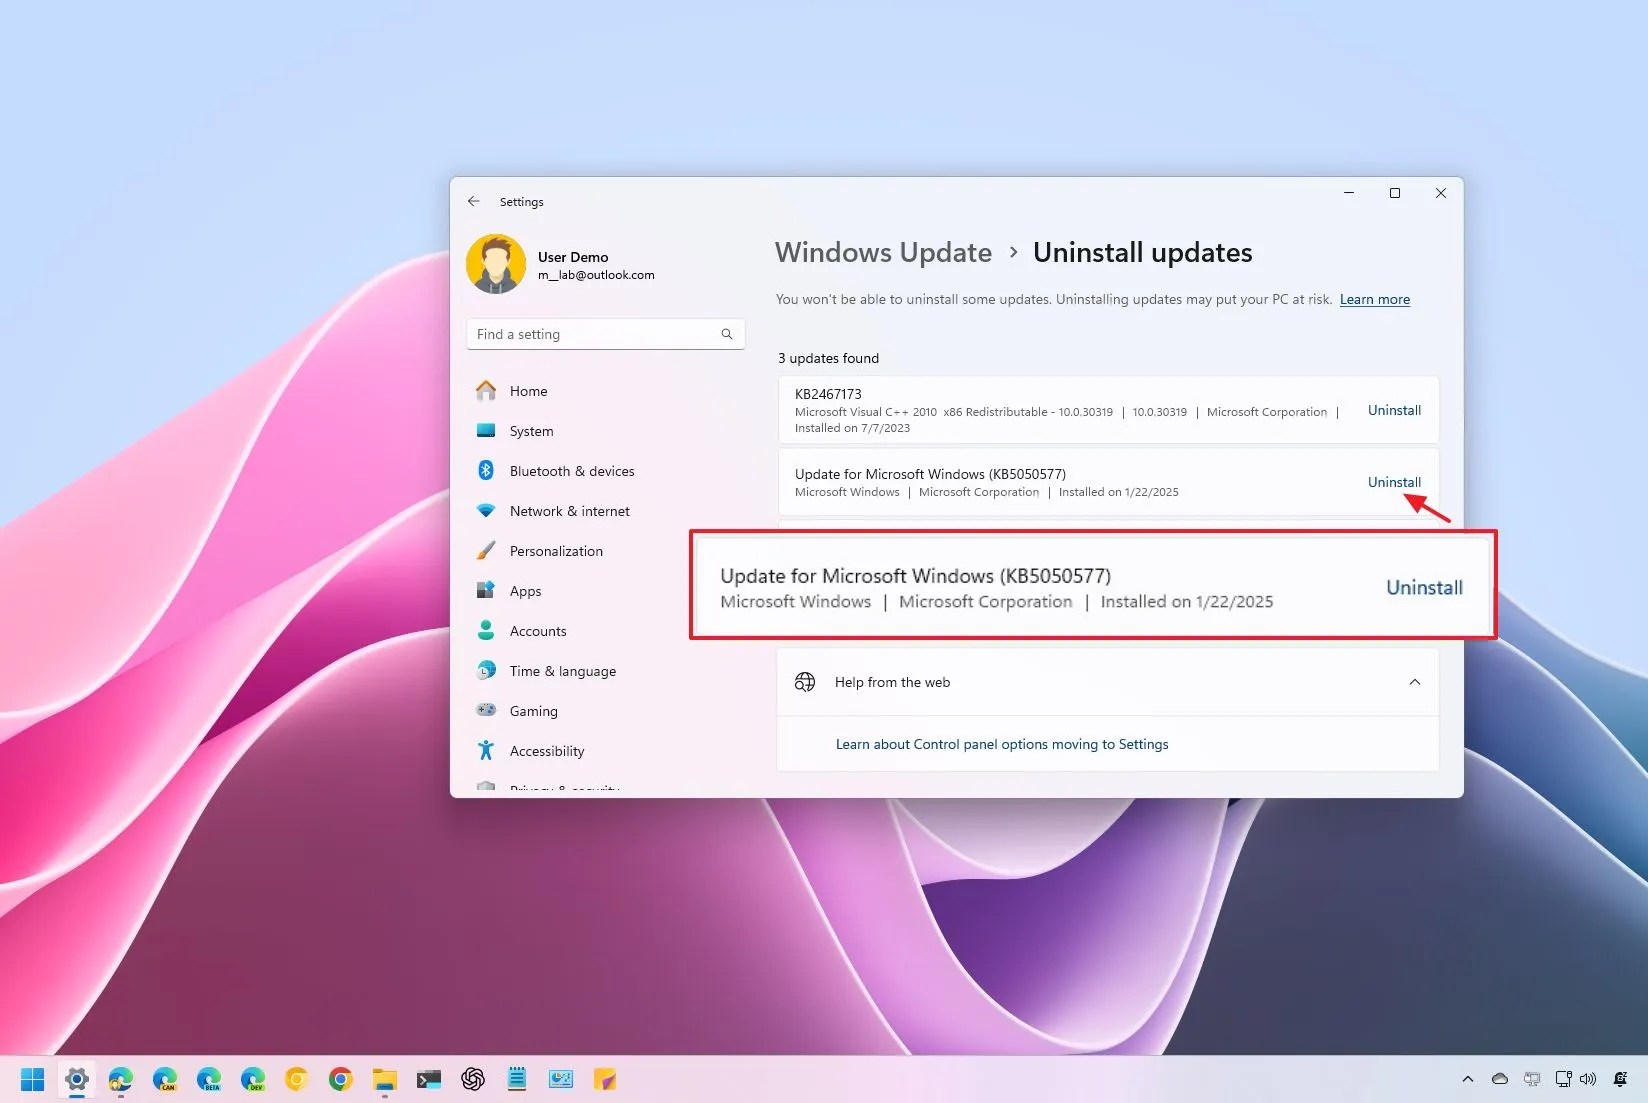
Uninstall update on Windows 11 from Settings
To uninstall updates on Windows 11 through the Windows Updates settings, use these steps:
-
Open Settings on Windows 11.
-
Click on Windows Update.
-
Click the Update history page.
-
Click the Uninstall updates setting under the “Related settings” section.

-
Click the Uninstall option to remove the update from Windows 11.

After you complete the steps, the problematic update will be removed from the device. The computer may also require a restart to complete the process.
Uninstall update on Windows 11 from Command Prompt
To uninstall an update through Command Prompt, use these steps:
-
Open Start.
-
Search for Command Prompt, right-click the top result, and select the Run as administrator option.
-
Type the following command to view the update history and press Enter:
wmic qfe list brief /format:table

-
Check the Windows Update history of your device, and identify the update using its HotFixID and InstalledOn information.
-
Type the following command to uninstall the update from the computer and press Enter:
wusa /uninstall /kb:KBNUMBER
In the command, replace “KBNUMBER” with the KB number corresponding to the update to uninstall. This example removes the update KB5050090 from Windows 11:
wusa /uninstall /kb:5050090

-
Click the Yes button.
-
Continue with the on-screen directions (if applicable).
After you complete the steps, the update will be removed from the computer running Windows 11.
Uninstall update on Windows 11 from PowerShell
To remove an update on Windows 11 through PowerShell, use these steps:
-
Open Start.
-
Search for PowerShell, right-click the top result, and select the Run as administrator option.
-
Type the following command to install the PowerShell module to update Windows 11 and press Enter:
Install-Module PSWindowsUpdate

-
Type “Y” to accept and press Enter.
-
Type “A” to install the module and press Enter.
-
Type the following command to allow scripts to run on PowerShell and press Enter:
Set-ExecutionPolicy RemoteSigned
Quick tip: If you’re getting a PowerShell error about a policy being defined at a more specific scope, use theSet-ExecutionPolicy -ExecutionPolicy RemoteSigned -Scope CurrentUsercommand. You can learn more about the steps to change the execution policy to run scripts on PowerShell here. -
Type the following command to import the installed module (if applicable) and press Enter:
Import-Module PSWindowsUpdate

-
Type the following command to view a list of the 20 most recent updates and press Enter:
Get-WUHistory | Select-Object -First 20

-
Type the following command to select and remove the update with PowerShell and press Enter:
Remove-WindowsUpdate -KBArticleID KBNUMBER
In the command, replace “KBNUMBER” with the update number you want to block. This example blocks the KB5050090 update:
Remove-WindowsUpdate -KBArticleID KB5050090
-
Type “A” to accept and install the module and press Enter.
Once you complete the steps, the device may need to restart to complete the process.
If the above instructions do not work, the Command Prompt instructions should also work with PowerShell.
Uninstall update on Windows 11 from WinRE
To uninstall an update using the Windows Recovery Environment, use these steps:
-
Start PC on WinRE.
Quick tip: Depending on the severity of the problem, you can access the recovery environment in a few ways. You can use this guide to learn the methods to access the recovery settings and then continue with the steps below. -
Click on Troubleshoot.
-
Click on Advanced options.
-
Click on Uninstall Updates.

-
Click the “Uninstall latest quality update” option.

-
Sign in using your administrator credentials.
-
Click the “Uninstall quality update” button.
After you complete the steps, the computer will uninstall the most recent update from your device (if available).
Uninstall update on Windows 11 from Safe Mode
To remove updates on Windows 11 from Safe Mode, use these steps:
-
Open Start.
-
Search for msconfig and click on System Configuration to open the app.
-
Click the Boot tab.
-
Check the Safe boot option under the “Boot options” section.
-
Choose the Minimal option to start Windows 11 in Safe Mode. You can also select the Network option to boot Windows 11 with networking support.

-
Click the Apply button.
-
Click the OK button.
-
Restart the computer.
-
Sign in to your account.
-
Use the “Windows key + R” keyboard shortcut to open the Run command.
-
Type Control Panel and click the OK button.

-
Click on Programs.

-
Click the “View installed updates” option.

-
Select the “KB” update to remove.
-
Click the Uninstall button.

-
Click the Yes button.
-
Restart the computer.
The only caveat with this option is that Windows 11 will continue to boot into Safe Mode until you revert the changes.
After resolving the problem, you can revert the changes using the same instructions, but in step 4, clear the “Safe Boot” option.
In addition to using Control Panel, while in Safe Mode, you can also use Command Prompt and PowerShell commands to remove updates from Windows 11.
Additional considerations
-
Backup your files: Before uninstalling any update (especially if using WinRE or command-line methods), make sure your data is backed up. Although uninstalling an update is generally safe, you never know when an error can occur.
-
Understand the risks: Uninstalling security updates might leave your system vulnerable to known issues. Only remove an update if it’s known to cause system instability or other critical problems.
-
Reinstall the update: If you still need the features or fixes provided available with that specific update, consider reinstalling it after troubleshooting or waiting for a revised version.
-
Limitations: Some updates cannot be uninstalled because they are necessary for the operating system to run. If the update you’re targeting isn’t listed, it may fall into this category.
- Control Panel: You can no longer uninstall quality updates from the Control Panel, as the experience is now managed by the Settings app.
System updates are not the same as driver updates. If you’re dealing with driver issues, the process to remove a driver update is different, but you can still use the Settings app to complete this process. You can also use Device Manager, Control Panel, and Command Prompt.
This guide outlines the steps to remove security and quality updates. However, Microsoft also offers feature updates, which you can uninstall from the computer to roll back to the previous version, but the steps are different. You may even have to perform a clean installation of Windows 11 to uninstall the feature update.
Update January 31, 2025: This guide has been updated to ensure accuracy and reflect changes to the process.
Source link