Microsoft Office documents can span anything from a business plan to your great American novel, and losing your work can range from frustrating to catastrophic. Luckily, it’s not hard to ensure that this never happens. Here are six steps you can take to ensure that your work remains safe.
A Document Doesn’t Exist Unless You Have at Least Three Copies
If anyone knows about the risks of data loss, it’s those who work in IT. They have two sayings that are worth bearing in mind before we get into the specifics.
“There are only two types of people in the world: those who have lost data, and those who are going to lose data.”
Too many people think it will never happen to them, but it’s almost inevitable that it will at some point. Whether that turns out to be a momentary nuisance or a disaster depends entirely on whether or not you have backups.
“A document doesn’t exist unless you have at least three copies.” This one takes the idea a step further. You want to have not just one backup, but two. There are certain types of failure that can lead to losing not just your working copy of a document but also your backup. For example, if you have a backup copy on an external drive in your home or office, and the building burns down. Personally, I add the rider “… one of which is off-site.”
Ensure That AutoSave Is Switched On
This option is only available if you have a Microsoft 365 subscription. Just look for the “AutoSave” toggle at the top-left of your window, and slide it on.
AutoSave requires your document to be stored on OneDrive, or to a Sharepoint folder, so if it isn’t already stored in one of those places, go to File > Save As and then select OneDrive. (You’ll need to be signed-in to your Microsoft account to see this option, and if it still isn’t visible then select the “Add a Place” option.)
You should then continue your work in this version, so that it is protected.
Switch on OneDrive Backup
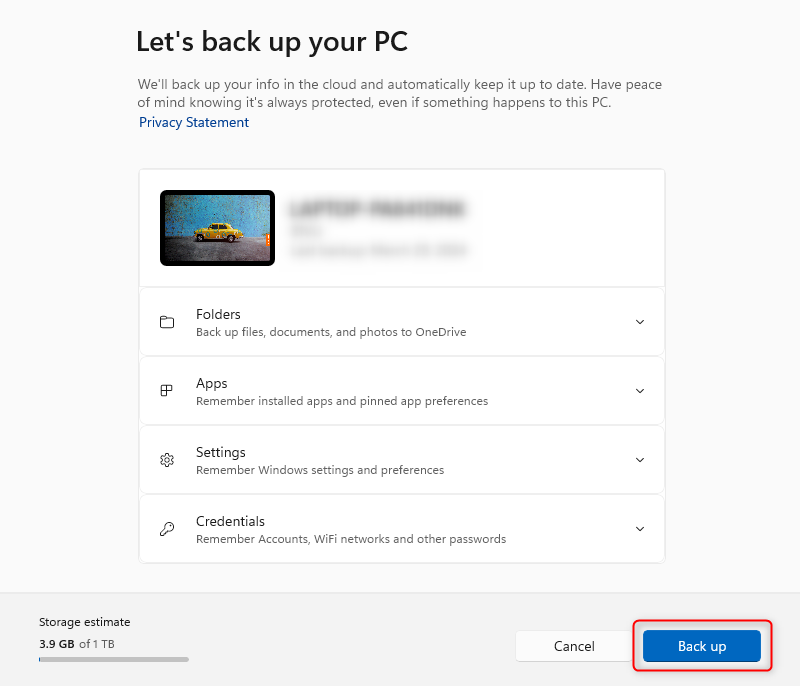
If you’re instead working on a document stored locally on your Windows PC or Mac, you can ensure the entire folder is backed up to OneDrive. You only need to do this once, and then if anything happens to your machine, you’ll have an online backup available.
Windows
Click on the OneDrive (cloud) icon in your system tray to open OneDrive. Click the gear icon, top right, then select “Settings.” Click on the “Sync and Backup” tab, then the “Manage Backup” button. Check whether the folder you are using (for example, Documents) is being backed-up. If not, then simply toggle it on.
If you’re using Windows 11, you may find this is on by default.
Mac
You need to use the standalone OneDrive app, and this must be the version downloaded from the Microsoft website. The Mac App Store version will not work for this (thanks, Microsoft).
Once you’ve installed the app, you need to give it full disk access. Click the Apple menu top-left, then “System Settings.” Click “Privacy & Security” then scroll down to “Full Disk Access” and click that (or just search for “Full Disk Access” in the settings searchbar). Toggle on OneDrive.
OneDrive lives in your Mac menubar, and is shown as a cloud icon. Click this, then the three-dots menu. Then Preferences > Backup > Manage Backup. If your folder is shown as “Files Backed Up,” then all is good. Otherwise, just click the “Start Backup” option for your desired folder.
Ensure Your PC or Mac Is Backed-Up Automatically
Even if you’re working in the cloud, it’s always a good idea to ensure that your PC or Mac is backed-up, and the only reliable way to achieve this is to ensure it happens completely automatically. Manual backups will always be forgotten when things get busy, which is also when they are most likely to be needed.
You’ll need an external drive which is bigger than the internal drive of your machine, and it’s recommended to use one around twice the size. So if your PC or Mac drive is 1TB, for example, then use a 2TB external drive. This creates enough space for multiple versions of a document, so if you ever do something like delete a bunch of text and then realize you need it, you’ll be able to recover it from a previous version.
Start by connecting your external drive.
Windows
In Windows 10, go to Start > Backup Settings. In Windows 11, go to Start > File History. In both cases, continue by selecting Add a Drive > More Options and then select your external drive.
Mac
On Mac, as soon as you connect the external drive, you’ll be asked if you want to use it as a Time Machine drive. Say yes. (If this doesn’t happen, go to the Time Machine icon in your menubar—an anti-clockwise arrow around a clock—then Open Time Machine Settings. Click the plus sign and select your drive.)
For Large Documents, Do Periodic Save As Copies
In case your current version of the file gets corrupted, or you make a catastrophic mistake like accidentally deleting half your text, then it’s a good idea to have multiple versions of your document. The simplest way to do this is to periodically do a Save As and then add a number to the filename.
For example, if your document is called “My Novel,” then do a Save As to “My Novel 001.” Next time, “My Novel 002” and so on.
How often you do this is up to you, but personally, I recommend at least once a day. If your document is super-critical, or you’re working at pace, you may want to do it more often. Once the work is complete and submitted, you can delete all the previous versions to recover the drive space.
Save a Local/Cloud Copy at the End of Each Work Session
If the document is stored on the cloud (for example, OneDrive), then at the end of each work session do a Save As to your PC or Mac. Conversely, if your working copy is on your own machine, then do a Save As to the cloud—this could be OneDrive, iCloud, Dropbox or whatever other cloud service you use. That way, whether disaster strikes your machine or the cloud company, you’ll be protected.
Consider a USB Key Copy for Crucial Documents
Finally, if your document is really important, or losing your day’s work would make you cry, then you might want to create one final backup, by copying the document to a USB key and taking that with you each evening.
If you’ve followed all these steps, then you should be protected against anything short of the Earth being wiped out by a giant meteorite—in which case you probably won’t need to worry about submitting your work.
Source link


