7 ways to customize the Windows 11 Start Menu
Are you tired of the same Windows 11 Start Menu whenever you boot up your PC? Whether you’re wondering how to move the Start Menu in Windows 11 to the left or want to organize it better, there are plenty of built-in options. You can change the Windows 11 Start Menu and personalize everything from pinned apps and folders to what shows up in the Recommended section. These small adjustments can make the Start Menu feel more personal and efficient. If you want to find out more, read this guide showing seven practical ways to customize the Windows 11 Start Menu and get the most out of it:
First things first: The Windows 11 Start Menu and how to use it
Before you jump into customizing, it’s worth getting familiar with how the Windows 11 Start Menu works. Whether you’re brand new to Windows 11 or just need a refresher, knowing your way around the basics will make personalization much easier.

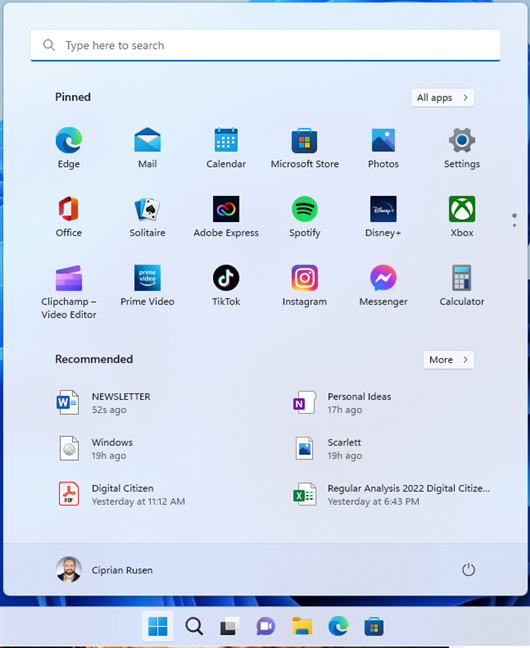
The Start Menu in Windows 11
You can use the Start Menu to open the apps you want to access, search for what you need, or even shut down and restart your device. For more information, check out my guide on using the Windows 11 Start Menu. That being said, let’s get to the Start Menu personalization in Windows 11:
1. How to pin items to the Start Menu in Windows 11
One of the easiest ways to personalize the Windows 11 Start Menu is to pin the things you rely on most. You can pin apps, folders, files, games, and even websites and email accounts to keep everything important just a click or tap away.

The Pinned section in the Windows 11 Start Menu
You can pin any app from the Start Menu All section. To access it, click or tap the All button in the top-right corner.

Use the All button to see all your apps
In the All section, find the app you want to pin and right-click or press-and-hold it. Then, click or tap Pin to Start in the pop-up menu.

Pin to Start in Windows 11
After pinning everything you need, you can use the Start Menu to access your favorite tools, open important locations, or launch frequently visited pages without digging through folders or lists. If you want more details, read my tutorial on pinning to the Start Menu in Windows 11.
While the default Pinned section displays a maximum of 18 icons, you can change its layout to fit more if you really like pinning to Start. I discuss this further in this guide’s fourth chapter, so continue reading.
2. How to create folders in the Windows 11 Start Menu
You can also create folders in the Start Menu Pinned section. If you drag and drop one icon over another, Windows automatically groups them into a folder called Folder. Click or tap the Folder folder 🙂 to access it, then use the Edit name field at the top to rename it. Finally, click or tap outside the field to apply your change.

Creating a folder in the Windows 11 Start Menu
You can add as many icons as you want to a folder. Creating more folders is also a great idea, especially if you use many apps and want to organize the Windows 11 Start Menu. If you like to keep everything tidy, you should also know…
3. How to move icons in the Windows 11 Start Menu
It’s easy to move around the icons and folders in the Pinned section. One way is to drag and drop them anywhere you want. However, you can also right-click or press-and-hold an icon to open a contextual menu with up to three Move options.

Use the Move options to organize Start Menu icons
I prefer dragging and dropping, but you should use the method that’s comfortable for you.
4. How to change the Windows 11 Start Menu layout
Changing the layout is an important aspect of the Windows 11 Start Menu customization. However, you must get to the Settings app to access this option and the rest of the configuration options available for the Start Menu. To begin, open the Settings app in Windows 11, click or tap Personalization in the left sidebar, and then access the Start section on the right.

Access Settings > Personalization > Start
This takes you to the personalization settings available for the Windows 11 Start Menu. The first one is called Layout, and there are three options you can choose from:
- More pins – Displays more Pinned icons, leaving less room for the Recommended section at the bottom.
- Default – The layout used in the screenshots included in this guide. The Pinned and Recommended sections each take up about half of the Start Menu.
- More recommendations – The Recommended section gets bigger, while the Pinned one shrinks. This layout is useful if you install a lot of new apps or work with many documents on a regular basis.

The Layout options for the Start Menu in Windows 11
You get a preview for each option, so choosing the one you prefer shouldn’t be too hard. However, keep in mind that you can also…
5. Show or hide items in the Recommended section of the Start Menu
The next five switches on this page help you decide what’s shown in the Recommended section of the Windows 11 Start Menu. Let’s go over each setting one by one:
- Show recently added apps – When enabled, newly installed apps appear in the Recommended section. This makes it easy to spot and open new apps without searching for them.
- Show most used apps – Displays the apps you use most often in the Recommended section. It gives you quick access to your frequently used tools without having to pin them.
- Show recommended files in Start, recent files in File Explorer, and items in Jump Lists – Controls whether files you recently accessed appear in the Start Menu’s Recommended section, in File Explorer’s Recent list, and in Jump Lists (like taskbar right-click menus for apps).
- Show recommendations for tips, shortcuts, new apps, and more – Displays suggestions from Microsoft, like tips or apps you might want to try. This setting is mostly used by Microsoft for promotional messages, so turning it off should make for a less spammy experience.
- Show account-related notifications – Lets the Start Menu show alerts tied to your Microsoft account, including notifications from OneDrive, Microsoft 365, and other Microsoft services.

Show or hide items in the Recommended section
I dislike the Recommended section in Windows 11’s Start Menu. While there’s currently no way to remove it completely, it should no longer display items if you turn Off all the available switches on this page.
6. Choose the buttons shown in the bottom-right corner of the Windows 11 Start Menu
The last entry on the Start settings page is called Folders, but its name can be confusing. By default, the Windows 11 Start Menu only shows the Power button in its bottom-right corner. However, next to it, you can add several shortcuts to places you visit frequently. Click or tap Folders to access all the available options.

Access Folders to customize the bottom-right corner of the Start Menu
This takes you to a long list of options. There’s a switch for every shortcut you can display in the Start Menu: Settings, File Explorer, Documents, Downloads, Music, Pictures, Videos, Network, and Personal folder (this is your user account folder). Because of my job, I use the Settings app a lot, so I turned On the switch next to it. Find the locations you access the most and click or tap the switches next to them.

Turn On the switches for the shortcuts you want
Remember that adding too many shortcuts can crowd the Start Menu and make it difficult to tell them apart. In that case, you can return to the Folders page and turn them Off. I like a clean look, so I only use Settings. Its gear icon is displayed in the bottom-right corner of the Windows 11 Start Menu, next to the Power button, as shown below.

The Settings shortcut added through Folders
7. How to move the Start menu in Windows 11 to the left
When Windows 11 launched, the Start Menu was front and center instead of in its usual corner. I didn’t have a problem with this because I used macOS, but my friends and relatives wanted nothing more than to move it back.
While Microsoft offers the option to do that, it buried it pretty deep in the taskbar settings. If you’re trying to figure out how to make Windows 11 move Start to the left, the option is under Settings > Personalization > Taskbar > Taskbar behaviors.

How to move the Start Menu in Windows 11
Finding the exact setting can be a bit complicated. That’s why we created a guide with step-by-step instructions for moving the Windows 11 Start Menu to the left.
What do you (dis)like about the Windows 11 Start Menu?
After exploring all these options, you’ve got everything you need to make the Windows 11 Start Menu truly yours. From pinning your go-to apps to shifting the Start Menu back to the left, even a small change can make a big difference in your workflow. Before you close this guide, I’m curious about your tweaks to the Start Menu in Windows 11. I’d also like to know your opinion about it. Do you like the Windows 11 Start Menu? What else would you change about it? Let me know your thoughts in the comments section below.
Source link