Critical Path Method (CPM) Guide for Project Management

Timely project completion ensures that projects stay within budget and fulfill the expectations of stakeholders. The critical path method is a project management technique that is integral to achieving these objectives.
CPM was developed in the late 1950s by James E. Kelley of Remington Rand and Morgan R. Walker of DuPont to address the challenges of complex project scheduling. It is beneficial for projects with interdependent activities, where delays in one task can have cascading effects on subsequent tasks and the project’s completion date.
In this guide, I explain the concept of CPM, analyze its benefits, and show you how to implement and calculate critical paths. Whether managing a small project or a large-scale enterprise operation, understanding and implementing CPM can significantly enhance the likelihood of success.
1
monday.com
Employees per Company Size
Micro (0-49), Small (50-249), Medium (250-999), Large (1,000-4,999), Enterprise (5,000+)
Any Company Size
Any Company Size
Features
Agile Development, Analytics / Reports, API, and more
2
Wrike
Employees per Company Size
Micro (0-49), Small (50-249), Medium (250-999), Large (1,000-4,999), Enterprise (5,000+)
Medium (250-999 Employees), Enterprise (5,000+ Employees), Large (1,000-4,999 Employees)
Medium, Enterprise, Large
Features
Agile Development, Analytics / Reports, API, and more
3
Quickbase
Employees per Company Size
Micro (0-49), Small (50-249), Medium (250-999), Large (1,000-4,999), Enterprise (5,000+)
Medium (250-999 Employees), Enterprise (5,000+ Employees), Large (1,000-4,999 Employees), Small (50-249 Employees)
Medium, Enterprise, Large, Small
Features
Agile Development, Analytics / Reports, API, and more
What is the critical path method?
The critical path method is a step-by-step project management technique used to identify the sequence of tasks that must be completed on time for the entire project to be finished by the deadline. These tasks form the “critical path,” which is the longest stretch of dependent activities that determines the shortest possible project duration.
CPM focuses on the most crucial tasks that cannot be delayed without affecting the project timeline. By calculating the critical path, project managers can determine the minimum project duration and identify which tasks have flexibility (float) and which do not. This method also highlights potential bottlenecks and helps project managers prioritize tasks essential for on-time project completion.
This knowledge allows for better resource allocation, risk management, and scheduling, ensuring the project stays on track.
Benefits of CPM
CPM allows project managers to focus on critical tasks, better manage their time to avoid delays, and ensure that the project stays on track. Aside from timely project completion, CPM also offers the following benefits.
Manages budget
CPM enables project managers to optimize resource allocation by providing a precise sequence of critical tasks, therefore reducing unnecessary expenses. For instance, when you identify float time in non-critical tasks, you can reassign resources like employees to critical functions that are behind schedule, thus avoiding unnecessary overtime costs.
This proactive approach ensures that every dollar is spent where it has the most impact. CPM’s structured timeline also makes it easier to plan for material deliveries just in time, which minimizes storage costs and reduces the likelihood of tying up capital in excess inventory.
Identifies critical tasks
CPM offers a clear view of the tasks that are critical to the project’s success, which helps project managers set priorities and allows for the proactive management of potential delays. This focus ensures that the project stays on track and reduces the risk of missing deadlines. It also helps identify potential risks early on so that proactive measures can be taken to mitigate them.
Visualizes the project timeline
Typically depicted through a network diagram or flowchart, CPM highlights the sequence and duration of each task within a project. This visual representation allows project managers to easily see how tasks are interrelated and which ones are critical to the project’s overall timeline. This clarity simplifies the planning process, making allocating resources and anticipating potential delays easier.
Improves team communication
By clearly defining the critical path and task dependencies, CPM enhances communication within the project team. Each person knows which tasks are critical, who is responsible for them, and the impact of delays. This shared understanding fosters collaboration, reduces misunderstandings, and ensures the team is aligned toward the project’s goals.
How to calculate the critical path
Calculating the critical path involves several steps that require a detailed understanding of the project’s tasks and dependencies. Here’s a step-by-step guide:
Step 1: List all tasks (activities) required for the project
Identify and list all the tasks required to complete the project. Each task function or activity should be clearly defined and its expected duration should be included.
Step 2: Determine dependencies (sequence of activities)
Identify the dependencies between tasks to understand which tasks must precede others. Mapping these dependencies is vital for comprehending the sequence of activities.
Step 3: Estimate task durations
Assign a duration to each task. This can be done using historical data, expert judgment, or estimation techniques like the Program Evaluation and Review Technique (PERT).
Project managers can also use the Forward Pass and Backward Pass techniques to calculate tasks’ earliest and latest start and finish times. These techniques are integral to identifying the critical path and ensuring the project stays on schedule.
- Forward Pass technique: Determine each task’s earliest possible start and finish times. This process helps schedule tasks as early as possible, minimizing project duration.
- Backward Pass technique: Define each task’s latest start and finish times, ensuring that the project is completed by its deadline. This process enables PMs to identify the flexibility in the schedule and the latest possible start times without delaying the project.
Step 4: Draw a network diagram of the critical path
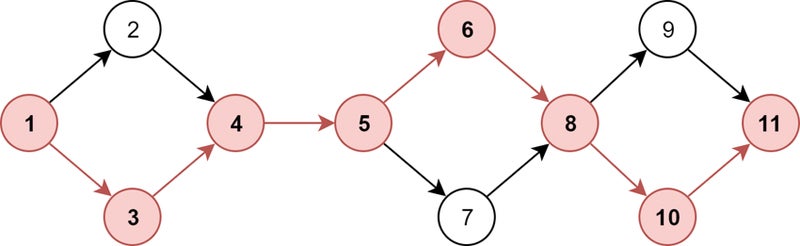
Using the information from the previous steps, create a network diagram (also known as a project schedule network diagram). In this diagram, tasks are represented as nodes and dependencies are shown as arrows connecting the nodes. This visual tool helps to illustrate the sequence of tasks and their interrelationships clearly.
Step 5: Identify the critical path
The critical path is the longest sequence of activities in the network diagram that must be completed in order to finish the project, and it represents the shortest possible time for completion.
To identify the critical path, calculate the earliest start (ES) and earliest finish (EF) times for each task, followed by the latest start (LS) and latest finish (LF) times.
- Calculate ES and EF: Begin at the start of the network diagram and calculate the earliest time each task can start and finish. The earliest start time is the earliest time a task can begin, considering the completion of preceding tasks. The earliest finish time is calculated by adding the task duration to its earliest start time (EF = ES + task duration).
- Calculate LS and LF: Work backward from the project completion date to determine the latest time each task can start and finish without delaying the project. The latest start time is calculated by subtracting the task duration from its latest finish time (LS = LF – task duration).
- Calculate Float (Slack) for each task: Float, or Slack, is the amount of time a task can be delayed without affecting the project’s completion date. It is calculated by subtracting the earliest start time from the latest start time (Float = LS – ES). Tasks with zero float are on the critical path, meaning any delay in these tasks will delay the project.
Step 6: Analyze and adjust
Review the critical path and identify any potential issues or bottlenecks. Adjust the schedule as needed to optimize the project timeline. If critical tasks are at risk of delay, consider reassigning resources or adjusting the project plan to keep the project on track.
Examples of critical path method
To better understand how CPM works, here are two real-world examples where it could be implemented to support a project.
Developing a website
In this instance, you are managing the project to create a corporate website. The project includes planning, designing, developing, testing, and launching the website.
Tasks and durations
- A. Project Planning (2 days)
- B. Requirements Gathering (3 days): Starts after A
- C. Design Mockup Creation (5 days): Starts after B
- D. Design Approval (2 days): Starts after C
- E. Website Development (10 days): Starts after D
- F. Content Creation (7 days): Starts after B
- G. Content Integration (3 days): Starts after E and F
- H. Testing (4 days): Starts after G
- I. Final Approval (2 days): Starts after H
- J. Website Launch (1 day): Starts after I
Critical path calculation
Step 1: Identify all possible paths.
- Path 1: A → B → C → D → E → G → H → I → J
- Path 2: A → B → F → G → H → I → J
Step 2: Calculate the duration of each path.
- Path 1: A (2 days) + B (3 days) + C (5 days) + D (2 days) + E (10 days) + G (3 days) + H (4 days) + I (2 days) + J (1 day) = 32 days
- Path 2: A (2 days) + B (3 days) + F (7 days) + G (3 days) + H (4 days) + I (2 days) + J (1 day) = 22 days
Step 3: Determine the critical path.
- Critical path: Path 1
- Duration: 32 days
The critical path for developing this website is Path 1, with a total project duration of 32 days. Tasks on Path 2, such as Content Creation (F), do not influence the overall project duration as they can be completed in parallel without delaying the project, as long as they are done before the Content Integration (G) task, which is also part of the critical path.
Building a house
For this example, you’re managing a project to build a single-family home. All of the blueprints have already been approved, so your focus here is on the physical actions of construction. The project includes laying the foundation, framing, roofing, plumbing, electrical work, and interior finishing.
Tasks and durations
- A. Site Preparation (3 days)
- B. Laying Foundation (5 days): Starts after A
- C. Framing (7 days): Starts after B
- D. Roofing (4 days): Starts after C
- E. Plumbing (6 days): Starts after C
- F. Electrical Work (5 days): Starts after C
- G. Interior Finishing (8 days): Starts after E and F
- H. Final Inspection (2 days): Starts after G
- I. Handover to Client (1 day): Starts after H
Critical path calculation
Step 1: Identify all possible paths.
- Path 1: A → B → C → D → G → H → I
- Path 2: A → B → C → E → G → H → I
- Path 3: A → B → C → F → G → H → I
Step 2: Calculate the duration of each path.
- Path 1: A (3 days) + B (5 days) + C (7 days) + D (4 days) + G (8 days) + H (2 days) + I (1 day) = 3 + 5 + 7 + 4 + 8 + 2 + 1 = 30 days
- Path 2: A (3 days) + B (5 days) + C (7 days) + E (6 days) + G (8 days) + H (2 days) + I (1 day) = 3 + 5 + 7 + 6 + 8 + 2 + 1 = 32 days
- Path 3: A (3 days) + B (5 days) + C (7 days) + F (5 days) + G (8 days) + H (2 days) + I (1 day) = 3 + 5 + 7 + 5 + 8 + 2 + 1 = 31 days
Step 3: Determine the critical path.
- Critical path: Path 2
- Duration: 32 days
In this case, Path 2 is critical because it includes the longest sequence of dependent tasks. Any delay in these tasks will push back the entire project timeline.
CPM vs PERT
CPM and PERT are both project management tools used for planning and scheduling. They have distinct differences and are not interchangeable. However, they can complement each other when used together.
CPM is deterministic, providing a fixed timeline based on known task durations. It is used when precision is required. It focuses on identifying the longest sequence of dependent tasks (the critical path) to determine the project’s completion date. CPM is ideal for projects with well-defined tasks and stable timelines.
Conversely, PERT is probabilistic, allowing for flexibility in planning by considering different outcomes. It is useful for projects with high uncertainty, allowing project managers to plan for different scenarios. PERT is determined using three points:
- Optimistic (O): The minimum time needed if everything goes perfectly.
- Most Likely (M): The duration if the activity takes place under normal circumstances.
- Pessimistic (P): The maximum time needed if major problems occur.
FAQs
How do you calculate the critical path?
The critical path is calculated by identifying all tasks, determining their dependencies, estimating their durations, and then calculating the earliest and latest start and finish times. Tasks with zero float make up the critical path, and any delay in these tasks will delay the entire project.
What are the four key elements of the critical path method?
- Critical path analysis.
- Float determination.
- Early start and early finish calculation.
- Late start and late finish calculation.
Why is the critical path method used?
CPM is used to identify the longest sequence of tasks in a project. This allows project managers to focus on the most time-sensitive activities to ensure on-time project completion. It also helps with practical project scheduling, resource management, and the identification of potential delays.
Source link