How to change PC name on Windows 10
- To change the PC name on Windows 10, open Settings > About, click the “Rename this PC” button, confirm the new name, click “OK,” and restart the computer.
- You can also rename the computer through Control Panel, Command Prompt, and PowerShell. These instructions will work on Windows 10, 8.1, and even on Windows 7.
On Windows 10, you can change your computer name in at least four ways, and in this guide, I will explain the process for completing this configuration. Although the system assigns a name automatically during installation, this is a random name. Since we tend to use multiple devices nowadays, it’ll be difficult to identify them in the network and set up certain features if we don’t keep them organized.
For example, the primary way to set up a computer is by using a Microsoft account. This type of account not only helps you sign in to multiple devices with the same credentials but also allows you to keep an organized inventory and configure other features, such as Find My Device and the ability to reactivate Windows 10 after a hardware change. Configuring these features will be more difficult if you don’t rename your computer accordingly.
In addition, a name can help you identify your computer when you have multiple devices connected to the local network. Using a descriptive name makes it easier to connect with other devices around the house or even to configure your router to allow or deny access to the internet.
In this guide, I will teach you how to change the name of a Windows 10 laptop, desktop, or tablet using the Settings app, Control Panel, Command Prompt, and even PowerShell. You can choose any method since there’s no best approach to completing this process. (I usually use the Settings app and the command options. I only use them if I’m writing a script.)
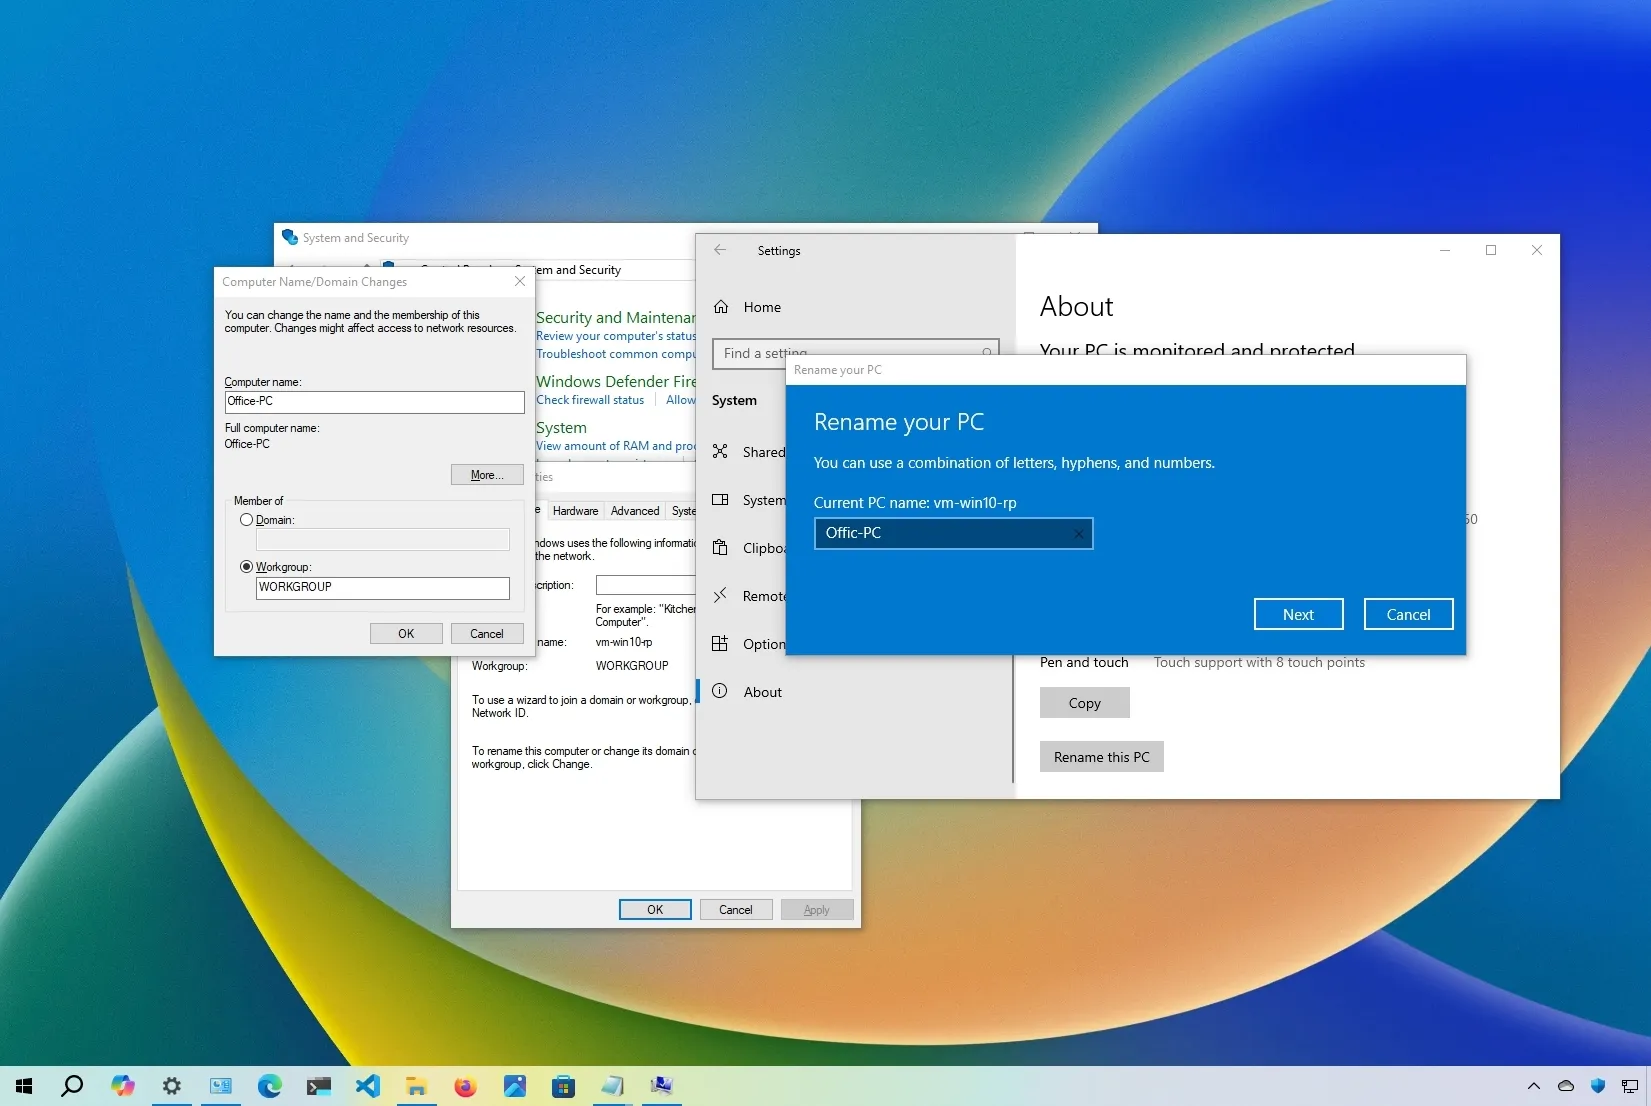
Change PC name from Settings app
To rename a Windows 10 PC using the Settings app, use these steps:
-
Open Settings on Windows 10.
-
Click on System.
-
Click on About.
-
Click the “Rename this PC” button under the “Device specifications” section.
-
Confirm a new name for the computer.
Quick tip: You can use a combination of letters, numbers, and hyphens. Avoid any special characters, keep it short (less than 15 characters is always recommended), and don’t leave a space when you’re trying to use multiple words.
-
Click the Next button.

-
Click the Restart now button.
Once you complete the steps, the device will restart and apply the new name.
You can also follow these instructions in my video tutorial on my YouTube channel. (Remember to like and subscribe.)
Change PC name using Control Panel
To change the computer name with Control Panel on Windows 10 (and on 8.1 and 7), use these steps:
-
Open Control Panel.
-
Click on System and Security.
-
Click on “Allow remote access” under the “System” settings.

-
Click the Computer Name tab.
-
Click the Change button.

-
Confirm the new device name.

Quick tip: You can use a combination of letters, numbers, and hyphens. Avoid any special characters, keep it short (less than 15 characters is always recommended), and don’t leave a space when you’re trying to use multiple words.
-
Click the OK button.
-
Click the OK button again.
-
Click the Close button.
-
Click the Restart Now button.
After you complete the steps, the computer will reboot, and upon restart, it’ll start using the name.
Change PC name using Command Prompt
To change the PC name through Command Prompt on Windows 10 (and on 8.1 and 7), use these steps:
-
Open Start.
-
Search for Command Prompt, right-click the top result, and select the Run as administrator option.
-
Type the following command to reveal the current device name and press Enter:
hostname
-
Type the following command to rename the Windows 10 PC name and press Enter:
WMIC computersystem where caption='CURRENT-PC-NAME' rename 'NEW-PC-NAME'
In the command, make sure to change “CURRENT-PC-NAME” and “NEW-PC-NAME” with your information. You should use double quotation marks or single quotation marks on the caption switch and, even more importantly, when you’re using a hyphenated name.

-
Type the following command to restart the device and press Enter:
shutdown -r -t 00
Once you complete the steps, the changes will apply after restarting the computer.
Change PC name using PowerShell
To change the computer name with PowerShell on Windows 10 (and on 8.1 and 7), use these steps:
-
Open Start.
-
Search for PowerShell, right-click the top result, and select the Run as administrator option.
-
Type the following command to reveal the current PC name and press Enter:
Rename-Computer -NewName "NEW-PC-NAME"

-
Type the following command to restart the device and press Enter:
Restart-Computer
After you complete the steps, the computer will restart to apply the changes.
While renaming a desktop computer, laptop, or tablet using the Settings app only works on Windows 10, you can use System Properties, Command Prompt, and even PowerShell to change a device’s name in all major releases of the operating system, including Windows 10, Windows 8.1, Windows 7, and other versions. You can also change the computer on Windows 11 with these instructions.
Update August 26, 2024: This guide has been updated to ensure accuracy and reflect changes to the process.
Source link
