How to enable Remote Desktop on Windows 11
- To enable Remote Desktop on Windows 11, open Settings > System > Remote Desktop, turn on the “Remote Desktop” toggle switch, and click “Confirm.”
- You can also configure the feature through the Control Panel or with PowerShell and Command Prompt commands.
UPDATED 2/10/2025: On Windows 11, enabling the Remote Desktop feature is essential for using Remote Desktop Protocol (RDP) to connect to other computers on the local network. This allows you to access devices remotely or provide assistance without being physically present. You can use either the modern “Remote Desktop” app or the classic “Remote Desktop Connection” tool.
If you need to allow remote connections to your device, Windows 11 offers multiple ways to configure the feature, including the Settings app, Control Panel, Command Prompt, and PowerShell.
In this guide, I’ll explain how to enable Remote Desktop on Windows 11 to control other computers over the local network.
Enable Remote Desktop on Windows 11
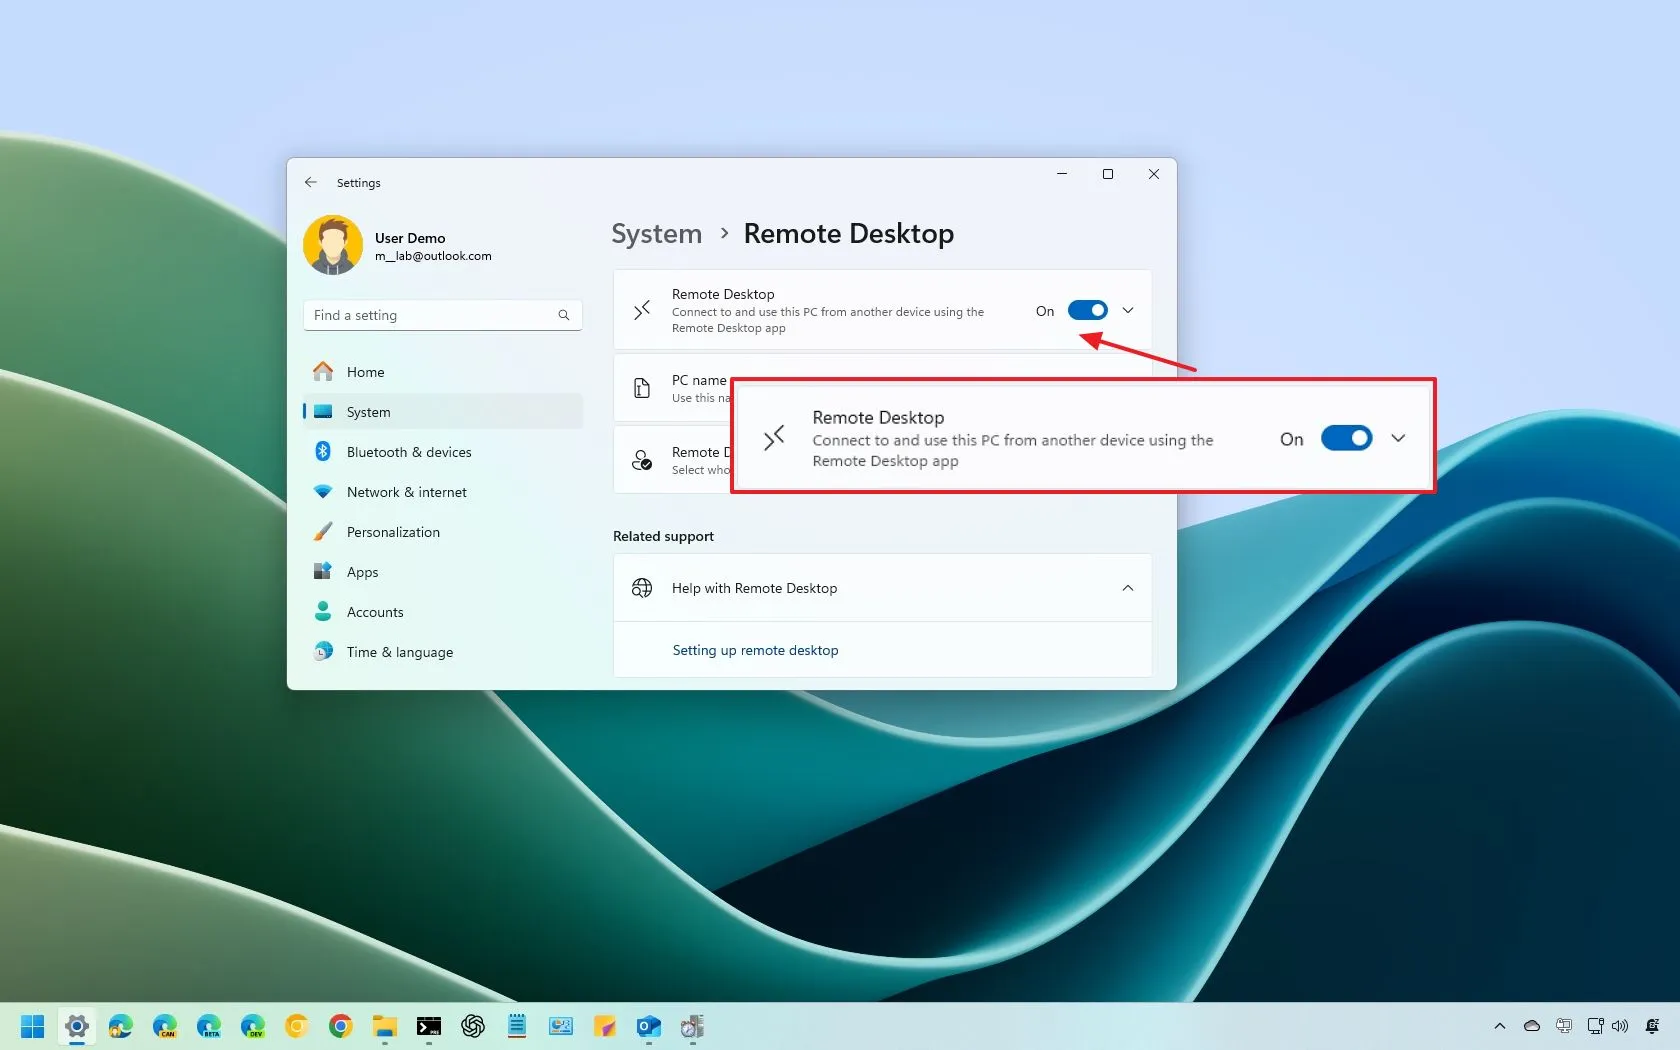
To enable Remote Desktop on Windows 11 from the Settings app, use these steps:
-
Open Settings on Windows 11.
-
Click on System.
-
Click the Remote Desktop page.
-
Turn on the Remote Desktop toggle switch.
-
Click the Confirm button.
Once you complete the steps, you can connect to your computer using the modern Remote Desktop app (recommended).
The system will grant the current user permission to access the computer remotely. To grant access to another user, click the “Remote Desktop users” setting on the page, click the “Add” button, and specify the user.
The Remote Desktop feature uses the “Network Level Authentication” option to make the connection more secure. The settings page also displays the current “Remote Desktop” port in case you need to configure a router to allow remote connections outside the network. If nothing changes on your machine, the port number should always be “3389.”
This video outlines the different ways to enable the feature on your computer.
Enable Remote Desktop from Control Panel
To turn on the Remote Desktop with the Control Panel, use these steps:
-
Open Control Panel.
-
Click on System and Security.
-
Under the “System” section, click the “Allow remote access” option.

-
Under the “Remote Desktop” section, select the “Allow remote connections to this computer” option.

-
Click the Apply button.
-
Click the OK button.
After you complete the steps, you can connect to your device remotely using the Remote Desktop app on another computer.
When you enable the feature using the Control Panel, the option to require “Network Level Authentication” also gets selected by default, which is an option you want to allow anyway.
Enable Remote Desktop from Command Prompt
To enable the remote desktop protocol with Command Prompt on Windows 11, use these steps:
-
Open Start.
-
Search for Command Prompt, right-click the top result, and select the Run as administrator option.
-
Type the following command to enable the remote desktop protocol and press Enter:
reg add "HKEY_LOCAL_MACHINE\SYSTEM\CurrentControlSet\Control\Terminal Server" /v fDenyTSConnections /t REG_DWORD /d 0 /f

-
(Optional) Type the following command to enable remote desktop through the Windows Firewall and press Enter:
netsh advfirewall firewall set rule group="remote desktop" new enable=Yes
Once you complete the steps, the features will be enabled, and the firewall will be configured, allowing you to access the computer remotely.
Enable Remote Desktop from PowerShell
To enable the Remote Desktop feature with PowerShell commands on Windows 11, use these steps:
-
Open Start.
-
Search for PowerShell, right-click the top result, and select the Run as administrator option.
-
Type the following command to enable the remote desktop protocol and press Enter:
Set-ItemProperty -Path 'HKLM:SystemCurrentControlSetControlTerminal Server' -name "fDenyTSConnections" -value 0

-
(Optional) Type the following command to turn on the remote desktop feature through the Windows Firewall and press Enter:
Enable-NetFirewallRule -DisplayGroup "Remote Desktop"
After completing the steps, you can use the Remote Desktop app on Windows 11 to access the device remotely, even when the firewall is enabled.
Troubleshooting tips
- Remote Desktop Option Missing: This feature is not supported by the “Home” edition of Windows 11. Confirm you’re using Windows 11 Pro or Enterprise.
- Unable to connect remotely: Verify that the computer is turned on and connected to the network and that the remote desktop is enabled. Also, check firewall settings to ensure Remote Desktop connections are allowed.
- Network-Level Authentication (NLA) issues: If you experience problems with NLA, you can disable it (not recommended for security reasons) by unchecking the option in the Remote Desktop settings. NLA requires users to authenticate before establishing a session, adding an extra layer of security.
Practical use cases
The ability to connect remotely to another computer can come in handy in many scenarios. For example:
- Access your work computer from home to utilize applications and files as if you were physically present.
- IT professionals can troubleshoot and manage client computers remotely, reducing the need for on-site visits.
- Retrieve personal files or manage downloads on your home computer while away.
Update February 10, 2024: This guide has been updated to ensure accuracy and reflect changes to the process.
Source link