How to resolve any Blue Screen of Death (BSOD) issue on Windows 11
- A Blue Screen of Death on Windows 11 can have many solutions that will depend on the issue.
- You must first troubleshoot the problem to determine the cause so you can then apply the appropriate fix.
- This guide covers the troubleshooting steps as well as solutions for bugcheck errors due to buggy updates, drivers, graphics problems, hardware issues, data corruption, and more.
On Windows 11, depending on the problem, you have multiple ways to fix a Blue Screen of Death (BSOD). In this guide, I will show you the different ways to troubleshoot and resolve this issue to get your device up and running quickly. These instructions will work on Windows 11 24H2, 23H2, 22H2, and the original release.
What’s a Blue Screen of Death?
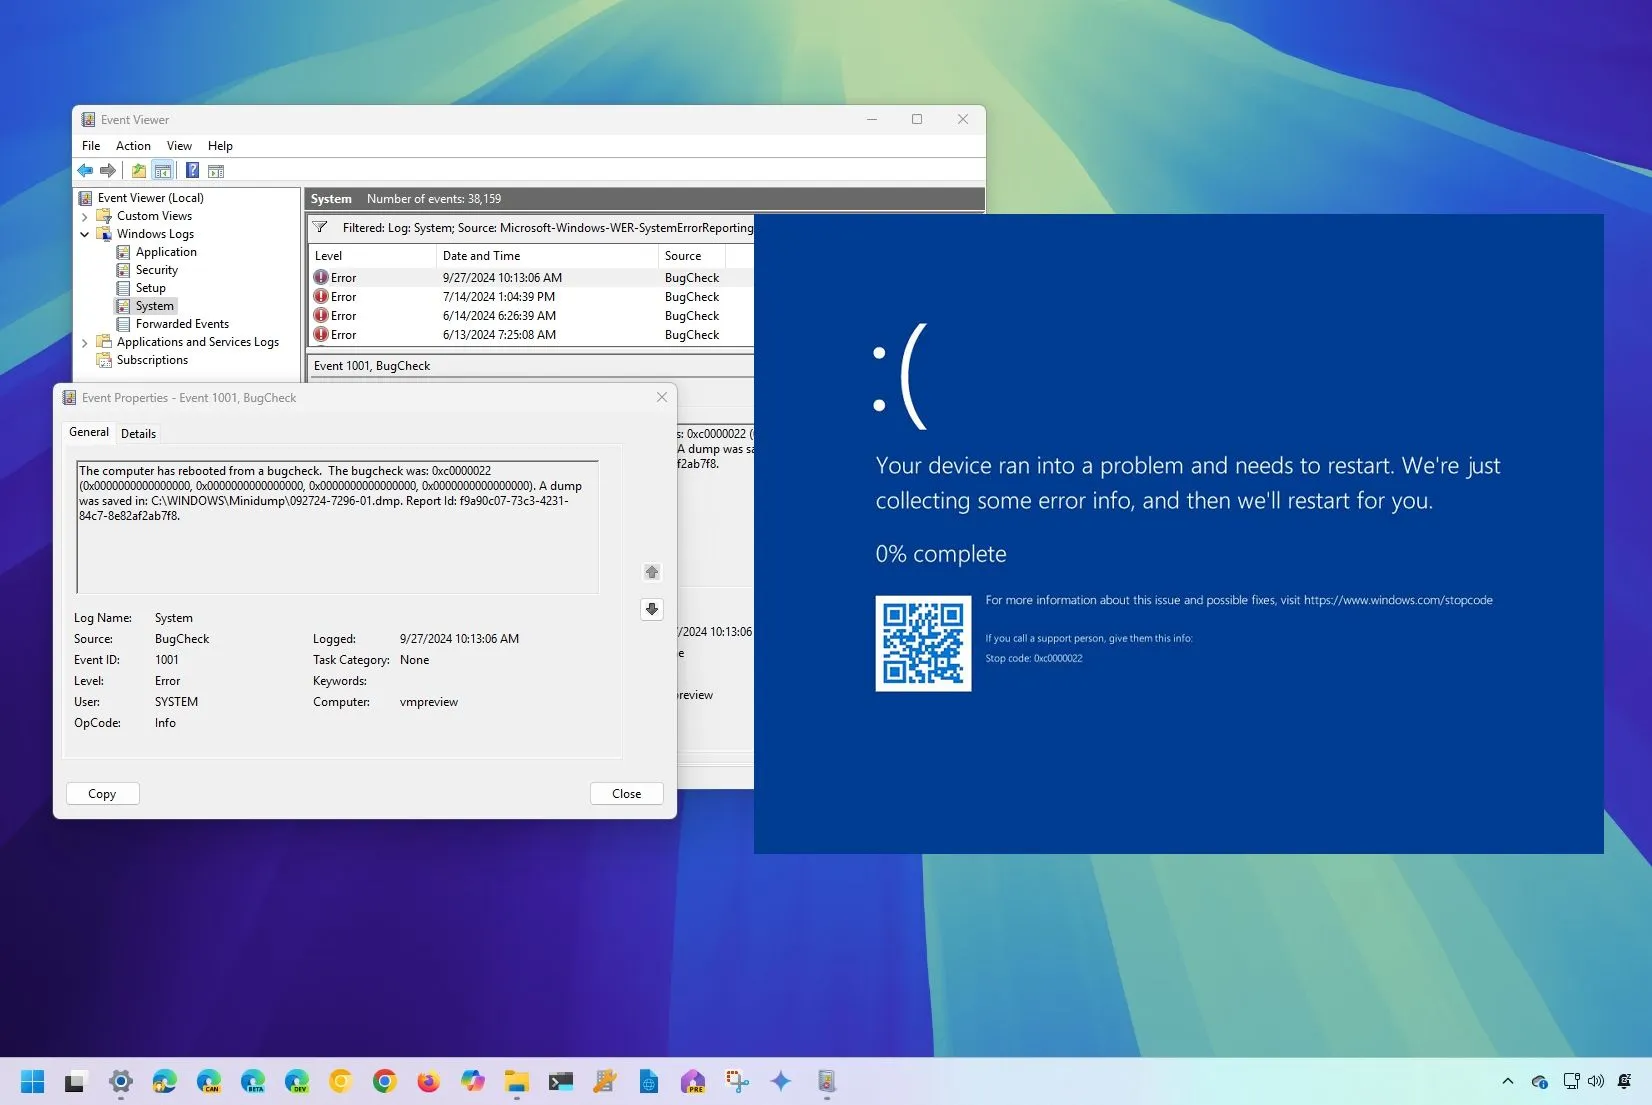
A Blue Screen of Death is an error that occurs when the system encounters a problem it can’t handle automatically. As a result, the computer displays a blue screen with a sad base “:(“ along with a brief explanation and a QR Code to find more information online.
It’s important to note that Microsoft calls this error a “Blue Screen” only, a “STOP code error,” and sometimes, you may even find it as a “bugcheck” error.
When a blue screen occurs, you may encounter different messages, such as “Your device ran into a problem and needs to restart. We’re just collecting some error info, and then we’ll restart for you,” “Your PC ran into a problem that it couldn’t handle, and now it needs to restart,” and many others. Sometimes, the message may include an error code that can give you a clue about the problem.
Although this can happen randomly at any time, the biggest problem is that the blue screen usually doesn’t provide enough information to understand and resolve the issue. However, you can leverage the operating system’s tools to troubleshoot and fix the problem as soon as possible.
Since this type of error can happen for many reasons, no specific set of steps exists to resolve it. However, a common way to approach this issue involves using different tools to determine the root of the problem. Then, based on the troubleshooting steps, you have to apply the appropriate steps to resolve the blue screen.
In this guide, I will help you to troubleshoot and resolve the blue screen problem on Windows 11.
Fix BSOD errors on Windows 11
If your computer crashes with a Blue Screen of Death, the first step is to determine the reason with the various tools available on Windows 11 or third-party applications.
Once you know the root of the problem, you can proceed with the steps to resolve it.
1. Determine the problem cause
If your desktop computer or laptop is experiencing a blue screen, you must first understand the problem to take the correct action. In my experience, it’s usually the graphics driver or a buggy system update. You can also add updates to the list for other drivers and compatibility issues with an application.
Event viewer
The Event Viewer is among the first places you should look to understand why the system is crashing with the stop error.
Event Viewer is a tool available on Windows 11 that records and displays information about significant events on your computer, from system errors and warnings to application crashes and security alerts.
To use the Event Viewer to determine the cause of the Blue Screen of Death, use these steps:
-
Open Start.
-
Search for eventvwr.msc and click the top result to open the Event Viewer.
-
Open the Windows Logs folder.
-
Right-click on System and choose the “Filter Current Log” option.
-
Check the BugCheck option in the “Event sources” setting.

-
Click the OK button.
-
Right-click the error event and choose the “Event Properties” option.

-
Review the error details.

Pay attention to the stop code, as this is the most critical information. You can search online for the specific stop code to find potential causes and solutions. The parameters can provide additional clues about the error, and the source can indicate the component or driver involved in the crash.
BlueScreenView
BlueScreenView is a free, portable tool for analyzing minidump files generated with the crash information when your computer encounters a blue screen. It’s designed to make the complex process of understanding these crash reports accessible to users of all levels.
To use the BlueScreenView app to find out the reason for the blue screen, use these steps:
-
Scroll down to the bottom of the page.
-
Click the Download BlueScreeView (in Zip file) option and save the file to your computer.

-
Extract the contents of the Zip file.

-
Double-click the BlueScreenView.exe file to launch the program.
-
Select the dump file at the top of the screen.

In the application, you want to pay attention to the “Bug Check Code” in column 4 and the “Bug Check String” in column “3,” which you can use to search online to find potential causes and solutions. You can also review the files involved in the crash at the bottom of the page.
2. Initial blue screen troubleshooting recommendations
Although you can use several troubleshooting steps to fix the problem, these are some initial recommendations.
If this was the first bug check error, restart the computer one more time and confirm the computer works normally. Sometimes, the error will happen once, and you can continue using the device. If so, you can stop here and continue using the device.
If the error occurs immediately after connecting a new peripheral, disconnect the device and confirm if that resolves the issue. If this is the case, the problem is damaged hardware or a conflict between other devices, the operating system, or a specific application or driver.

If the blue screen appears after installing an update, driver, or application, uninstall the component causing the issue. You can also try to perform a clean boot to troubleshoot and determine the root of the cause. I will discuss this further in the more advanced troubleshooting steps below.
3. Advanced fixes for most Blue Screen of Death errors
If your desktop computer, laptop, or tablet frequently runs into blue screen errors, there are some troubleshooting steps that can help you resolve the issue.
If a buggy system update causes the stop error, you can install a newer update or roll back to an earlier build to fix the problem.
If you can’t start your computer, you can start it in the Windows Recovery Environment (WinRE) to uninstall the update.
You also have the choice to reinstall the operating system without losing your files, settings, and app. Alternatively, if the blue screen appears on a setup you have had for a long time, perhaps resetting the system to keep your files can help fix the Blue Screen of Death.
Install system updates
To install Windows 11 updates manually, use these steps:
-
Open Settings.
-
Click on Windows Update.
-
Turn on the “Get the latest updates as soon as they’re available” toggle switch.
-
Click the “Check for updates” button.

-
Click the Restart button.
Once you complete the steps, the computer should boot normally without any issues.
Install device drivers
To update a device driver on Windows 11, use these steps:
-
Open Settings.
-
Click on Windows Update.
-
Click the “Advanced options” button.

-
Click the “Optional updates” setting under the “Additional options” section.

-
Click on Drivers.
-
Check the driver update for the device with the problem.
-
Click the “Download & install” button.

After you complete the steps, the stop error should be resolved.
Uninstall system update
To uninstall Windows 11 updates manually, use these steps:
-
Open Settings.
-
Click on Windows Update.
-
Click the Update history page.

-
Click the Uninstall updates setting under the “Related settings” section.

-
Click the Uninstall button for the buggy update.

-
Click the Restart button (if applicable).
Once you complete the steps, the system update should be removed to fix the blue screen error.
Uninstall system updates from WinRE
To remove an update manually from the Windows Recovery Environment (WinRE), use these steps:
-
Open Settings.
-
Click on System.
-
Click the Recovery page.
-
Click the “Restart now” button for the “Advanced startup” setting.

-
Click on Troubleshoot.
-
Click on Advanced options.
-
Click on Uninstall Updates.

-
Click the “Uninstall latest quality update” option.

-
Confirm your administrator account credentials.
-
Click the “Uninstall quality update” button.

After you complete the steps, the system update will be removed, and the computer should once again boot normally.
4. Remove problematic apps and drivers
Sometimes, you may encounter a Blue Screen of Death because of corruption or a bug on an app or driver.
If you notice the error occurring as you launch a specific application or use specific hardware, removing the app or driver can quickly resolve the problem.
Remove problematic app
To remove a problematic application on Windows 11, use these steps:
-
Open Settings.
-
Click on Apps.
-
Click the Installed apps page.
-
Open the app’s menu (three dots) and choose the Uninstall option.
-
Click the Uninstall option again.

-
Continue with the on-screen directions (if applicable).
Once you complete the steps, the app will be removed, and the BSOD error should no longer occur.
Remove problematic driver
To remove a problematic device driver on Windows 11, use these steps:
-
Open Start.
-
Search for Device Manager and click the top result to open the app.
-
Open the category that includes the problematic hardware.
-
Right-right the device and choose the “Uninstall device” option.

-
Click the Uninstall button.
After you complete the steps, the driver will be removed from the computer, resolving the blue screen error.
5. Troubleshoot graphics driver
You may notice different error codes if the problem is with a graphics driver. For example, “IRQL_NOT_LESS_OR_EQUAL” often points to a driver issue, including graphics drivers.
The “VIDEO_TDR_FAILURE” error indicates that the graphics driver has stopped responding, causing a timeout. Overclocking, incompatible drivers, or hardware issues can trigger this.
The “SYSTEM_THREAD_EXCEPTION_NOT_HANDLED” error can also be caused by a faulty graphics driver, which means a critical system thread encountered an unexpected error.
Finally, the “DPC_WATCHDOG_VIOLATION” error can also happen because of a driver problem, which indicates a delay in a critical process.
In addition to these error codes, your computer may experience a blue screen because of outdated or corrupted drivers, overclocking, compatibility issues, and software conflicts.
There are different solutions to this particular problem. The best approach is to reinstall the drivers. You can also try a beta version for an upcoming release, or, in the past, I have had success trying an older version of the graphics driver.
Uninstall graphics driver
On Windows 11, you have multiple ways to uninstall a graphics driver. For example, you can remove it with Device Manager if the device uses the driver available through Windows Update.
If you have the Control Panel app for a graphics card from Nvidia, AMD, or Intel, you may have to remove the application that will also remove the driver from the device.
Quick tip: If you have a video card from Nvidia, AMD, or Intel, I would recommend trying to remove the drivers by uninstalling the application from the Settings app. If the app isn’t available, then use the Device Manager settings.
Uninstall from Device Manager
To uninstall the graphics driver on Windows 11 from Device Manager, use these steps:
-
Open Start.
-
Search for Device Manager and click the top result to open the app.
-
Open the “Display adapters” category.
-
Right-right the device and choose the “Uninstall device” option.

-
Click the Uninstall button.
-
Restart the computer.
After you complete the steps, depending on the graphics card, the system may try to reinstall the driver again from Windows Update. If so, once the driver reinstalls, continue using the device and confirm if the problem has been resolved.
Uninstall from Settings app
To remove the graphics driver originally installed with the Nvidia, AMD, or Intel control panel, use these steps:
-
Open Settings.
-
Click on Apps.
-
Click the Installed apps page.
-
Open the app’s menu (three dots) for the driver and choose the Uninstall option.
-
Click the Uninstall option again.
-
Continue with the on-screen directions (if applicable).
You may need to repeat the steps to remove the remaining components of the graphics card.
You can also use third-party tools to completely remove the graphics driver from the computer.
Reinstall graphics driver
If the video driver doesn’t install automatically, you may have to reinstall the controllers manually.
Windows Update installation
To install the latest graphics driver available, use these steps:
-
Open Settings.
-
Click on Windows Update.
-
Click the “Check for updates” button to update the system.
-
Click the Advanced options setting.
-
Click the Optional updates setting.
-
Click on Driver updates.
-
Check the graphics driver update.
-
Click the “Download & install” button.
After you complete the steps, a fresh copy of the driver will be installed on the computer.
Graphics driver manual installation
Sometimes, the drivers available through Windows Update are not the most up-to-date. If this is the case, you must download and install the graphic driver manually.
You have two options to complete this task. If you have a laptop or branded computer, I recommend downloading the graphics driver from the manufacturer’s website (Dell, Asus, Acer, etc.) since the device may require a custom version. If you have a custom-built computer or have upgraded the graphics card manually, then it’s recommended you download the latest driver from the Nvidia, AMD, or Intel website.
Now, if the manufacturer driver keeps failing, only then would I recommend downloading the latest driver from the graphics manufacturer.
To install the graphics driver manually, double-click the executable and continue with the on-screen directions. Since the installation may be slightly different, depending on the manufacturer, you should follow the manufacturer’s directions.
Once you complete the steps, the graphics driver will install on the computer, fixing the Blue Screen of Death.
6. Troubleshoot faulty system memory
If your computer is experiencing random Blue Screen of Death errors, it’s possible that the problem is a faulty memory module. On Windows 11, you can use the legacy “Windows Memory Diagnostic” tool to test the RAM (Random Access Memory) to determine if you have to replace the system memory.
To check the system memory for problems on Windows 11, use these steps:
-
Open Start.
-
Search for Windows Tools and click the top result to open the app.
-
Right-click the “Windows Memory Diagnostic” app and choose the Run as administrator option.

-
Click the “Restart now and check for problems” option.

Quick note: The computer will automatically restart and perform a standard memory test. In this mode, the system will perform a “Basic” scan, and it will also do the LRAND, Stride6 (cache enabled), CHCKR3, WMATS+, and WINVC tests.
-
Open Start after the scan.

-
Search for Event Viewer and click the top result to open the app.
-
Expand the Windows Logs category.
-
Right-click the System item and choose the Find option.
-
Confirm the MemoryDiagnostics-Results keyword and click the Find Next button.
-
Click the Close button from the top right.
-
Double-click the MemoryDiagnostics-Results source on the right side.

-
Confirm the memory diagnostic results.
After you complete the steps, if the system shows an error, you may want to try the extended memory check. If the error continues to appear in the Event Viewer, you may have to change the memory modules to resolve the blue screen errors.
Another troubleshooting step you can perform before changing the memory is to resit the memory modules. If the problems continue, then you should consider upgrading the RAM.
7. Scan for malware and viruses
Although it doesn’t happen frequently, a virus or another type of malware can cause a Blue Screen of Death on your computer. If you use a third-party solution, I recommend checking the software vendor for specific instructions to perform a full scan. If you use the Microsoft Defender Antivirus, the steps to perform a scan are straightforward.
To perform a full virus scan on Windows 11 to resolve blue screen problems, use these steps:
-
Open Start.
-
Search for Windows Security and click the top result to open the app.
-
Click on “Virus & threat protection” from the left pane.
-
Click on Scan options under the “Current threats” section.

-
Select the Full scan option to check the entire system for viruses.

-
Click the Scan now button.
Once you complete the steps, the antivirus will scan the device for malware. If anything is detected, it’ll automatically remove or quarantine the threats to resolve the bugcheck problem. You can run an offline scan to remove a virus that can’t be removed while the system is running.
8. Restore to a previous working state with System Restore
System Restore is a feature on Windows 11 that creates snapshots of your system’s files and settings at specific points in time, and then, you can use a system restore point to roll back to a previous system state to undo changes that may be causing the Blue Screen of Death.
The only caveat is that this feature is off by default. You can only use it if you have previously enabled System Restore on your computer.
To recover Windows 11 from a blue screen error with a restore point, use these steps:
-
Open Start.
-
Search for Create a restore point and click the top result to open the app.
-
Click the System Restore button.

-
Click the Next button.
-
Select the restore point to restore Windows 11 to a good working condition.

-
Click the Next button.
-
Click the Finish button.

If the computer doesn’t start correctly, you can use System Restore from WinRE to resolve the Blue Screen error.
9. Repair installation with DISM, SFC, and CHKDSK
On Windows 11, you can use the Deployment Image Servicing and Management (DISM), System File Checker (SFC), and Check Disk (chkdsk) to repair the local system image. Then, you can use the local image files to repair the actual installation of Windows and fix logical and physical errors on the storage drive with the Check Disk tool.
To fix a Blue Screen of Death running the DISM and SFC command tools, use these steps:
-
Open Start.
-
Search for Command Prompt, right-click the top result, and select the Run as administrator option.
-
Type the following command and press Enter:
dism /Online /Cleanup-image /Restorehealth

-
Type the following command to repair the installation and press Enter:
SFC /scannow

-
(Optional) Type the following command and press Enter:
chkdsk/f c:

-
Type “Y” and press Enter to schedule a scan.
-
Restart the computer.
Once you complete the steps, the DISM command will repair the files inside the system’s local image, and the SFC command will use the local image to repair the files of the Windows 11 setup. The repair logs will be located in the C:\Windows\Logs\CBS folder inside the “CBS.log.”
10. Boot in Safe Mode to troubleshoot problems
If, for some reason, you can boot into the desktop or can’t remove a specific driver or application, starting the computer in Safe Mode can load a minimal environment to perform different types of troubleshooting steps.
To access Safe Mode on Windows 11 to resolve a bugcheck, use these steps:
-
Open Settings.
-
Click on System.
-
Click the Recovery page.
-
Click the Restart now button under the “Advanced startup” section.

-
Click the Restart now button again.
-
Click the Troubleshoot option.
-
Click the Advanced options button.
-
Click the Startup Settings option.

-
Click the Restart button.
-
Select “4” or press the “F4” key to boot in Safe Mode modes on Windows 11.

Quick tip: You can also choose “5” or press the “F5” key to start the troubleshooting mode with Networking or select “6” or press the “F6” key to start with Command Prompt.
After you complete the steps, the computer will boot in Safe Mode. While in this mode, refer to the previous steps to uninstall drivers, updates, and other applications that are causing blue screen errors and that you cannot remove while the operating system is running.
11. Roll back to a previous version
If the error occurs after upgrading to a new version of the operating system, you may be able to uninstall and roll back to the previous version to mitigate the Blue Screen of Death. (It’s important to note that the option to rollback is only available during the first ten days after upgrading to the newer version. After this time, the system will automatically delete the previous installation copy.)
You have at least two ways to uninstall a feature update of Windows 11, including through the Settings app or using the Windows Recovery Environment (WinRE) if the computer no longer boots correctly and you don’t have access to the desktop.
Roll back to previous version from Settings
To uninstall and revert back to a previous version of Windows 11, use these steps:
-
Open Settings.
-
Click on System.
-
Click the Recovery page on the right side.
-
Click the Go back button under the “Recovery options” section.

-
Click the Next button.
-
Click the “No, thanks” button.

-
Click the Next button.

-
Click the Next button again.

-
Click the Go back button.

Once you complete the steps, the feature update will be removed from the device, keeping your files and most of your settings and apps.
If the recovery feature reads “this option is no longer available on this PC” or the “Go button” is grayed out, you will need to perform a clean installation of Windows 11 and restore the files from a backup. (You can refer to the steps outlined below.)
Roll back to previous version from WinRE
To uninstall a newer version of Windows 11 from the recovery environment, use these steps:
-
Press the power button.
-
You see the blue Windows logo immediately after the Power-On Self-Test (POST). Press and hold the power button again to interrupt the boot sequence and shut down the computer.
-
Repeat steps 1 and 2 twice. (In the second or third restart, the system should enter the Windows Recovery Environment.)

-
Click the Advanced options button.

-
Click on Troubleshoot.

-
Click on Advanced options.

-
Click on Uninstall Updates.

-
Click the “Uninstall latest feature update” option.

-
Sign in using your administrator credentials (if applicable).
-
Click the “Uninstall feature update” button.

After you complete the steps, the computer will uninstall the recently installed version of Windows 11 and roll back to the previous version, hopefully fixing the Blue Screen of Death due to bugs or compatibility issues.
12. Reinstall operating system
Alternatively, you can also reinstall the operating system to fix the Blue Screen of Death in addition to performance and other problems.
Windows 11 offers multiple ways to reinstall the system. You can reinstall the operating system and keep files, apps, and settings, or you can perform the reinstallation only by keeping your files and deleting apps and settings.
Reinstall operating system while keeping everything
To reinstall the operating system to fix the Blue Screen of Death while keeping your files, settings, and apps, use these steps:
-
Open Settings.
-
Click on System.
-
Click the Recovery page.
-
Click the Reinstall now button for the “Fix problems using Windows Update” setting.

-
Check the “Automatically restart my PC 15 minutes after installation” option.

-
Click the OK button.
Once you complete the steps, Windows Update will download and reinstall the same build of Windows 11 on your computer to fix the Blue Screen of Death problem.
It’s important to note that this method will not upgrade the device to a newer version or delete your files, settings, and apps.
Reset computer keeping files and removing apps
To reset your computer, keeping files but removing apps and settings to fix blue screen errors, use these steps:
-
Open Settings.
-
Click on System.
-
Click the Recovery page.
-
Click the Reset PC button under the “Recovery options” section in the “Reset this PC” setting.

-
Click the “Keep my files” option.

-
Select the “Cloud download” option to download Windows 11 and perform a fresh reinstallation. Alternatively, Select the “Local reinstall” option to use the local files to reinstall the operating system without losing your data.

-
Click the Next button.
-
Click the Reset button.
After you complete the steps, the computer will reset to its factory results settings, keeping your files, but you will have to reinstall your applications and reconfigure your settings.
Clean installation on Windows 11
As a last resort, if nothing seems to fix the issue, you can erase the current setup and perform a clean installation to resolve the Blue Screen of Death. I’ll outline the steps to perform a fresh installation from a USB drive, but you have at least six different ways to do a clean installation of Windows 11.
However, the setup process will be slightly different depending on whether the device is running Windows 11 23H2 or 22H2 or version 24H2 or a higher release.
Windows 11 23H2 and older releases
To clean install Windows 11 (version 23H2 or older release) to resolve blue screen problems, use these steps:
-
Start the PC with the Windows 11 USB flash drive.
-
Press any key to continue.
-
Click the Next button.

-
Click the Install now button.

-
Click the “I don’t have a product key” option. (After the installation, the system will reactivate automatically.)

-
Select the edition of “Windows 11” that your license key activates (if applicable).
-
Check the “I accept the license terms” option.
-
Click the Next button.
-
Select the “Custom: Install Windows only (advanced)” option.

-
Select each partition on the hard drive where you want to install the operating system and click the Delete button. (Typically, the “Drive 0” is the drive that contains all the installation files.)

Warning: When you delete a partition, it also deletes all data on the drive. Also, it is not required to delete the partitions from a secondary hard drive.
-
Select the hard drive (Drive 0 Unallocated Space) to install Windows 11.

-
Click the Next button.
-
Select your region setting after the installation on the first page of the out-of-the-box experience (OOBE).

-
Click the Yes button.
-
Select your keyboard layout setting.

-
Click the Yes button.
-
Click the Skip button.
-
The computer will automatically connect to the network using an Ethernet connection. If you have a wireless connection, you’ll have to confirm the network credentials and click the Next button.

-
Confirm a name for the computer.

-
Click the Next button. (The device will restart automatically.)
-
Select the “Set up for personal use” option if configuring Windows 11 Pro. (The “Home” edition does not have this option.)

Quick tip: Use the “Set up for work or school” option to skip the Microsoft account and create a local account.
-
Click the Next button.
-
Click the Sign in button.

-
Confirm your Microsoft account email or phone number to create an account.

-
Click the Next button.
-
Confirm your Microsoft account password.
-
Click the Next button.
-
Click the “More options” setting.
 Quick tip: You can also click the “Restore from this PC” button to restore your files, apps, settings, and credentials from the system backup available in your OneDrive account. You can learn more about the Windows Backup app in this guide.
 -
Click the “Set up a new device” option to continue or select the backup to restore.

-
Click the Create PIN button.

-
Create a new four-digit PIN.

-
Click the OK button.
-
Scroll down and confirm your privacy settings.
-
Click the Accept button.

-
(Optional) On the “Let’s customize your experience” page, select one or more ways you plan to use the device.

-
Click the Accept button to continue. (Or click the Skip button to skip this part of the setup.)
-
Click the Skip button for the Android phone link process.
-
Click the “Continue without” button to skip the Microsoft 365 setup.
-
Click the Decline button to skip the OneDrive offer.
-
Click the “Skip for now” button to skip the Game Pass subscription promotion.
Once you complete the steps, the computer will start with a fresh installation of Windows that may fix the Blue Screen of Death problem.
Windows 11 24H2 and higher releases
To clean install Windows 11 (version 24H2 or higher release) to fix Blue Screen of Death problems, use these steps:
-
Start the PC with the Windows 11 24H2 USB flash drive.
-
Press any key to continue.
-
Choose the installation language and format.

-
Click the Next button.
-
Choose the keyboard and input method.

-
Click the Next button.
-
Select the “Install Windows 11” option.

-
Check the “I agree everything” option.
-
Click the “I don’t have a product key” option.

Quick note: The computer will activate automatically if you’re reinstalling the operating system. If this is a new device that never included a version of Windows, you will have to provide a product key.
-
Select the edition of “Windows 11” your license key activates (if applicable).

-
Click the Next button.
-
Click the Accept button
-
Select each partition in the hard drive you want to install Windows 11 24H2 and click the Delete button. (Usually, the “Drive 0” is the drive that contains all the installation files.)

-
Select the hard drive (Drive 0 Unallocated Space) to install the latest preview of the operating system.

-
Click the Next button.
-
Click the Install button.

-
Choose your region setting on the first page of the out-of-the-box experience (OOBE) after the installation.

-
Click the Yes button.
-
Select your keyboard layout setting.

-
Click the Yes button.
-
Click the Skip button if you do not need to configure a second layout.
-
The computer will automatically connect to the network using an Ethernet connection. You must set up the connection manually on a wireless connection (a security key may be required).
-
(Optional) Confirm a name for the computer.

-
Click the Next button. (The device will restart automatically.)
-
Select the “Set up for personal use” option for Windows 11 Pro. The “Home” edition does not have this option.

-
Click the Next button.
-
Click the Sign in button.
-
Confirm your Microsoft account email to create a Windows 11 account.

-
Click the Next button.
-
Confirm your Microsoft account password.
-
Click the Next button.
-
Click the Create PIN button.
-
Create a new four-digit PIN.

-
Click the OK button.
-
Confirm the privacy settings that best suit your situation by turning on or off the toggle switch for each setting.
-
Click the Next button.
-
Click the Next button again.
-
Click the Accept button.

-
Click the More options setting.

-
Click the “Set up as a new PC” option.

-
(Optional) On the “Let’s customize your experience” page, select one or more ways you plan to use the device to allow the setup to suggest tools and service customization during this experience.

-
Click the Accept button to continue. Or click the Skip button to skip this part of the setup.
-
(Optional) Use the code to link your Android phone or click the Skip option.
-
Select the “Next” button to automatically upload your Desktop, Pictures, and Documents folders to the cloud. Or Select the “Only save file to this PC” option.

-
Click the Next button.
-
Click the “Not now” button if you will be using a browser other than Microsoft Edge.

-
Click the “Skip for now” option to skip the PC Game Pass promotion.
-
Click the “No, thanks” button to skip the Microsoft 365 setup (if applicable).
After you complete the steps, the operating system will be reinstalled on your computer with a fresh setup that will also resolve startup, performance, and blue screen issues.
Additional information
It’s important to note that the screen may also appear in green, black, and even red.
The Green Screen of Death (GSoD) is the type of error that usually appears for a device enrolled in one of the channels of the Windows Insider Program.
The Red Screen of Death (RSoD) is generally a hardware problem from BIOS (Basic Input/Output System) or UEFI (Unified Extensible Firmware Interface). It can also indicate overclocking issues.
A Black Screen of Death is caused when the computer screen goes completely black, and the operating system shuts down because it can no longer function safely. So you won’t see an error code when your computer crashes with a black screen. When this happens, virtually anything can contribute to the problem, including hardware issues, software conflicts, setup problems, etc.
If you have any questions, you can add them in the comments below.
Source link