How to set up the Wi-Fi on your ASUS router for IoT devices or your guests
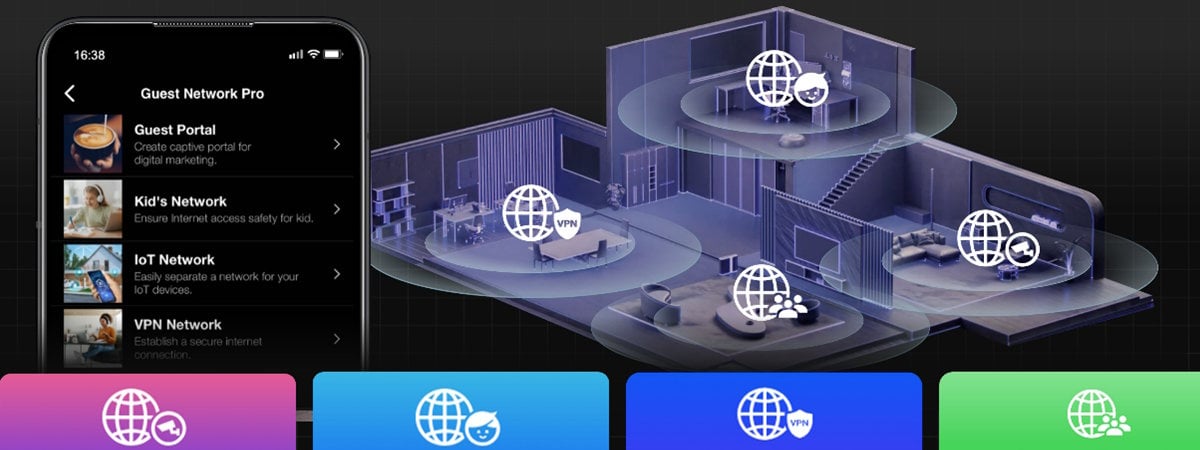
If you’re using a modern ASUS router or ZenWiFi mesh system with Wi-Fi 6 or Wi-Fi 7, connecting older IoT devices may be problematic because they aren’t compatible with newer wireless standards. The same can happen with your guests and their devices. If they have older phones or laptops, they might not even detect your home Wi-Fi. To solve such issues, you can set up your ASUS router or ZenWiFi to create a separate network for IoT devices or your visitors. Here’s how it all works:
How to set up the Wi-Fi for your IoT devices
Our homes and business offices are getting smarter by the day. Today, it’s commonplace to use a smart TV, smart plugs, smart bulbs, smart sensors. You get the picture, everything’s smart nowadays. These smart devices are called Internet of Things (IoT) devices, and to do what they were designed to, they require internet connectivity, usually over Wi-Fi. If you have a modern router with Wi-Fi 6 or Wi-Fi 7 connectivity, older IoT devices may not be able to see your Wi-Fi and connect to it. This is problematic because you won’t be able to use all your existing IoT devices. To fix this issue, you can create a separate Wi-Fi just for your IoT devices, that uses the older Wi-Fi 4 standard, which is compatible with all IoT devices, no matter how old they are. You can set up a Wi-Fi network for IoT devices from the firmware of the ASUS router or ZenWiFi system you’re using or from the ASUS Router app on your smartphone. I’ll present both options in their own section.
How to create an IoT Wi-Fi network on your ASUS router or mesh Wi-Fi
On a laptop or PC connected to the network managed by your ASUS router or ZenWiFi system, open a web browser and navigate to asusrouter.com or the IP address of your router. Then, log in with your admin username and password.
In the admin user interface, select Network in the column on the left. On the right, you see your main network, the bands it emits its signal on, and the network names and settings. For example, I’m using a dual-band ASUS RT-BE58U router with Wi-Fi 7 connectivity. To create a separate Wi-Fi for IoT devices, click or tap IoT Network in the Smart Home Master section.
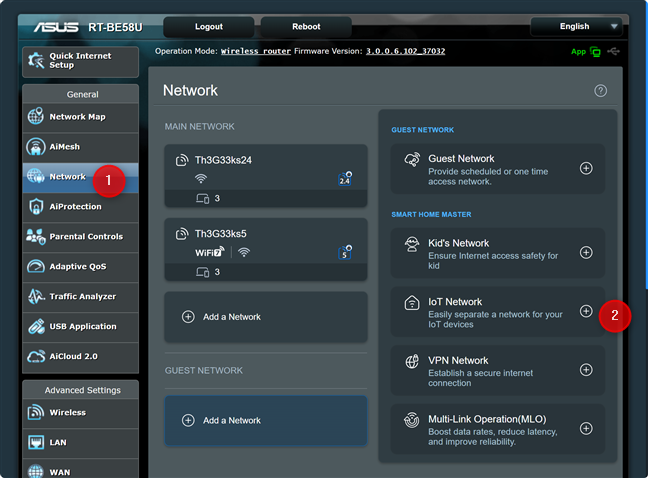
On your ASUS router, go to Network and click or tap IoT Network
The Default IoT Network dialogue box appears. In the Network Name (SSID) field, type the name for the Wi-Fi you want to create. Next, enter the password you want to use in the Wireless Security field. Use a password that includes uppercase and lowercase characters, numbers, and special characters like !, @, or &.
It’s a good idea to also click or tap More Config to further fine-tune your IoT network.
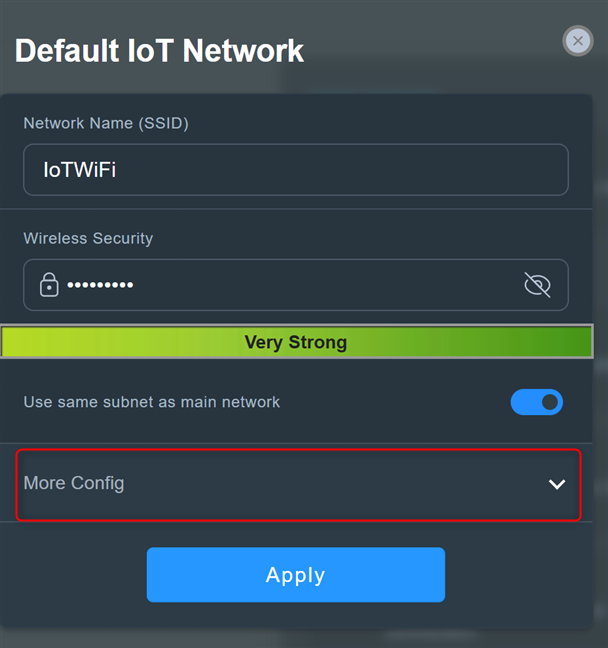

Set up the network name and password, and click or tap More Config
Click or tap the WiFi Band drop-down box, and choose 2.4 GHz. There’s no point in creating an IoT network that emits its signal on the 5 GHz band, because such devices usually can’t use this wireless frequency. You can also enable WiFi Scheduling if you want, but this doesn’t tend to be useful for IoT networks that need to function nonstop. When you’re done setting things up, click or tap Apply.
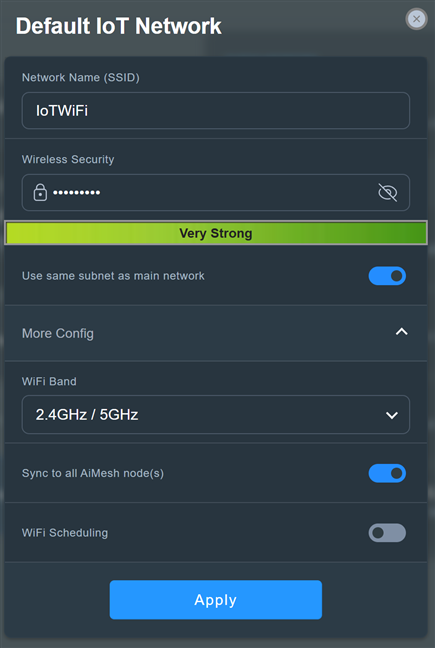

Set up the IoT Network and click or tap Apply
Your ASUS router or ZenWiFi system spends some time creating the new IoT network. Wait for a minute or two until it’s created. During this time, your router may reboot, and your network won’t be available for a little while. When the new IoT network is up and running, you can start connecting your IoT devices to it.
How to create an IoT Wi-Fi network from the ASUS Router app
Open the ASUS Router app on your smartphone and sign in, if required. In the Home section of the app, tap the plus sign (+). You can find it in the top-right corner.
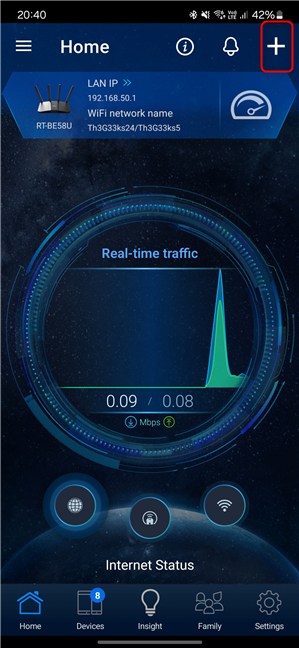

In the ASUS Router app, tap the plus sign
In the Create Self-defined Network section, tap IoT Network.
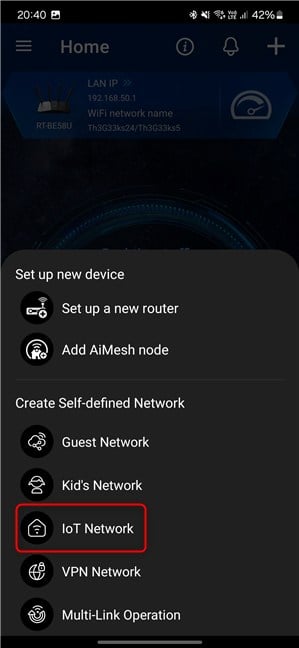

Select IoT Network
First, enter a name for the Wi-Fi you’re about to create in the Network Name (SSID) field. Then, type the password you want to use in the Wireless Security field. Make sure you use a strong password that’s not easy to crack.
Next, tap More Config to reveal more options, and then set the WiFi Band to 2.4 GHz. You won’t need to emit the Wi-Fi network on the 5 GHz band, because most IoT devices don’t work with this wireless frequency. When you’re done setting things up, tap Apply.
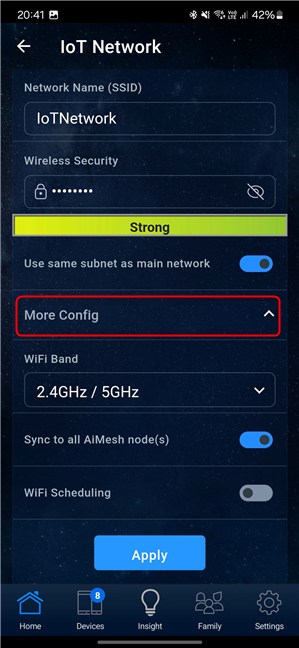

Set up the IoT network and tap Apply
You are informed that your main wireless network will temporarily be interrupted. Tap OK to go ahead.
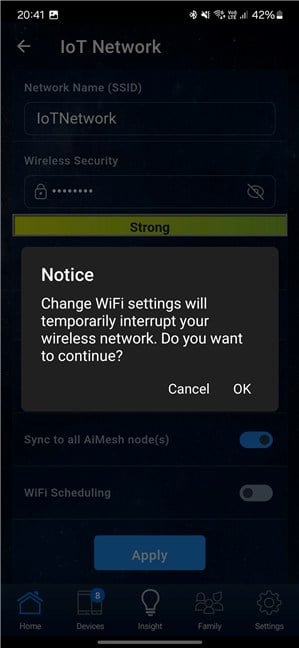

Tap OK to continue
The ASUS Router app informs you that your settings are successfully applied. Wait for the IoT network to be created. This usually takes a minute or two. Then, you can reconnect to your main Wi-Fi network and set up your IoT devices to connect to the newly created IoT network.
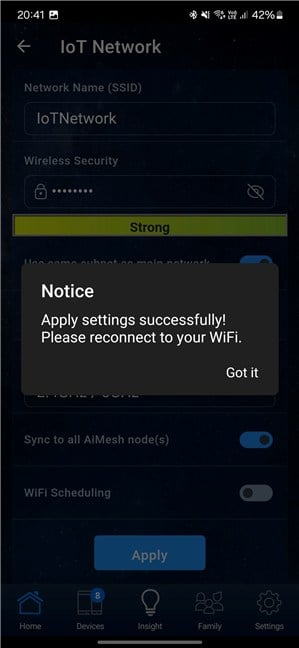

Wait and reconnect to your WiFi
You can now enjoy using all the IoT devices in your home or workplace, including older ones that aren’t compatible with Wi-Fi 6 or Wi-Fi 7.
How to set up the Wi-Fi for your guests
If you frequently have visitors outside your immediate family, it’s a good idea to create a separate Wi-Fi network for your guests, isolated from your main network. This boosts your security, as only you and your family can access the main network and its connected devices, preventing guests from doing things you may not want, like monitoring your network traffic. Additionally, if guests’ devices are infected with malware, they won’t be able to spread it to your network or compromise your devices.
Using an extendable ASUS router or mesh Wi-Fi system, you can easily set up a separate guest Wi-Fi network and configure specific rules. You can limit how long guests can stay connected, control their access to the main network, and decide whether they get Wi-Fi access only once, for a specified period, or perpetually.
This approach ensures a more secure and controlled network environment for you and your family. Setting up a guest Wi-Fi network can be done from the firmware of the ASUS router or ZenWiFi system you own, or from the ASUS Router app on your smartphone.
How to create a guest Wi-Fi network on your ASUS router or mesh Wi-Fi
On a laptop or desktop computer connected to the network managed by your ASUS router or ZenWiFi system, open your favorite web browser and navigate to asusrouter.com or the IP address of your router. Then, log in with your admin username and password. If you aren’t familiar with how this is done, here’s a detailed guide on how to log in to your ASUS router.
In the admin user interface, select Network in the left sidebar. On the right, you see your main network, the bands it emits its signal on, and the network names and settings it uses. For example, in the screenshot below, you can see (in the top-left corner) that I’m using a dual-band ASUS RT-BE58U router. In the middle, you can see that the Wi-Fi on the 5 GHz frequency band uses the Wi-Fi 7 standard. To create a separate Wi-Fi for your guests, click or tap Guest Network on the right side.
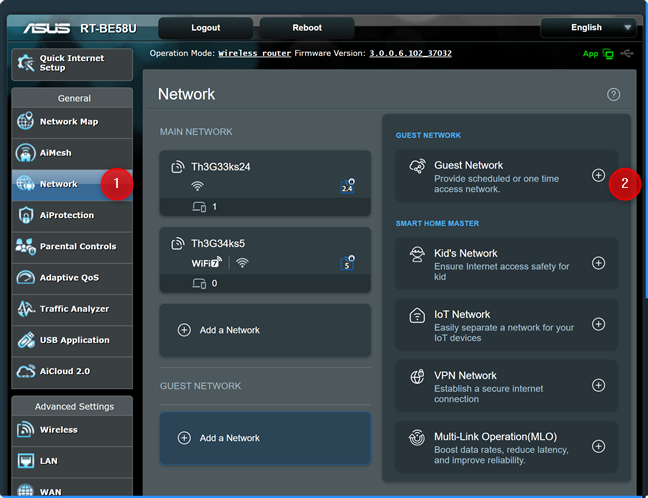

On your ASUS router, tap Network and then Guest Network
You see the Guest Network dialog box, where you can personalize the network name (SSID) and other settings. By default, ASUS uses Open for the network’s security, meaning your guest Wi-Fi won’t require a connection password. I think this is a mistake because anyone can connect to it, including people who are not in your home, like your neighbors, or others passing near your home or apartment.
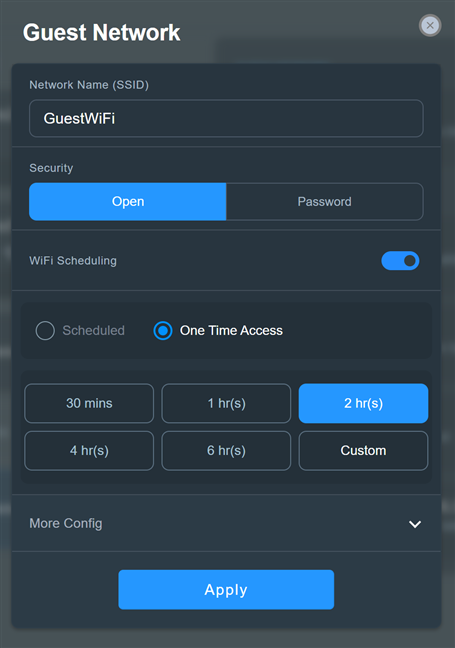

Setting up the guest Wi-Fi
To ensure better security, select Password instead of Open in the Security field. Then, type a strong password in the Wireless Security field. Use both uppercase and lowercase characters, as well as numbers and special characters like !, ?, or %. This password is what your guests will type to connect to your network. Ensure you use a password that’s easy to remember. This doesn’t mean it should be weak. For example, in the screenshot below, I provided a password that’s eight characters long, which is easy to remember and quite logical. Can you guess it?🙂It’s something that you would say when receiving the visit of someone you like.
Under the WiFi Scheduling switch, you see that ASUS recommends you create a One Time Access network for your guests, and limit their access to two hours. If you like this approach, you can select how much time you want to give your guests access to your guest Wi-Fi. If you select Custom, you can set a time that can go up to 99 hours and 59 minutes.
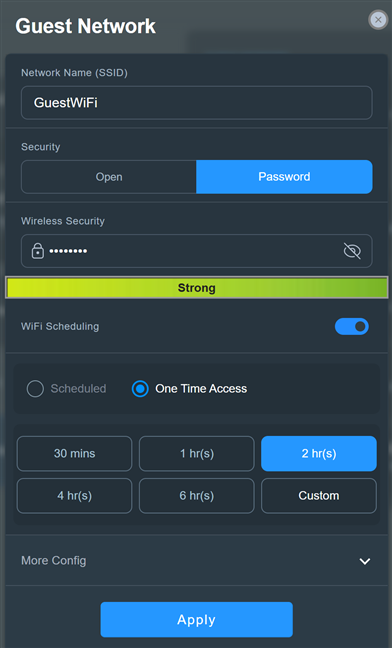

Choose to use a password
If you select Scheduled, you can set the guest Wi-Fi to start and stop broadcasting automatically, whenever you decide. You can also set the network to be available during one or more weekdays or have it available all day long on the days you select. If you choose to schedule the guest network like this, don’t forget to click or tap Save for your settings to be remembered.
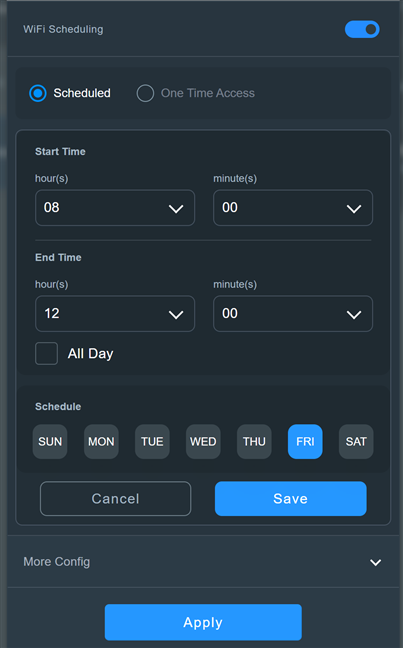

The options for scheduling the guest Wi-Fi
I don’t think home users will appreciate the options presented earlier, and they’ll prefer to create a guest network that is available at all times. If you want the same, simply click or tap the WiFi Scheduling switch to disable it.
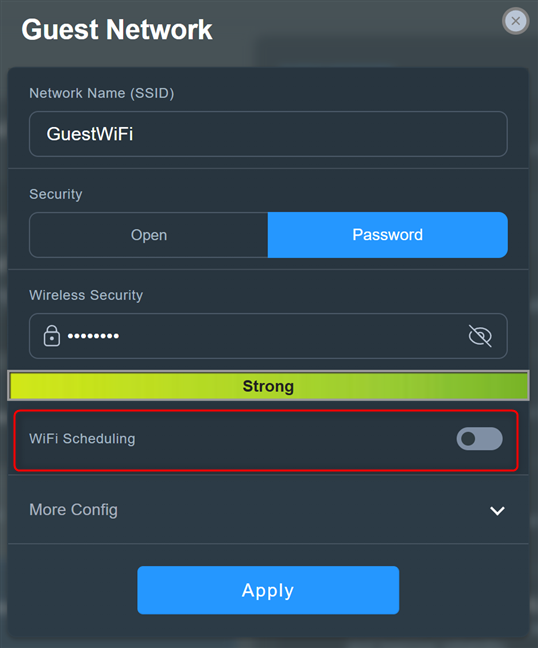

Disable WiFi Scheduling
To access more configuration options, click or tap More Config. You can then select the WiFi Band for the guest network, enable and set the Bandwidth Limiter (useful for people with a slow internet connection), give your guests access to the intranet (I recommend you don’t and keep the Access Intranet switch turned off), or enable AdGuard (a paid DNS service which can block ads and protect your privacy).
When you’re happy with the settings you’ve selected for the guest Wi-Fi, click or tap Apply.
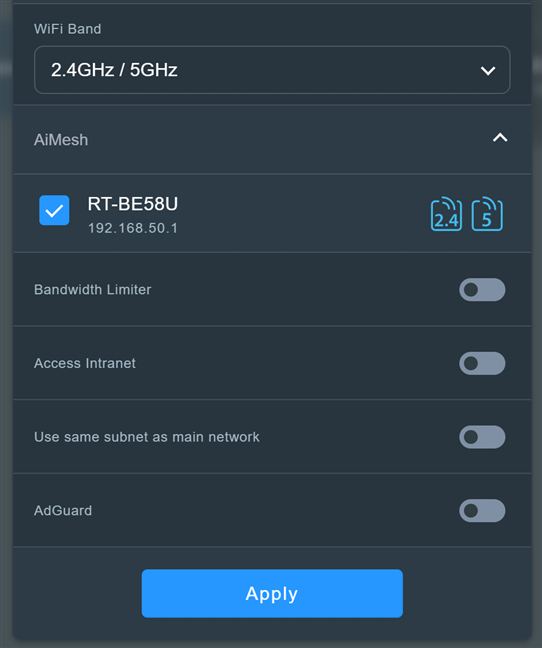

Set up the guest Wi-Fi and click or tap Apply
Your ASUS router or ZenWiFi system will reboot its Wi-Fi radios and then start broadcasting the guest Wi-Fi according to the settings you have provided. The network should be visible and usable after a minute or two.
How to create a Guest Wi-Fi network from the ASUS Router app
Open the ASUS Router app on your smartphone and sign in to your router, if required. In the Home section of the app, tap the plus sign (+) in the top right corner.
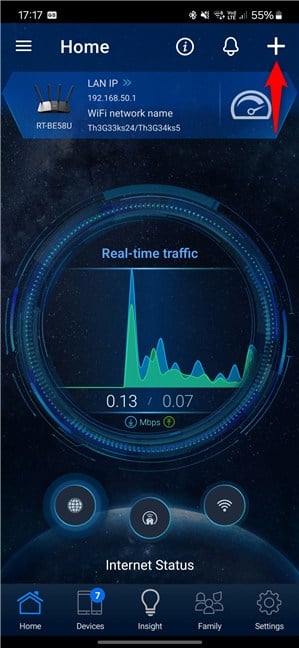

In the ASUS Router app, tap the plus sign
This action opens a list of options. Under Create Self-defined Network, tap Guest Network.
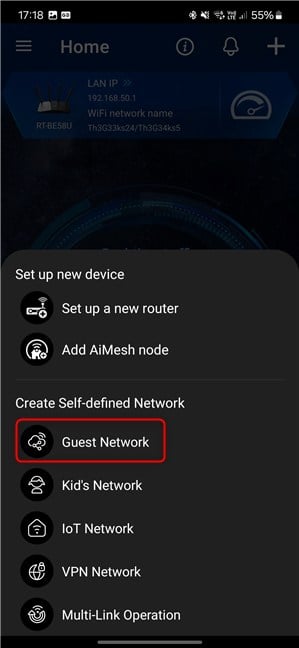

Tap Guest Network
The ASUS Router app displays the options for creating a guest network. As in the firmware of your ASUS router or ZenWiFi system, it suggests creating an Open network, which is very insecure. Type the Network Name (SSID) you want to use, and then tap Password.
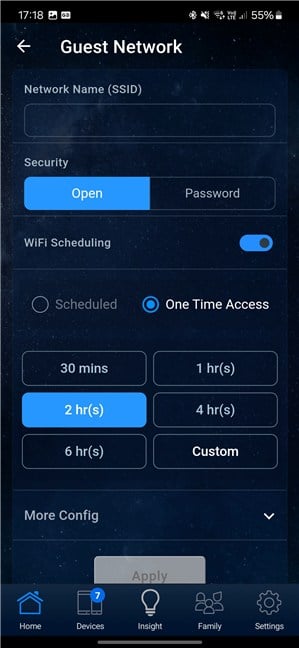

Setting up the Guest Network
Type a password for your guest Wi-Fi in the Wireless Security field. Then, you can configure the WiFi Scheduling options presented in the earlier section of this guide.
If you don’t want to create a network that gives one-time access to your guests for a specific number of hours, or which functions on a specific schedule, tap the WiFi Scheduling switch to turn it off. This way, you’ll create a guest network that is available at all times.
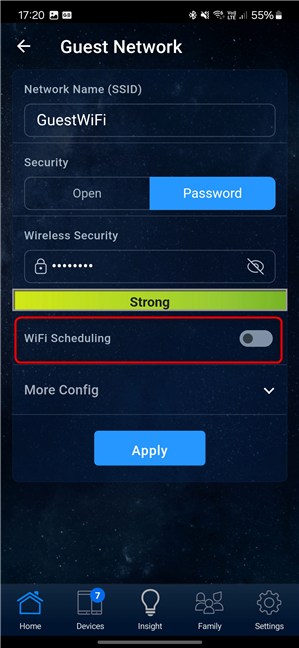

Disable WiFi Scheduling
Next, tap More Config to reveal additional options. You can then select the WiFi Band you want to use for the guest network. If your internet connection is slow, it’s a good idea to choose 2.4 GHz. You may also want to enable Bandwidth Limiter and set up a maximum bandwidth for your guests. Don’t enable the switch for Access Intranet, as your guests will also get access to your main network, which exposes you to security and privacy risks. When you’re done setting things up, tap Apply.
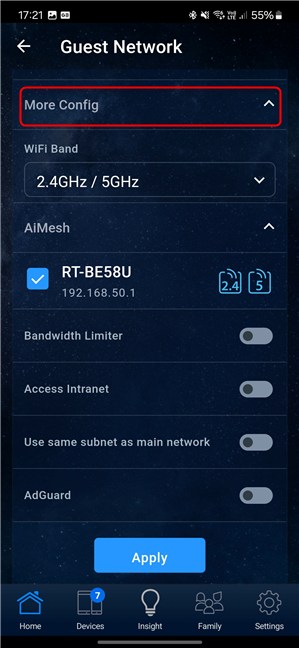

Tap More Config and personalize the guest network
You are informed that changing your Wi-Fi settings temporarily interrupts your wireless network. Tap OK to continue.
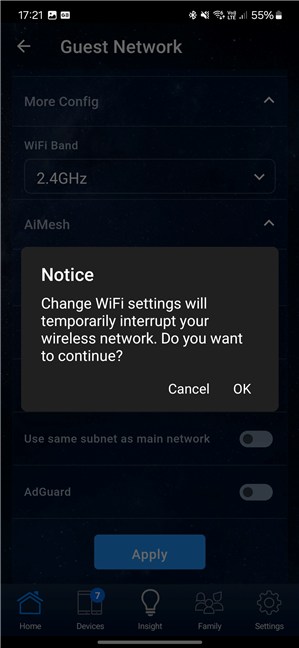

Tap OK to continue
Your guest Wi-Fi network is now created. This process takes a minute or two, depending on your router. Your Wi-Fi may not work during this time. The ASUS Router app informs you to reconnect to your Wi-Fi when it becomes available again. Tap Got it, and do as instructed.
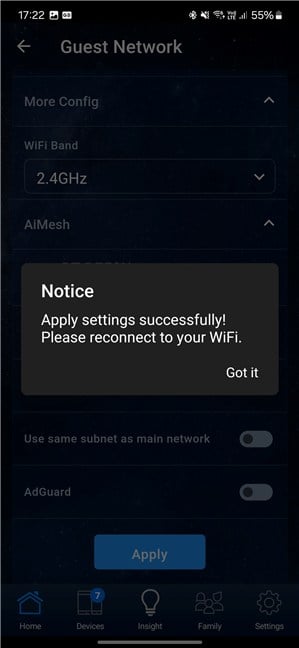

Reconnect to your Wi-Fi, when available
You should see a list with all your Wi-Fi networks in the ASUS Router app, including the guest Wi-Fi you’ve just created. If this is the case, the network was successfully created, using the settings you’ve provided.
Did you encounter problems when setting up your IoT or guest Wi-Fi?
As you have seen in this tutorial, ASUS offers many options for setting up your Wi-Fi to work with the IoT devices in your home or workplace. It also does a good job at helping you create a separate wireless network for your guests and keeping them away from your main network to increase security and privacy. While the necessary steps aren’t complicated, some people may stumble upon issues now and then. If you did too, don’t hesitate to share them in a comment, and I’ll try to help if I can.
Source link


