How to use Rufus to create a bootable USB drive with Windows, Linux, or FreeDOS
There are moments when you need to install or reinstall an operating system. That may be Windows 11, a Linux distribution such as Ubuntu, or even something lighter like FreeDOS. Maybe your laptop needs a fresh start, or you’re trying to revive an old PC. Whatever the case, you’ll need a bootable USB drive. I’ve tested different tools over the years, but my favorite remains Rufus. It’s fast, free, doesn’t need installation, and works with a wide range of operating systems. In this guide, I’ll show you how to use Rufus to make your own bootable USB drive. Interested? Then, read on:
What is Rufus and why should you use it?
Rufus is a small app for Windows that helps you format USB drives and make them bootable. I like that it’s so easy to use and how well it handles different operating systems. Sure, there is also Microsoft’s Media Creation Tool, but that only works for Windows. Rufus, on the other hand, goes further: you can use it to create bootable USB drives with Windows 11, Windows 10, or Linux distros (Ubuntu, Zorin OS, Fedora, Manjaro, etc.), and even FreeDOS (which can be useful for flashing BIOS, running old software, or playing old DOS games). Having said that, here are the steps to make a bootable drive with Rufus:
Step 1. Download Rufus
Start by going to the official Rufus website. Scroll down a bit until you see the Download section. Under it, choose the edition you prefer. It’s worth noting that you can get Rufus as a portable app. This means you don’t have to install it and you can run it directly once you download it.
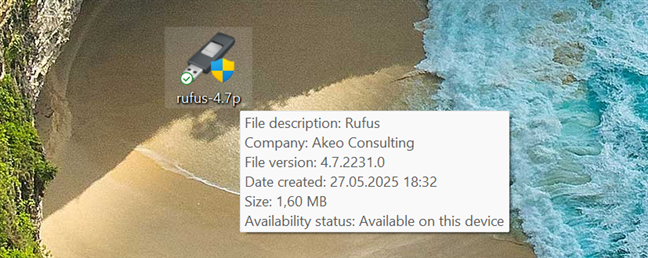
The executable file of Rufus
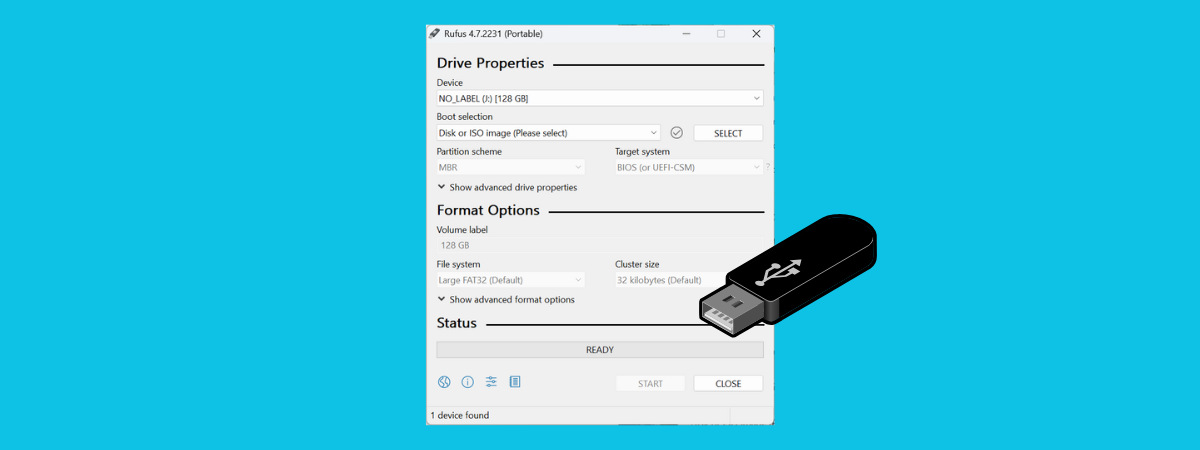
When you run Rufus, you should see a user interface similar to this:
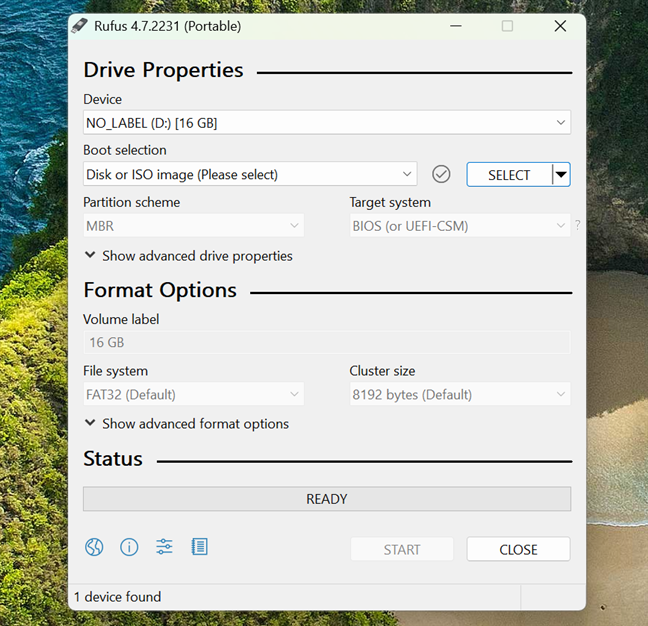
How the Rufus app looks like
Step 2. Plug in the USB memory stick
Next, you have to plug in the USB memory stick that you want to use. Plug it into your Windows PC or device, and Rufus automatically detects it.
When it does, the USB memory stick is included in the Device list at the top of Rufus’ window. If you also have other USB drives like portable hard disks connected to your computer, they are also shown in this list. Make sure that you select the USB stick you want to use and not some other drive, because it is going to be formatted.
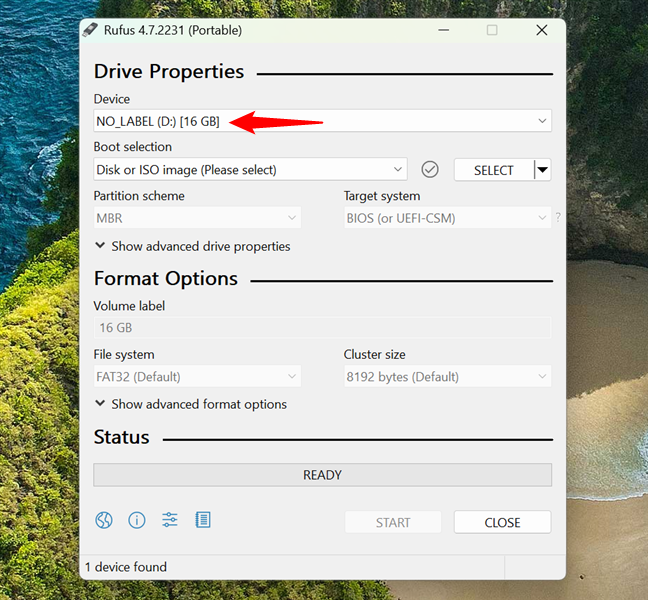
Rufus detected a USB memory stick
Step 3. Choose what you want on the bootable USB drive: Windows, Linux, or FreeDOS
Look for the Boot selection dropdown list. This is where you tell Rufus what kind of bootable drive you want to make:
If you’re creating a FreeDOS USB drive, just choose FreeDOS from the list and jump to Step 5 in this tutorial.
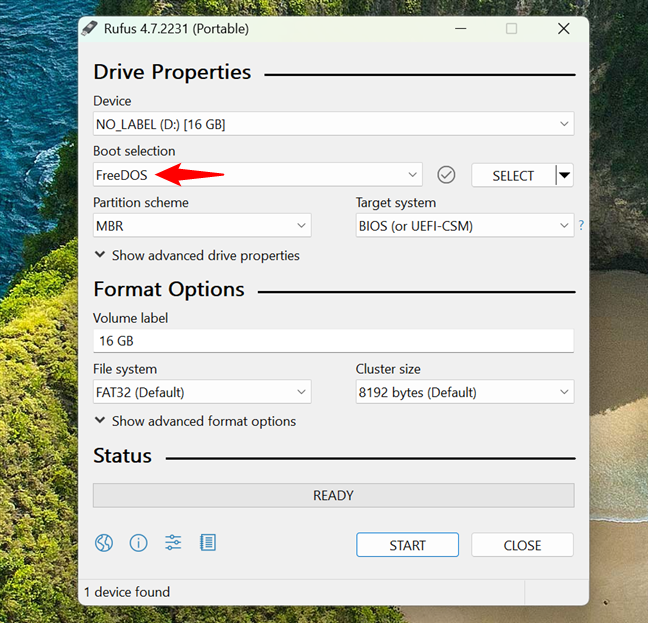
Using Rufus for a FreeDOS USB drive
If you want to create a bootable USB with Windows 11 or Linux, choose “Disk or ISO image (Please select),” then click or tap SELECT.

Choosing to use a disk or ISO image to create the USB drive
Now, browse your PC and select the ISO file for the operating system you want. It can be a Windows 10 or Windows 11 ISO, a Ubuntu ISO, or anything else supported. After you locate the ISO file, select it and press Open.
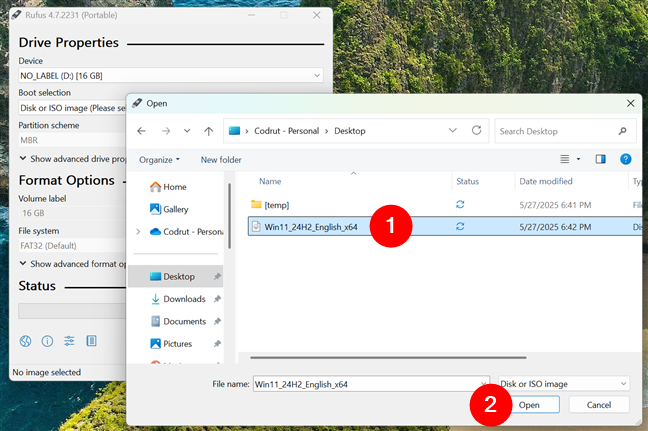
Selecting an ISO file with an operating system
NOTE: If you need some help in downloading an ISO file with Windows 11, read: How to download Windows 11 for free.
Rufus loads the ISO file and adjusts its default settings to fit the operating system in that ISO. Although the default settings should be just right for most people and devices, you might want to change a few of them.
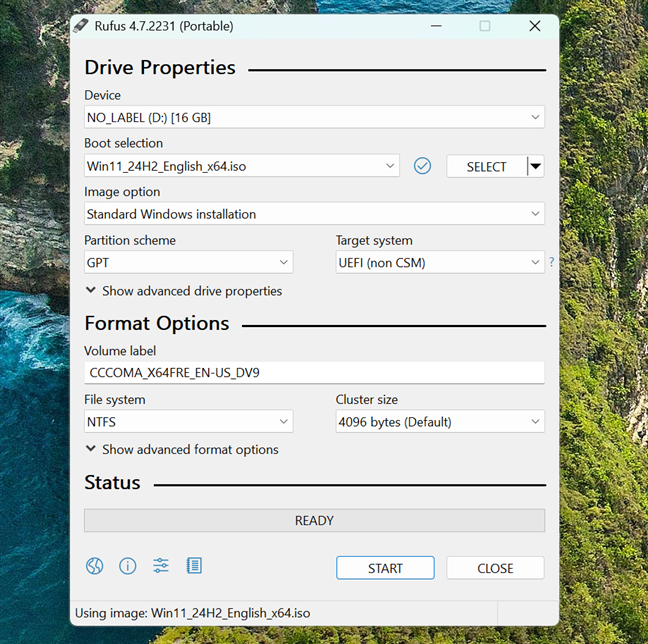
Rufus automatically adjusts the settings for the USB drive
TIP: Did you know you can also install Windows directly on a memory stick or USB drive and run it on any computer? Check out this guide to learn how to install Windows 11 & Windows 10 on a USB drive (Windows To Go).
If you intend to create a bootable drive with Windows or Linux, you might want to pay particular attention to the Partition scheme and Target system settings.
Step 4. Set the correct options for the bootable USB drive
Rufus usually adjusts everything automatically based on the ISO you’re using, but it doesn’t hurt to check:
Creating a bootable USB drive for modern PCs (UEFI)
If you want to install Windows or Linux on a fairly new PC with UEFI and a GPT partition scheme, you should choose the following settings:
- Partition scheme: GPT
- Target system: UEFI (non-CSM)
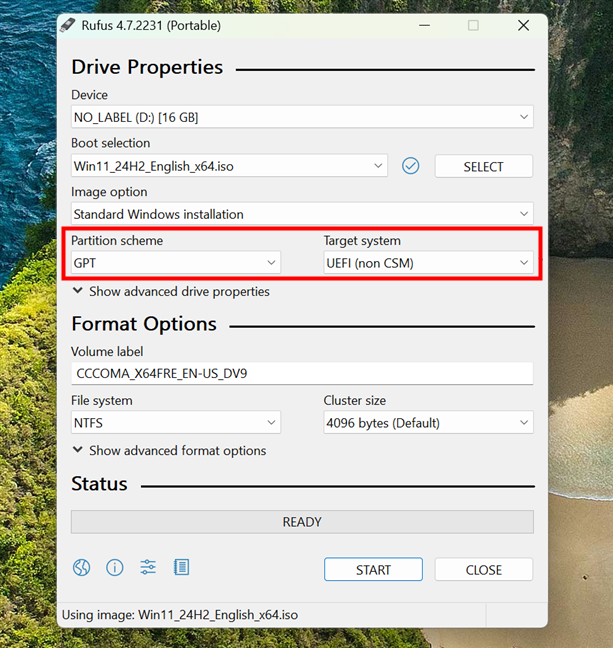
Rufus set for installing Windows on a PC with UEFI and GPT
Creating a bootable USB drive for older PCs (BIOS or legacy boot)
If you want to install Windows or Linux on an older device with a traditional BIOS or UEFI set to compatible mode and an MBR partition scheme, you should choose the following settings:
- Partition scheme: MBR
- Target system: BIOS (or UEFI-CSM)
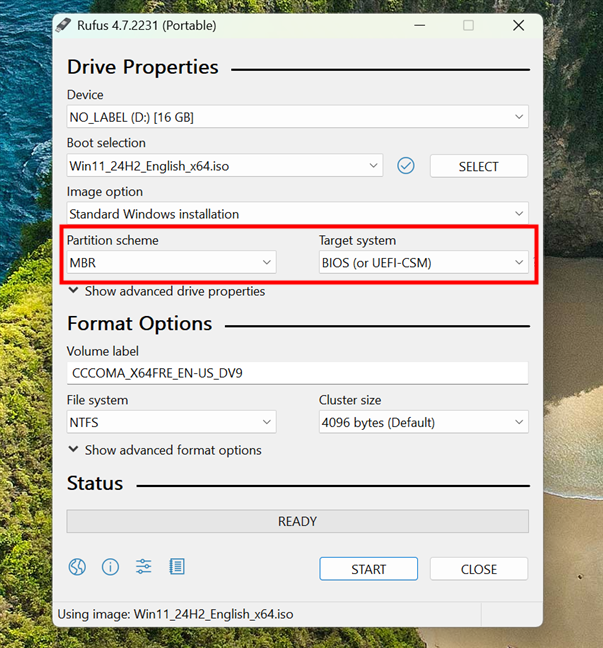
Rufus set for installing Windows on a PC with BIOS and MBR
You can also check the other few options available, but unless you know what you are doing, I recommend leaving them as they are. Rufus automatically adjusts everything else.
TIP: If your Windows computer is no longer booting correctly, here’s how to repair the EFI Bootloader or the MBR (Master Boot Record).
Step 5. Create the bootable USB drive
The final step is to click or tap START.

Starting the creation of the bootable USB memory stick
However, what happens next depends on what you choose to put on the USB drive:
Using Rufus to create a Windows 11 USB drive
When you create a bootable USB drive for Windows 11 using Rufus, a special window called Windows User Experience pops up, like the one in the next screenshot. This dialog gives you options to customize the Windows 11 installation.
For example, you can choose to remove requirements for 4 GB of RAM, Secure Boot, and TPM 2.0, which are normally mandatory for installing Windows 11. You can also skip the need for a Microsoft account and set up the system with a local user account instead. Other options include disabling data collection, skipping privacy questions, setting regional preferences, or turning off automatic BitLocker encryption.
After selecting the changes you want, you just click or tap OK, and Rufus applies them when creating the bootable USB drive. And if you need more details on all of this, check out the second method in this guide I wrote a while ago: How to install Windows 11 on unsupported hardware.
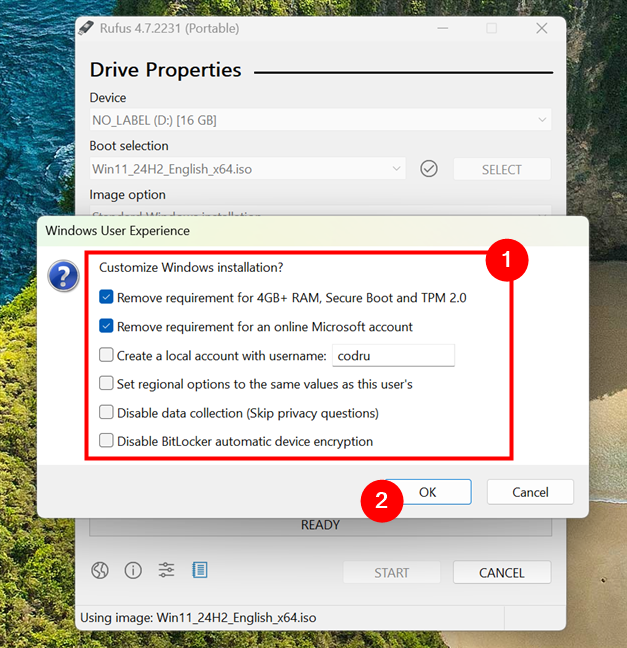
Customize Windows 11 and remove requirements
Rufus might show a warning that all data on the USB stick will be destroyed. Click or tap OK to continue.

The USB drive will be erased
Depending on the size of your ISO and the speed of your USB drive, this step can take anywhere from a few seconds to several minutes. While Rufus is working, you see a green progress bar at the bottom of the window that shows how far along the process is.
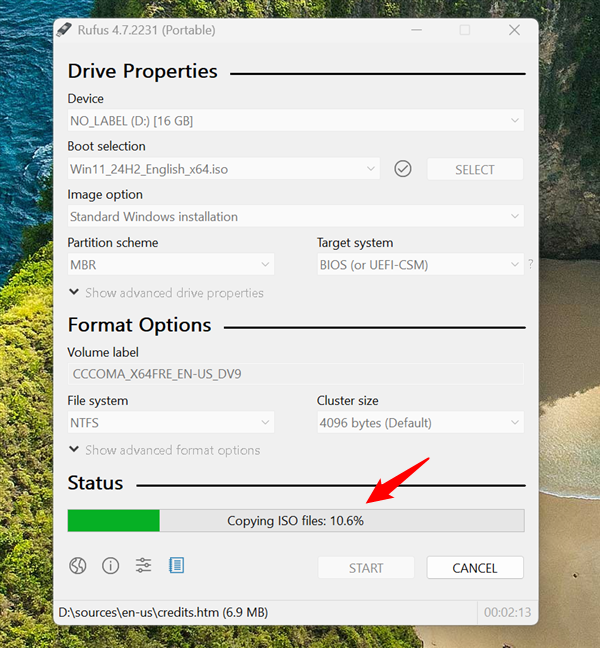
The progress bar at the bottom of the Rufus app
Once the bootable USB is ready, Rufus displays a status message to let you know that the process is complete.

Rufus finished creating the Windows 11 USB drive
Using Rufus to create a Windows 10 USB drive
If you’re using Rufus to create a bootable USB drive for Windows 10, you should also see a Windows User Experience window like the one shown below. This dialog lets you apply a few optional tweaks to the installation.
For instance, you can set up a local account with a predefined username, skip privacy questions by disabling data collection, match the regional settings to your current Windows setup, or disable BitLocker automatic device encryption. Unlike the version for Windows 11, this screen doesn’t offer options to bypass system requirements simply because Windows 10 doesn’t have the same strict hardware checks.
Once you choose the customizations you want, click or tap OK. Rufus applies them and then starts preparing the USB drive.
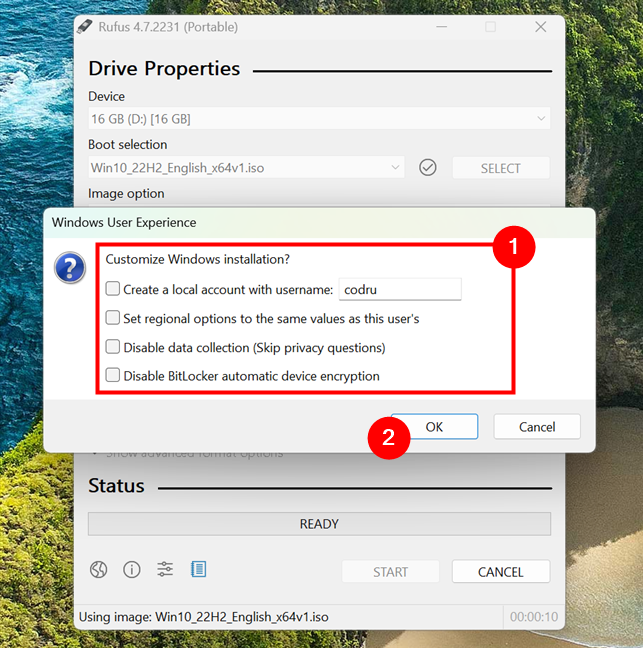
Rufus can customize the Windows 10 USB drive
Next, everything works exactly the same way it does for Windows 11. You practically have to wait until you see the READY message. Then, you can close Rufus, unplug your drive, and start installing Windows 10 on any computer you need. In case you need help with that, here’s a step-by-step guide: How to install Windows 10 from a USB drive, DVD, or ISO.
Using Rufus to create a FreeDOS USB drive
If you choose to install FreeDOS, there’s nothing more to do after you press START. Just wait, as it won’t take long before the USB drive is READY.
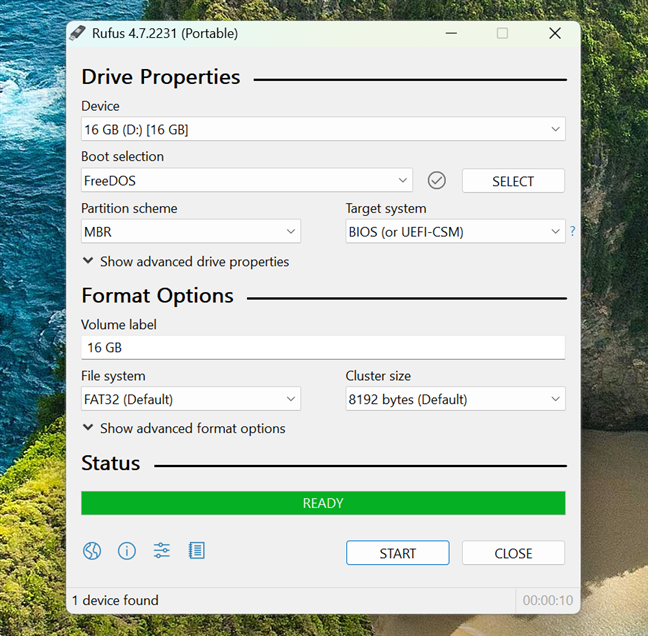
Rufus made a bootable USB memory stick with FreeDOS on it
You now have a fully functional bootable USB drive that you can use to run FreeDOS on any computer you want.
Using Rufus to create a Linux (Ubuntu) USB drive
When you’re using Rufus to create a bootable USB drive for Linux distributions like Ubuntu, you may see an ISOHybrid image detected window like the one below. This pops up because many Linux ISOs are “hybrid,” meaning they can be written to the USB drive in two different ways: ISO Image mode or DD Image mode.
Rufus recommends using ISO Image mode, which writes the files in a format that allows you to access the contents of the USB stick after it’s created. This is usually the best choice for most users. However, if your USB drive doesn’t boot properly, you can try again using DD Image mode, which writes the entire ISO as a raw disk image. Once you choose the mode (again, ISO Image is generally fine), click or tap OK. Rufus continues the process the same way it does for the other operating systems I discussed earlier.
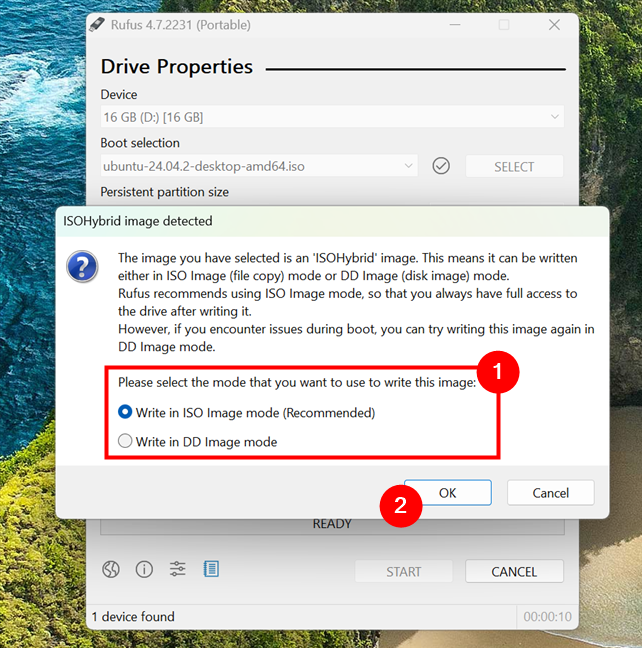
When creating Linux USB drives, you can choose between two different writing modes
That’s it! Once Rufus finishes making the USB drive, you can boot your computer from it and install that Linux distro you’ve been meaning to test for a while now. 🙂
What do you think? Is Rufus worth using?
If you ever need to create a bootable USB drive, either for installing Windows 11, testing out a Linux distribution, or running FreeDOS, Rufus is one of the easiest and most reliable tools you can use. It’s lightweight, doesn’t require installation, and works surprisingly fast. I’ve used it for years on all sorts of systems, and it’s never failed me. And if you’ve got older PCs that don’t meet modern requirements, Rufus can even help you bypass those limitations during setup. Give it a try, and let me know in the comments how it worked out for you. Was everything OK? Or did you run into something unexpected? Don’t hesitate to let me know by commenting below.
Source link