I thought Wi-Fi was good enough until I upgraded to a mesh router — now I’m wiring my whole home for Ethernet
Instead of dealing with slow Wi-Fi speeds in parts of my house this year, I’ve decided it’s finally time to roll up my sleeves, get to work and wire my entire home for Ethernet. Extreme I know, but since I’m paying for a super fast 10 Gbps connection, I don’t want all that extra speed to go to waste.
Although Wi-Fi speeds have certainly improved over the years (especially now with Wi-Fi 7), there’s something to be said for the reliability and raw performance of using a wired connection instead. Likewise, there are no passwords to enter and the rest of your wireless devices will have even more bandwidth to work with.
Now I don’t plan on hardwiring every single device in my home. Instead, I have a select few in mind, such as my desktop and my PS5. So why am I running cable up through the attic to rooms throughout my entire house? Well, it all started when I upgraded to one of the best mesh Wi-Fi systems.
That solved my coverage issues, but when I switched from cable internet to fiber, my internet speeds saw a massive boost. The catch is that with my home network’s current setup, I can’t take full advantage of them.
Here’s how I plan to wire my whole house for Ethernet and why I came to this conclusion after dealing with inconsistent Wi-Fi speeds for years now.
Mesh (almost) solved my connectivity problems
Back when I first moved into my house, I finally said enough was enough and bought one of the best Wi-Fi routers with my own money instead of renting one from my internet service provider. While it was a nice router and worked well, it just didn’t have the range I needed. You see, up until then, I had only lived in apartments and with a big, one-story house like mine, a single router just couldn’t cut it.
There were Wi-Fi dead zones everywhere and in places like my garage, I could barely get a signal. I tried using one of the best Wi-Fi extenders at first; when that didn’t fix things, I knew I would have to go bigger.
To that end, I picked up the TP-Link Deco XE75 in a three-pack. With one unit serving as the main router and the other two satellites strategically placed throughout my home, my range issues were solved — at least I thought they were.
I ended up having to add another satellite on the very edge of my network to finally get decent Wi-Fi speeds out in my garage. With more than two satellites, though, I ran into another problem. You can only have so many hops between satellites before the overall quality of your home network starts being affected.
The reason for this is that instead of using wired backhaul, I was using wireless backhaul for the communication between the main unit that acted as my router and the other satellites. This works well enough in a smaller home with fewer satellites but given all the ground I have to cover with a strong wireless signal, I knew that connecting them to each other via Ethernet would significantly improve my home network overall.
On a gigabit cable internet connection, though, I wasn’t too worried about making full use of the internet speeds I pay for each month. But once I upgraded to Wi-Fi 7 and switched from cable to fiber, everything changed.
Fiber took my speeds to the next level

Last year, I gave my home network a one-two-punch upgrade. I switched from cable internet to fiber while simultaneously upgrading to one of the best Wi-Fi 7 routers. The best part, though: I actually now pay less for 10 gigabit speeds than what I used to pay for just over a gigabit.
If you’re considering switching from cable to fiber as well, I’d recommend shopping around first; you just might be able to find a great deal with a local provider like I did.

To make things easier both for myself and if I ever sell my house, I had the crew who came out to install my fiber line put it right next to where my cable connection comes into my home. That way, I can still have all of my networking equipment in the same spot. This is also going to play a huge role when I start wiring my home for Ethernet, since I can have all of the lines meet in the same space.
Right now, I’m considering doing a hybrid setup where I have an in-wall network cabinet with some of my equipment and a large bookshelf next to it where I have the rest. This will let me quickly add new things to my network without having to reorganize everything inside my network cabinet, and it will give me a bit more flexibility with my smart home hubs and other wired gear that requires extra ventilation.
I know 10 Gbps will certainly be overkill for most people. However, I decided to go for the maximum speeds possible to have plenty of extra headroom when it comes to bandwidth and to futureproof my home network.
Even with all of this extra bandwidth, though, I’m still dealing with the same problems as before. My internet speeds are blazing fast when I connect directly to the main eero Max 7 unit that serves as my router, but the same can’t be said for my Wi-Fi speeds, especially when I move further away from that router.
Wireless backhaul just isn’t good enough
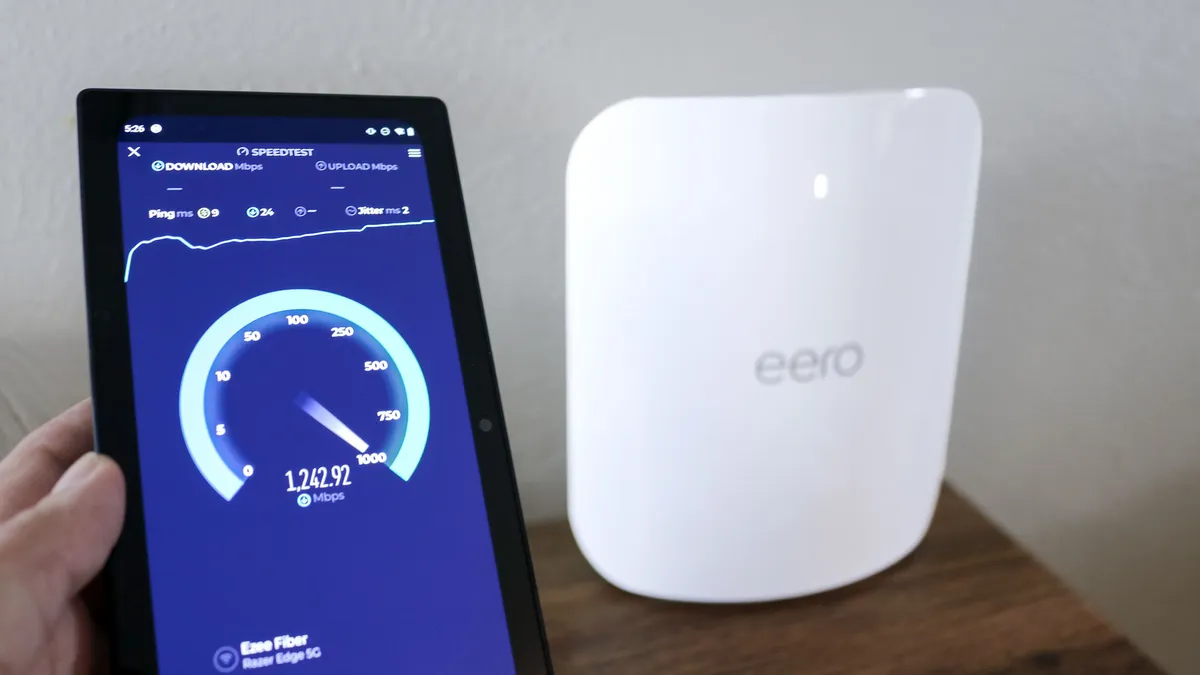
In my game room where I have the main eero Max 7 unit, I often see speeds of over 2 Gbps. This makes sense because, at that distance, my Wi-Fi 6E and Wi-Fi 7 devices can utilize the faster 6 GHz band. However, as you can see here, I don’t get nearly the same speeds in the kitchen on the other side of the house. This is the reality of wireless backhaul — as the signal travels from the main unit to the satellite, the speed takes a massive hit.
Don’t get me wrong, wireless backhaul is awesome. If you aren’t planning to wire your own home for Ethernet and are thinking about upgrading to a mesh router, then you definitely want to look for a quad-band mesh Wi-Fi system like the Asus ZenWiFi BQ16 Pro with an extra band just for wireless backhaul. Likewise, if you’re not using the faster 6 GHz band like I wasn’t back with my TP-Link Deco XE75, you can often use that as a dedicated band for wireless backhaul.
Since I have such a fast fiber connection coming into my home now and I’ve paired that with eero’s top-of-the-line mesh router, I want to make full use of the speeds I’m paying for and what this mesh Wi-Fi system is capable of. While I could use a network switch to connect all of the satellites to my eero Max 7 system, I’ve got another idea since multi-gig switches — especially 10 Gbps ones — are so expensive.

Do you see those two 10 GbE ports on the far right of the eero Max 7? Well, I’m going to use one of those ports to connect the satellites to the main router and the other to connect it to my ONT terminal which converts the data from my fiber line. This will ensure that every satellite has the maximum bandwidth possible; then, I can use those remaining 2.5 GbE ports to connect to a network switch for the rest of my hubs and other stationary wired devices.
With my tentative plan in place, it was time to get the tools and supplies I’m going to need for this project.
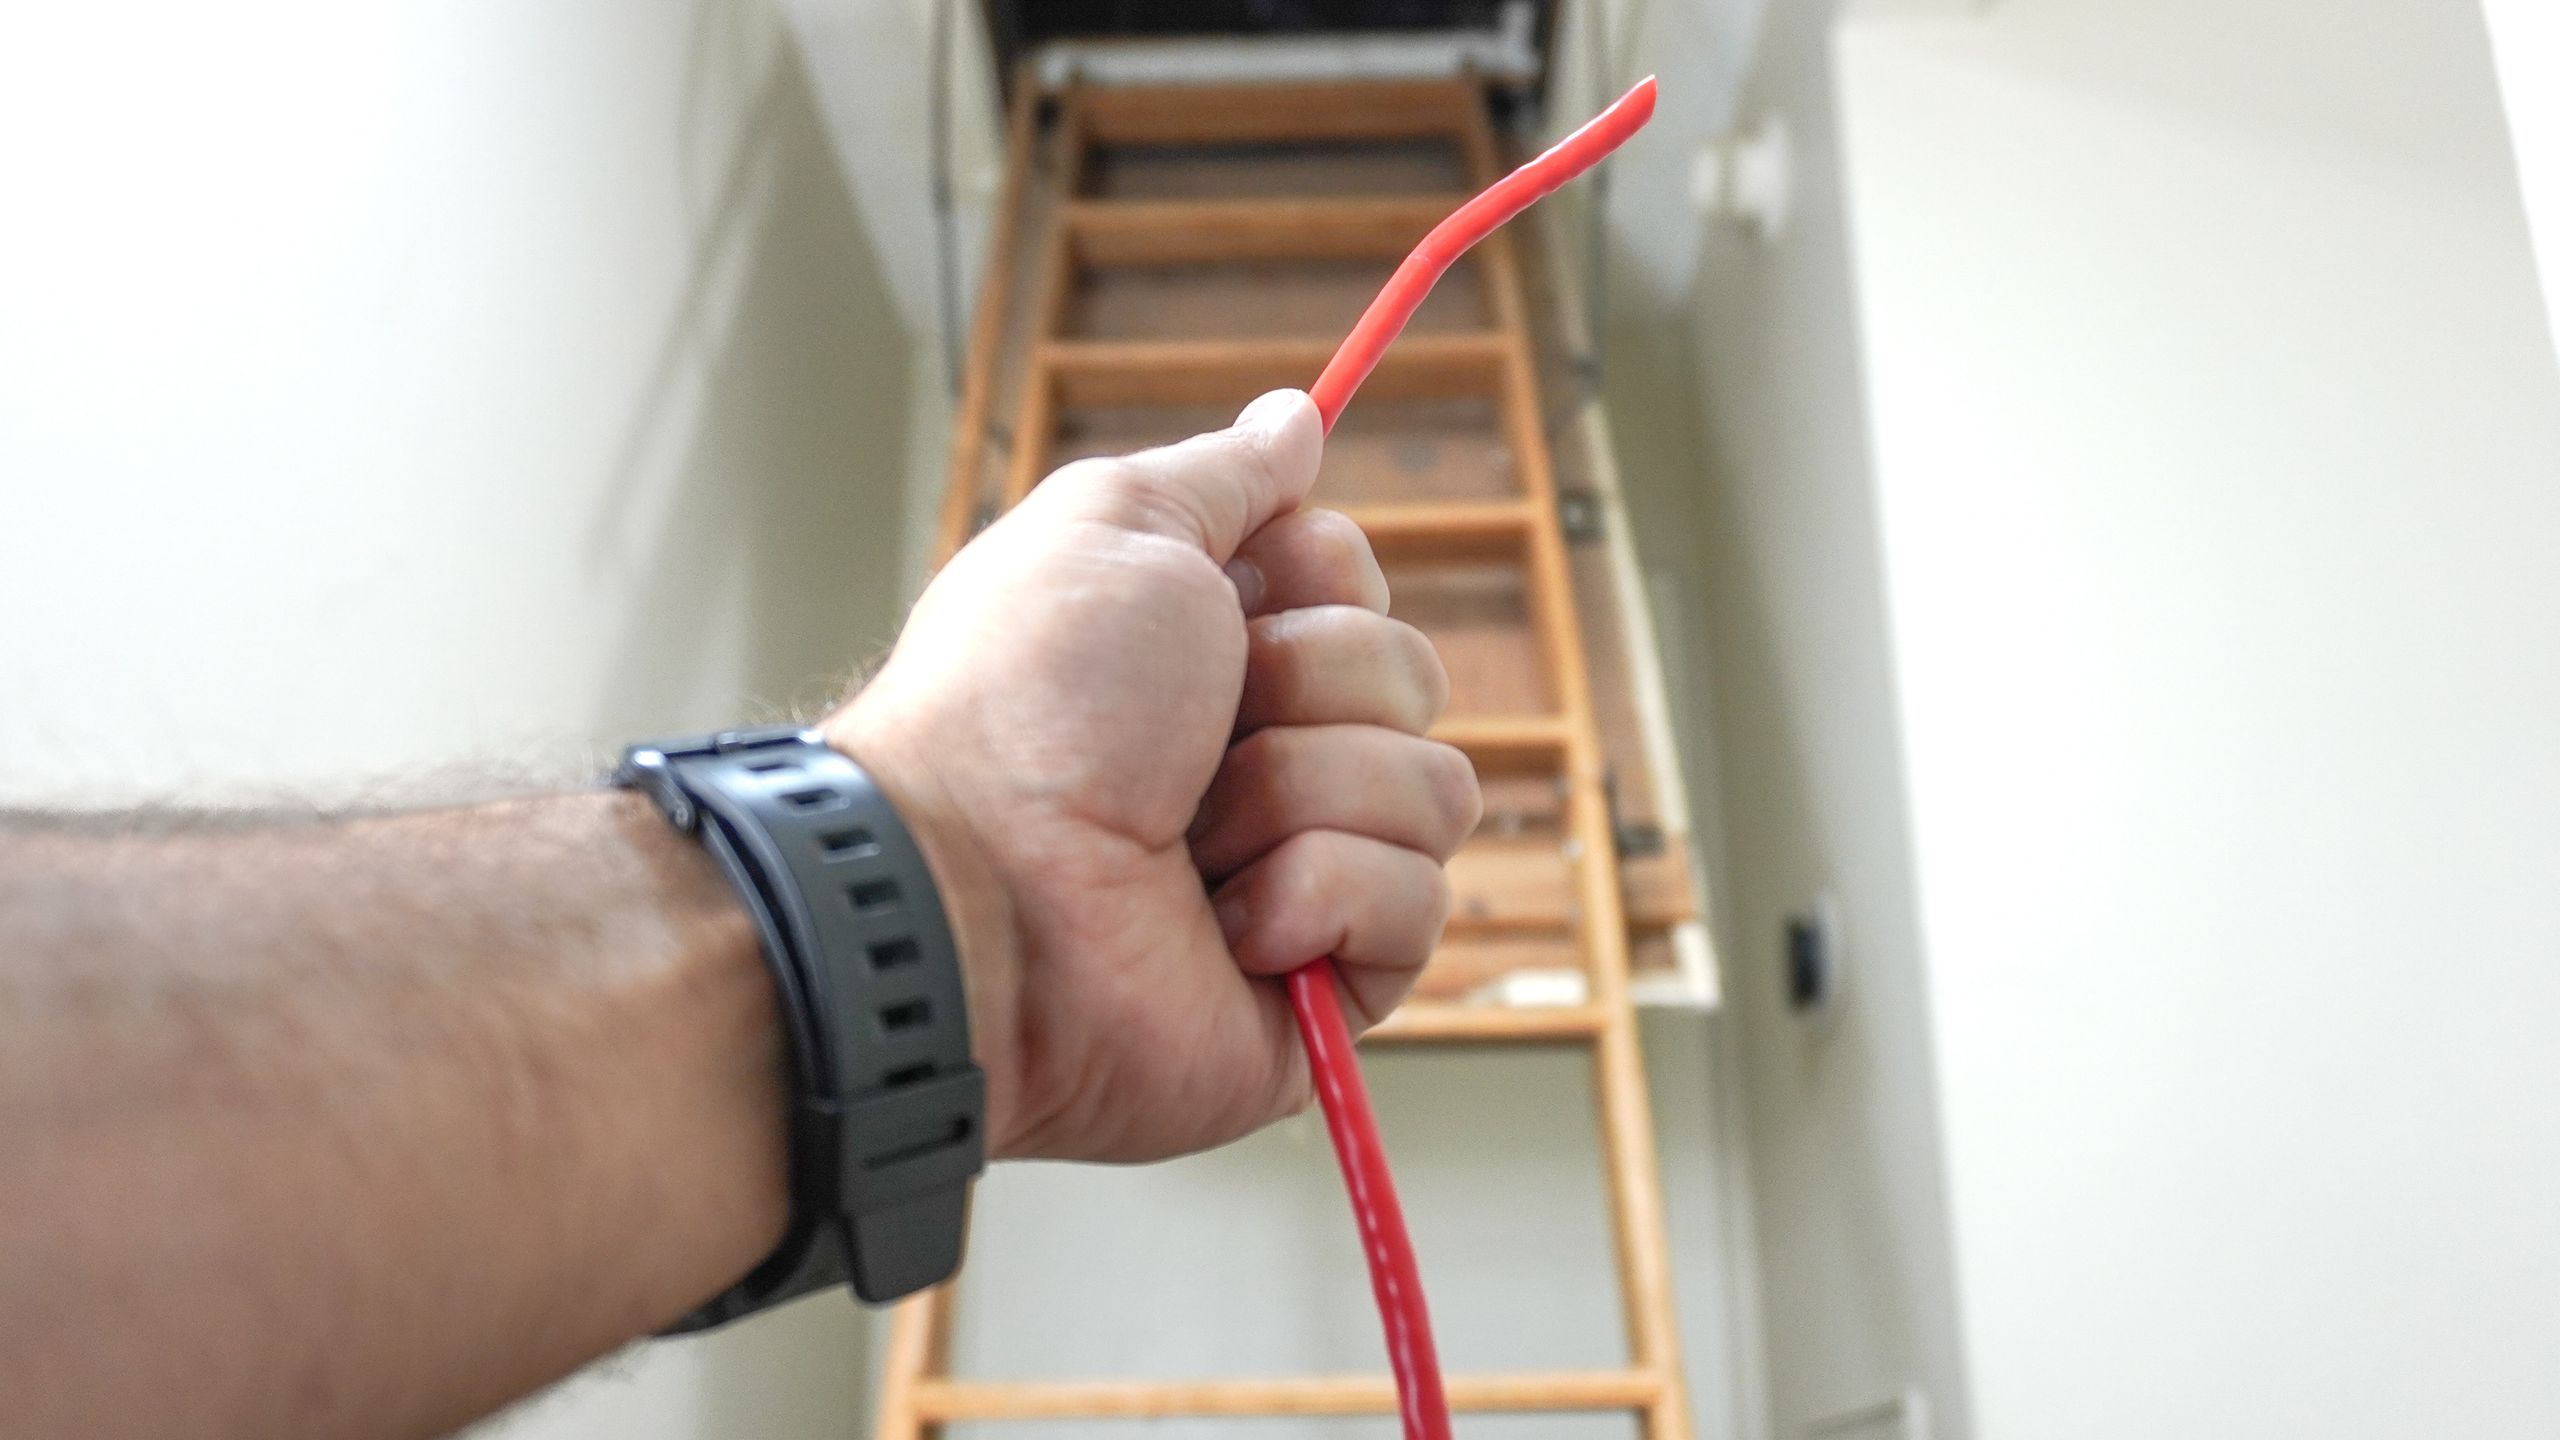
Up to the attic I go

The labor is free since I’m doing it myself — though I guarantee I’ll be laid up in bed after crawling around my attic for hours.
In order to get ready for what I’m sure is going to be a time-consuming project, I did plenty of research into exactly what I needed. Since I want to have multiple lines going to each of my drop points, I decided to go all out and get a huge box of Cat6 Ethernet cable. That way, I would have more than I need for this project with plenty left over in case I want to run some extra lines for a hardwired home security camera system down the line.
I know businesses and professionals like to color-code their Ethernet wire based on what it will be used for. Even though red is often used for high-priority lines, I decided to use it for my whole house so that I’d easily be able to see it up in the attic and coming down through my walls when trying to fish it out of holes. It’s a bit unconventional, but I am wiring my own home for Ethernet, after all.
I also picked up a tool kit with everything I’d need for this project instead of buying everything on its own. From a network cable tester to a universal stripper to an Ethernet crimper, it’s packed with useful tools and gadgets that I hope will make the whole process a lot easier. Finally, I got some mounting brackets and wall plates, as I want this to be a clean install I can look at proudly for years to come.
All told, everything you see here came out to just under $200. I’m sure I’ll need other supplies and tools once I actually get going, but considering the major performance improvements that come from wiring your home for Ethernet, this is a small price to pay. As for the labor, that’s free since I’ll be doing this install by myself — though I guarantee I’ll be laid up in bed after crawling around my attic for hours at a time.
A lot of work but a solid investment

I may be in over my head and not even know it right now, but that’s part of the fun of DIY, right? Spending several days crawling through my attic to pull all of this Ethernet cable is going to be a lot of work. Then there’s the anxiety of putting holes in your walls and hoping they line up with the cables you dropped down from above. Still, if I manage to pull this off, not only will I turbocharge and future-proof my home network, but I’ll be able to proudly say that yes, I wired my home for Ethernet.
I did look into what it would cost to get this done professionally, and the quotes were eye-opening. For a whole-home installation, prices typically fall between $1,500 and $3,500, and professional installers usually charge between $150 and $250 per individual line or “drop.” When you factor in the labor rates for low-voltage technicians — which can range from $50 to $150 per hour — the cost of a professional retrofit adds up quickly. By doing the work myself for just $200 in parts, I’m saving thousands of dollars in labor.
Like I said before, I know having a 10 gigabit connection and a hardwired home will definitely be overkill for most people. However, since I am paying for all that data and my home is a bit of a fixer-upper anyway, why not wire it for Ethernet?
Instead of another New Year’s resolution that falls by the wayside a few months into the year, I decided to pick one that will massively benefit myself and the rest of my family. To hold myself accountable, I’ve already bought the supplies and started documenting the process. I’ll keep you updated with my progress in a future story, but for now, let me know in the comments if your home is wired for Ethernet or whether or not you’d consider taking on a monumental task like this one. Likewise, if you’ve already wired your house, I’d love to hear some of the tricks you used to pull it off.

Follow Digitpatrox on Google News and add us as a preferred source to get our up-to-date news, analysis, and reviews in your feeds.
More from Digitpatrox
Source link