Microsoft will let you uninstall Windows Recall AI feature on Windows 11
- Microsoft adds an entry in the Windows Features settings to remove Recall on version 24H2.
- To uninstall Recall on Windows 11, open Settings > System > Optional features > More Windows Features, clear the “Recall” option, and click the “OK” button.
- You can also use Command Prompt and PowerShell commands to remove the AI feature from the operating system.
On Windows 11 24H2, it might be possible to uninstall the Windows Recall feature. I tried, and it worked.
Windows Recall was supported to be this impressive photographic memory feature that takes screenshots of everything you do on the computer every few seconds and then applies AI to analyze the contents to make the data searchable in a timeline-like interface. However, after many security and privacy concerns, the company pulled out the testing preview of the feature from the operating system.
After many weeks, Microsoft recently gave us an update noting that it will resume testing Recall in October 2024, but only with Copilot+ PCs. One thing the company didn’t mention is that it’ll be possible to uninstall Windows Recall from Windows 11 (sort of).
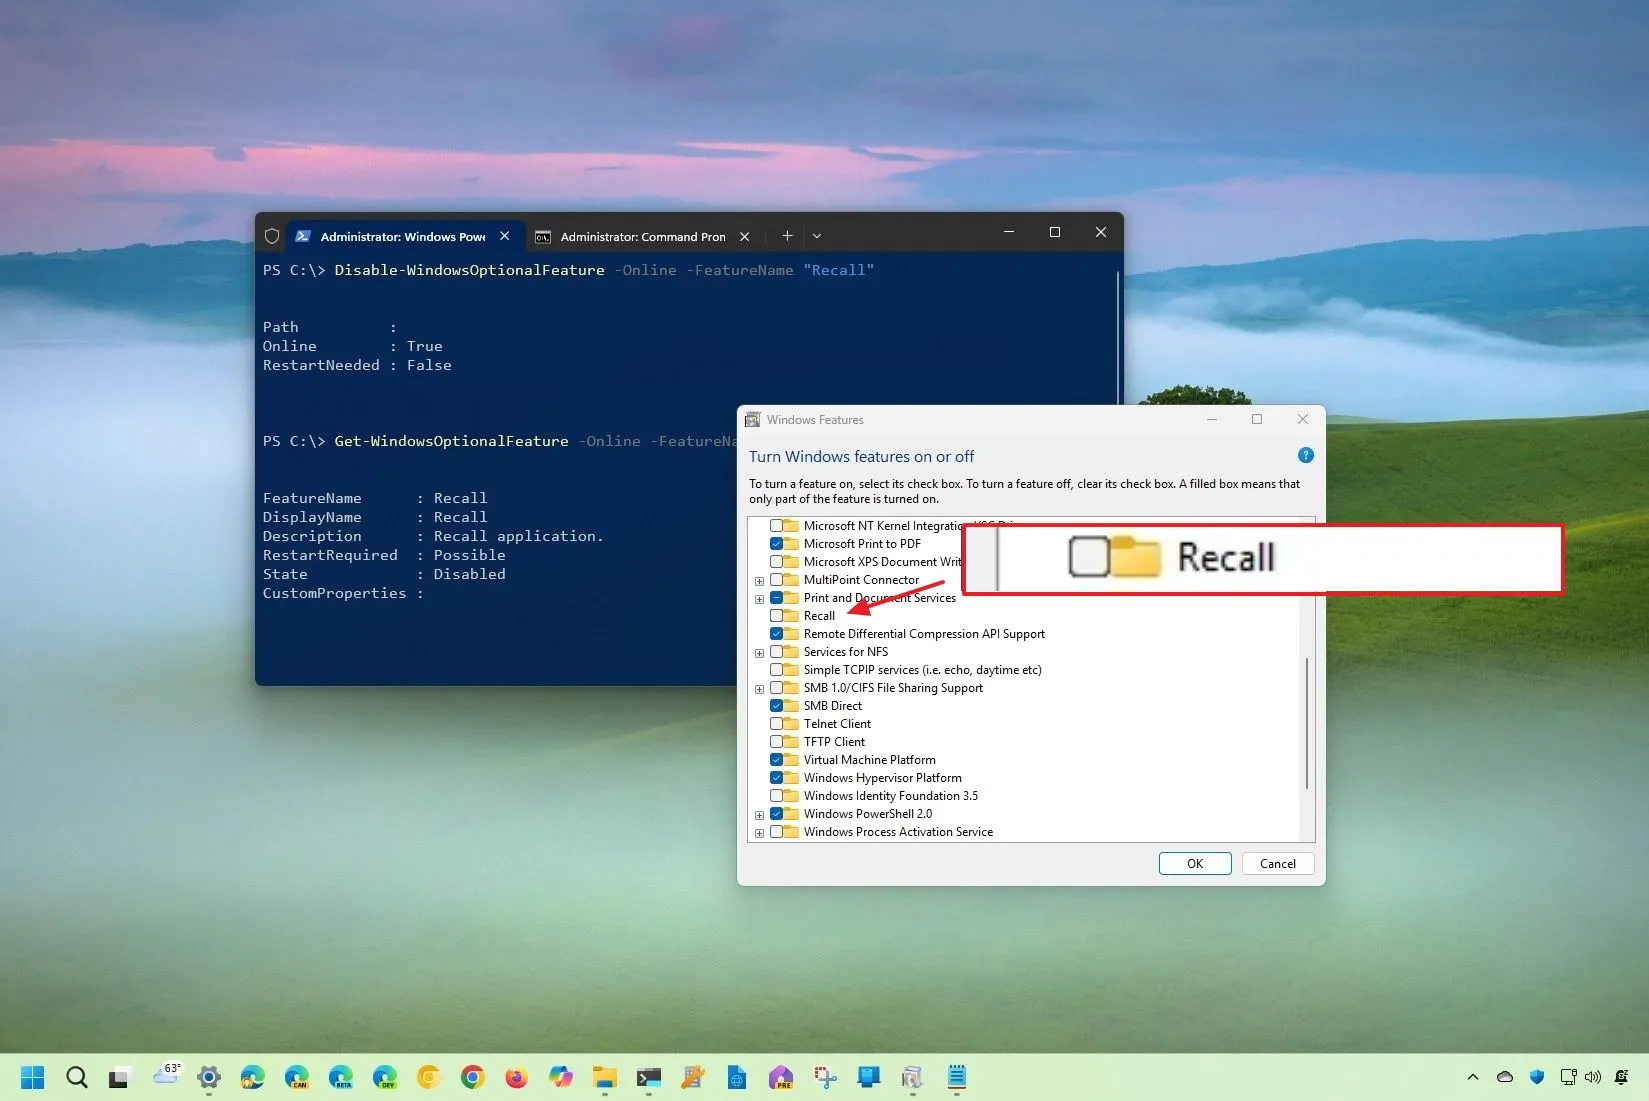
The website Deskmodder spotted that the Windows 11 build 26100.1591 (KB5041865) includes a new entry to uninstall the AI feature from the operating system. Also, I have the update KB5041865 on one of my computers, and I can confirm that the option to uninstall Recall is available through the “Windows Features.” settings. I also took it one step further, and I was able to remove the feature using PowerShell and Command Prompt.
In this guide, I will explain the different ways to completely uninstall Windows Recall from Windows 11 24H2 or higher releases.
Uninstall Windows Recall AI on Windows 11 24H2
To uninstall Recall on Windows 11, use these steps:
-
Open Settings on Windows 11.
-
Click on System.
-
Click the Optional features page.
-
Click the “More Windows features” option under the “Related settings” section.
Quick tip: You can also open this page from the Start menu when searching for “Turn Windows features on or off.”
-
Clear the Recall option.

-
Click the OK button.
-
Restart the computer (if applicable).
Once you complete the steps, the system will uninstall the Windows Recall components from the operating system. However, the “installation” files will remain on the system if you ever want to reinstall the feature, similar to any other optional features available through the “Windows Features” page.
Uninstall Windows Recall AI from PowerShell
To uninstall Recall with PowerShell commands, use these steps:
-
Open Start.
-
Search for PowerShell, right-click the top result, and choose the Run as administrator option.
-
Type the following command to uninstall Recall AI from Windows 11 and press Enter:
Disable-WindowsOptionalFeature -Online -FeatureName "Recall"

After you complete the steps, the PowerShell command will remove the feature’s components from the setup.
Uninstall Windows Recall AI from Command Prompt
To remove Windows 11 Recall with Command Prompt, use these steps:
-
Open Start.
-
Search for Command Prompt, right-click the top result, and choose the Run as administrator option.
-
Type the following command to remove Recall from your computer and press Enter:
Dism /online /Disable-Feature /FeatureName:"Recall"

Once you complete the steps, the DISM command through Command Prompt will uninstall the Windows Recall feature from version 24H2.
One thing to remember is that Recall is only part of the AI platform since Windows 11 24H2 also includes the Windows Copilot Runtime, which is the system that integrates the new AI platform. The runtime combines AI frameworks, toolchains, the Windows Copilot Library, and on-device AI models, and it ends with applications and features that provide AI capabilities in the operating system.
It’s important to note that the feature isn’t enabled by default. It’s a feature you must enable manually. Once it’s turned on, you can always disable Windows 11 Recall through the Settings app.
Why You Can Trust Pureinfotech
The author combines expert insights with user-centric guidance, rigorously researching and testing to ensure you receive trustworthy, easy-to-follow tech guides. Review the publishing process.
Source link