The ultimate Android privacy guide – Computerworld

And one more thing to check: Make your way back to the Google settings menu where we started and tap your name and account name there one more time. If you see any additional Google accounts show up as options, be sure to tap them and follow the same steps we just went over for each subsequent account. Every Google account has its own separate settings, so you’ll have to make sure your ad personalization preferences are adjusted everywhere for them to become truly universal.
8. Reset or erase your Android advertising ID
- Time required: 2 minutes
- Inconvenience level: 2/10
As an alternate path to the full ad personalization opt-out, you can also now reset or erase something known as your “advertising ID” on Android.
That ID is a unique string of numbers specific to your phone that apps can use to identify you. They may not know your name or anything personal about you — unless you choose to share such info — but that advertising ID lets them learn about your interests and behaviors, even so, and then use that data to show you ads that are allegedly more likely to be up your alley.
When you reset or delete that ID, all of that data is lost — and apps have no way to connect your behavior to any consistent identifier associated with you. Again, just like with our last item, that doesn’t mean you won’t see ads within apps or around the web anymore. It just means those ads won’t be programmatically selected based on your ongoing activities and what those suggest about your interests.
Here, too, there’s some nuance available: If you reset the advertising ID, you’ll basically give yourself a fresh start and eliminate any data that’s been associated with your activity up until that moment. If you delete the ID, you’ll make it impossible for apps to identify you entirely (again, unless you choose to provide them with identifying info).
Either way, you can find the option by looking in the Security & Privacy section of your system settings, then tapping either “Privacy Controls” or “More Privacy Settings” followed by “Ads.” You’ll find both possible paths in that area, along with options to see and customize exactly which subject areas apps currently have associated with your ID, to see and customize if and how apps are able to use that data to control ads in other environments, and to opt in or out of allowing advertisers to request info that’d help them measure their ad performance over time.
Android’s advertising ID options are an untapped gold mine of privacy choices.
JR Raphael / IDG
9. Start using a VPN
- Time required: 5 minutes
- Inconvenience level: 2/10
If you’re using a company-connected phone, there’s a decent chance your employer is already providing you with a corporate VPN (virtual private network). But if not, it may be worth your while to set one up on your own.
A VPN, in short, keeps all the data you send and receive on your phone encrypted, private, and secure. Without it, someone could snoop on your connection and intercept sensitive info without your knowledge. (It’s an especially common concern when public Wi-Fi networks are involved.)
With widespread improvements to web security over the past several years, there’s now some debate as to whether a VPN is actually needed in most professional scenarios — especially outside of countries where authoritarian control over internet access is an issue.
Still, as long as you’re using a trustworthy and reputable provider, there’s certainly no harm in having that extra layer of protection in place. And if you’re working with sensitive company data in particular, there may be some significant benefits.
So where to begin? If you’re using a Google Pixel phone, you’ve got a VPN built right into your device and ready to roll without any expense. Just look for the “VPN” option within the Network & Internet section of your system settings, then tap the “VPN By Google” line to get it set up.
If you’re using a non-Pixel phone with the Google Fi wireless service, you also have access to a similar sort of built-in always-on VPN option. Like the Pixel VPN path, it’s free, secure, and as simple as can be to use. You can activate and manage it by tapping your name and then selecting “Privacy & security” within the Google Fi Android app. Look for the line labeled “Protect your online activity” to get started.
If you’re using any other phone and carrier, you’ll need to turn to a third-party provider to get that same sort of functionality. In its latest rankings, our sister publication, PCWorld, recommends ExpressVPN and NordVPN as its top two choices. Both have been consistently well-reviewed for years now.
Both are also minimal hassle once set up on your phone and shouldn’t change much about the way you work, but they do require an ongoing payment — roughly 13 bucks a month for either, with discounts available if you pay for a year or more up front — hence the inconvenience level score. But they’re absolutely more advisable to use than most free or dirt-cheap VPN options you’ll encounter, as those frequently mishandle data and stick you with unreasonably low usage limits in order to make up for their low costs.
10. Add extra encryption onto especially sensitive files
- Time required: 3 minutes
- Inconvenience level: 3/10
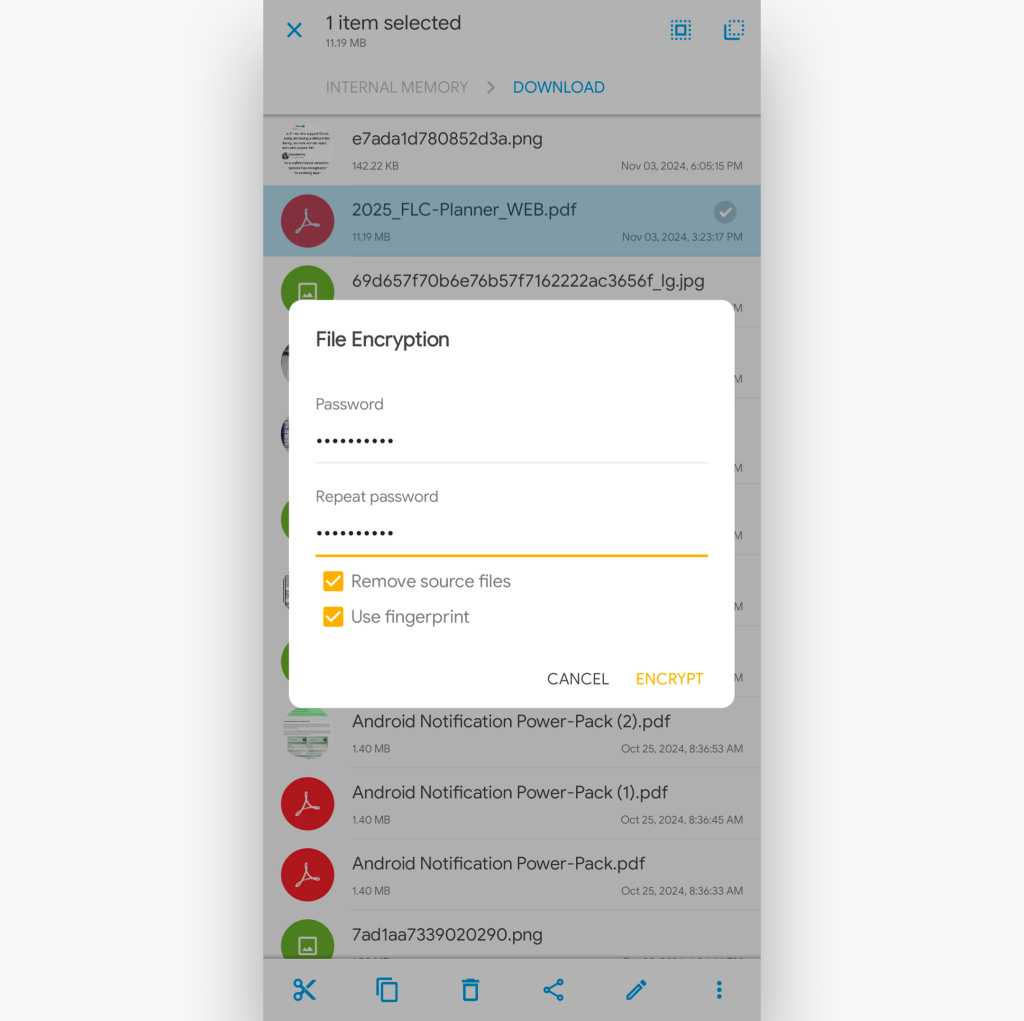
Give sensitive files on your phone an extra layer of encryption with Solid Explorer, which costs $3 after a two-week trial. The app lets you encrypt any file so it can be accessed only after your personal password or biometric authentication has been applied. That does mean you’ll have to unlock the file every time you want to view or share it, which can be mildly annoying — but depending on what type of material you have on your device, it might be worth it for the added peace of mind.

Solid Explorer lets you add an extra layer of encryption onto especially sensitive files.
JR Raphael / IDG
11. Find your Private and/or Safe Space
- Time required: 3 minutes
- Inconvenience level: 3/10
As of 2024’s Android 15 release, Android offers a native way to separate out sensitive apps and add in an extra layer of authentication to protect the information within them. The system also optionally allows you to hide those apps entirely and make ’em visible only after said authentication.
If your device is running Android 15 or higher, you can get started by searching your phone’s settings for Private Space and then selecting the “Private Space” option that shows up in the results.
Samsung devices also offer a similar feature called Secure Folder that’s available even on earlier Android builds. Search the system settings of any Galaxy gizmo for Secure Folder to find that.
And, no matter what type of Android device you’re carrying, you can find similar systems for keeping both files and photos out of sight and password-protected within the Google Files and Google Photos Android apps, respectively. Those systems don’t involve encryption, like our last measure, but they do make it far more unlikely for sensitive files and photos to be found in the first place — should anyone else ever have their hands on your device.
You can find ’em by looking for the “Safe Folder” tile on the Files app’s main screen and the “Locked” option at the bottom of the Photos app’s Collections tab.
12. Rethink your browser setup
- Time required: 4 minutes
- Inconvenience level: 4/10
Google’s Chrome Android browser has all sorts of impressive features, but many of them inherently require some manner of privacy tradeoff in order to work. For instance, you can easily find any page you visited on any device with a super-fast search — but in order for that to happen, Google has to maintain a cross-device record of every site you visit.
Only you can decide whether the conveniences outweigh the privacy tradeoffs, but if you want to make your Android web browsing as private as possible, Mozilla’s Firefox Focus app is hands-down the simplest, most minimal-effort way to make it happen.
Firefox Focus is designed at its core to provide an ephemeral, single-session-only sort of Android browsing experience: No history, cookies, or passwords are ever saved, and the app automatically blocks trackers and ads across the web. When you’re done with a page, you tap a trash can icon in the corner of the screen, and poof: It’s gone for good.
The app also offers a host of “enhanced tracking protection” features that make it incredibly easy to block scripts, cookies, and other forms of tracking, too. You can also configure it to require authentication every time you open it or switch to it from another app, in case you have a browsing session active and want to be sure no one else who holds your phone could possibly find it.
The downside, of course, is that there’s no syncing whatsoever — no ability to access or revisit your browsing history and also no way to find recently opened tabs from within the same browser on another device. Beyond that, aggressive blocking of cookies and other script-oriented elements on the web can often break websites and cause key functions to fail, without any obvious outward indication to you of what’s happening or why. (Believe me, I troubleshoot this stuff with people all the time!)
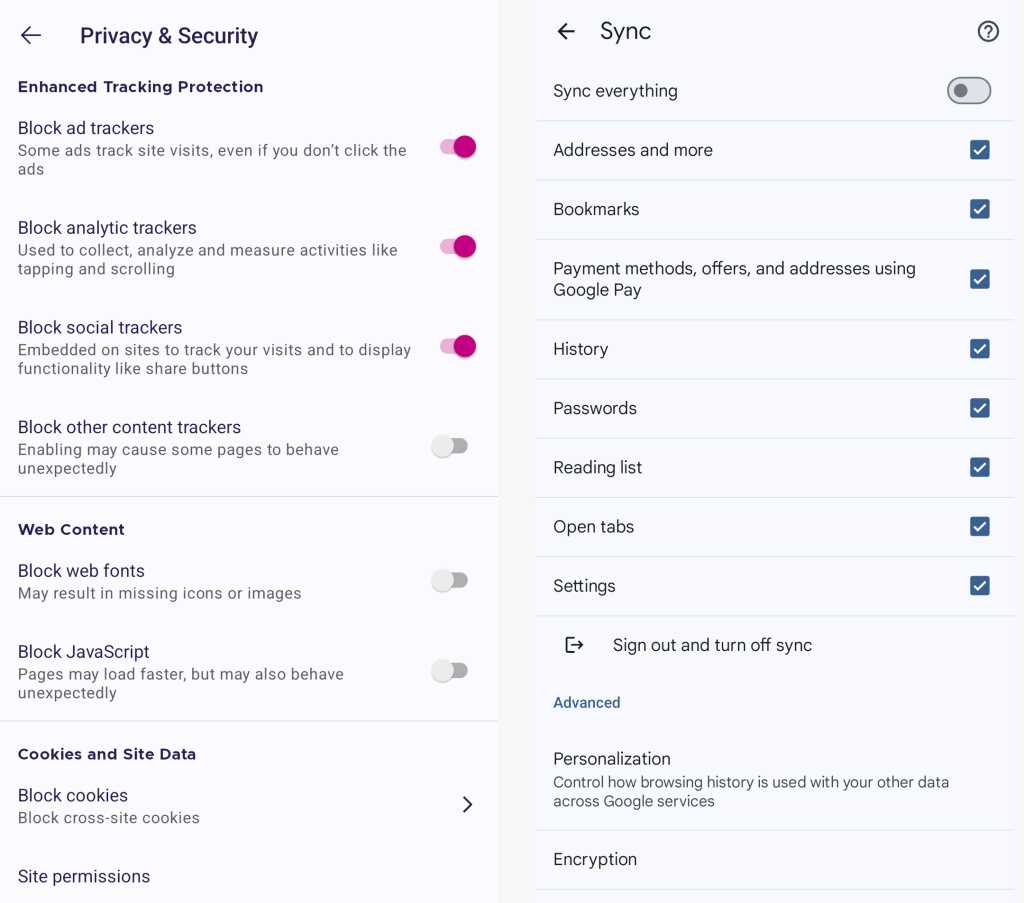
So if you’d rather stick with Chrome, there are things you can do to crank up its privacy protection and create a happy-medium of sorts for yourself. Start in the Sync section of the app’s settings, where you can scale down or even completely disable how different forms of your browsing data are shared with Google. Just remember that the more you disable, the more sacrifices you’ll make in terms of convenience — particularly when moving from your phone to your computer and maintaining a common collection of settings and history.

Firefox Focus and Chrome both offer a fair amount of privacy-related options, depending on which path you prefer.
JR Raphael / IDG
Other places to look include:
- The app’s Google Services section, where you can stop Chrome from sending your browsing data back to Google for different reasons
- The Search Engine section, where you can select any default search service you want
- The Payment Methods section, where you can tell Chrome not to save or store any of your payment info
- The Addresses and More section, where you can turn off Chrome’s on-by-default habit of saving your address and other such details and then offering to fill that in for you in the future
- The Privacy and Security section, where you can control what info sites are allowed to see about you when serving you ads as well as prevent sites from detecting if you have payment info saved, opt out of having Chrome preload pages for faster browsing, and activate an option to lock any incognito tabs every time you exit the app
- And the Site Settings section, where you can prevent all sites from accessing your location, camera, and microphone as well as control if and how cookies are allowed
13. Disable Android’s location history feature
- Time required: 3 minutes
- Inconvenience level: 4/10
By default, Google keeps track of everywhere you go with your Android phone in tow. That allows the software to proactively give you traffic and commute alerts for places you commonly visit and lets your phone make more intelligent suggestions based on your behavior — but it also, of course, gives Google quite the docket of data on your day-to-day whereabouts. (Again, the company doesn’t actually share that info with anyone but does use it to determine what ads are shown to you in certain places.)
If you want to turn off the system-level location tracking, open the Google section of your system settings, tap your name and account name at the top of the screen, then tap the Manage Your Google Account button. Next, tap the Data & Privacy tab and select “Location History” within the “History settings” section. (Note, too, that Google is in the midst of renaming this feature to “Timeline,” so the branding around it may change at some point before long.)
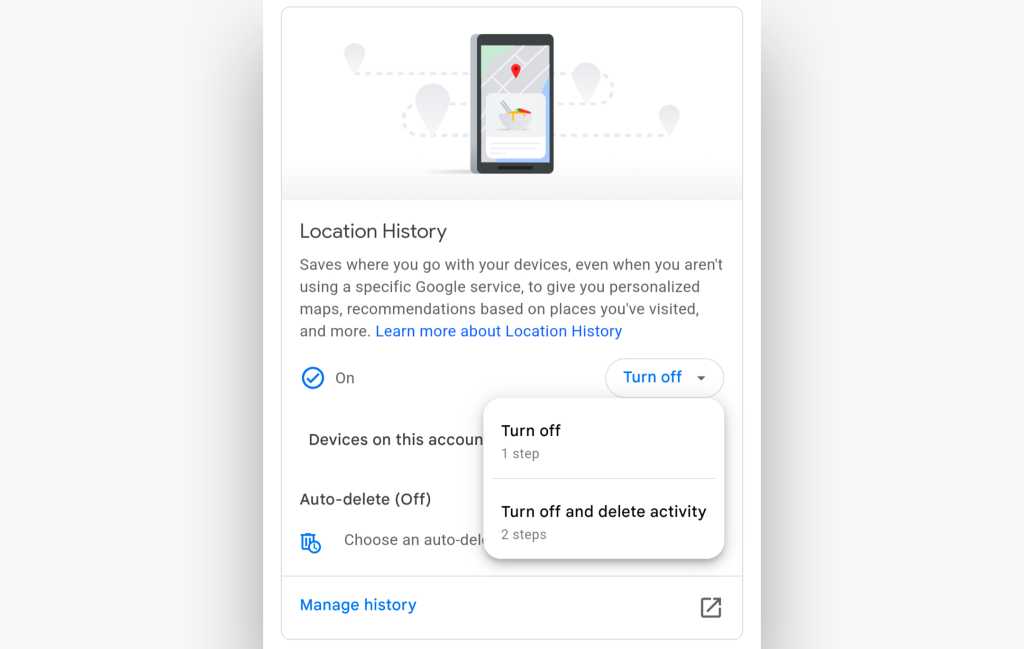
Tap the “Turn off” button on the screen that appears next and select either to turn the system off or turn it off and delete any activity that’s already been stored at the same time — and, either way you go, that’s it: Your phone won’t keep track of your treks anymore.

With a couple quick taps, you can stop Google from keeping track of your location — and optionally also eliminate all the existing data it’s stored.
JR Raphael / IDG
For a more nuanced option, look instead at the “Auto-delete” section directly beneath that button within the same Google account settings screen. There, you can instruct your phone to automatically delete all location data on a rolling three-month, 18-month, or 36-month basis — for a middle-ground possibility that’ll give you some of the standard location-oriented advantages without having quite as much data at play.
Here, too, by the way, settings are controlled on an account-by-account basis, so you’ll want to repeat this process as many times as needed for however many Google accounts you have associated with your device.
Section III: High-level Android privacy enhancements that won’t be for everyone
14. Ditch Gmail or Outlook for a more privacy-conscious email setup
- Time required: 4 minutes
- Inconvenience level: 6/10
If you’re really serious about privacy, ProtonMail is the inbox you want to use. ProtonMail applies end-to-end encryption to every message you send, which makes sure no one other than its intended recipient can ever set eyes on it. It’s a whole other level of protection from what you get with Gmail’s encryption or the encryption provided by most third-party mail servers.
The downside is that you have to either use a special ProtonMail.com address with the service or set up your own domain to work with ProtonMail’s servers — and anytime you’re emailing someone who isn’t a fellow ProtonMail user, you’ll have to encrypt your message with a password and a hint that they’ll then need in order to open it. That isn’t exactly easy, and it requires you to forfeit a fair amount of Gmail’s flexibility and power, but it does give you an awful lot of added privacy in return.
ProtonMail is free at its most basic level, which includes one address and 1GB of storage. If you need more storage or want any extra features — such as unlimited folders and labels and support for custom domains — you’ll have to subscribe to a paid plan, which starts at $48 a year for individuals or $84 per user per year for teams.
15. Encrypt your calls and messages
- Time required: 4 minutes
- Inconvenience level: 6/10
For full encryption on the calling and messaging front, Signal is the service you want. It adds end-to-end encryption only when you’re communicating with other Signal users, however — which severely limits its usefulness — and it doesn’t allow you to send and receive text messages from your computer, as most regular messaging apps now do.
Signal is free to use.
16. Consider other privacy-minded app alternatives
- Time required: 4 minutes
- Inconvenience level: 6/10
If you’re really concerned about maximizing your privacy, you don’t have to stop with swapping out your email, calling, and messaging tools. There’s a whole host of standard Android app alternatives — and also supplements — that offer extra privacy assurances at varying convenience-oriented costs.
Take a peek at my separate list of exceptional Android privacy and security apps for a bunch of possibilities worth exploring — such as:
- Notesnook, a privacy-first note-taking app that adds end-to-end encryption into your virtual notebook
- Cryptee, a fully encrypted vault for word processing as well as photo and general file storage
- Simple Keyboard, an Android keyboard app with absolutely no internet access or data collection
These options won’t be right for everyone, and they require at times significant quality-of-life sacrifices compared to the standard Google equivalents. But if privacy is paramount, they’re well worth your while to weigh out.
17. Disable your Google Web & App Activity
- Time required: 2 minutes
- Inconvenience level: 7/10
By default, Google keeps track of what you do on the web and within its apps, whenever you’re signed into your account (as you generally are while using an Android device). It uses that info to serve up those targeted ads we keep coming back to, of course, but it also uses it to power personalization, results, and recommendations in places like Search, Maps, and also Google Assistant — in the places where that service is still active. Without it enabled, in fact, some of Assistant’s most useful commands won’t work — whether you’ve still got Assistant present on your phone or you’re interacting with it on other Assistant-connected devices.
If you want to disable that tracking, though, you can: Just head back to the Google section of your system settings, tap your name and Google account name once more, and then tap the Manage Your Google Account button followed by “Data & privacy.”
Find and tap “Web & App Activity,” then tap the Turn Off button and decide if you want to simply turn the system off or turn it off and simultaneously delete any already-collected data within it.
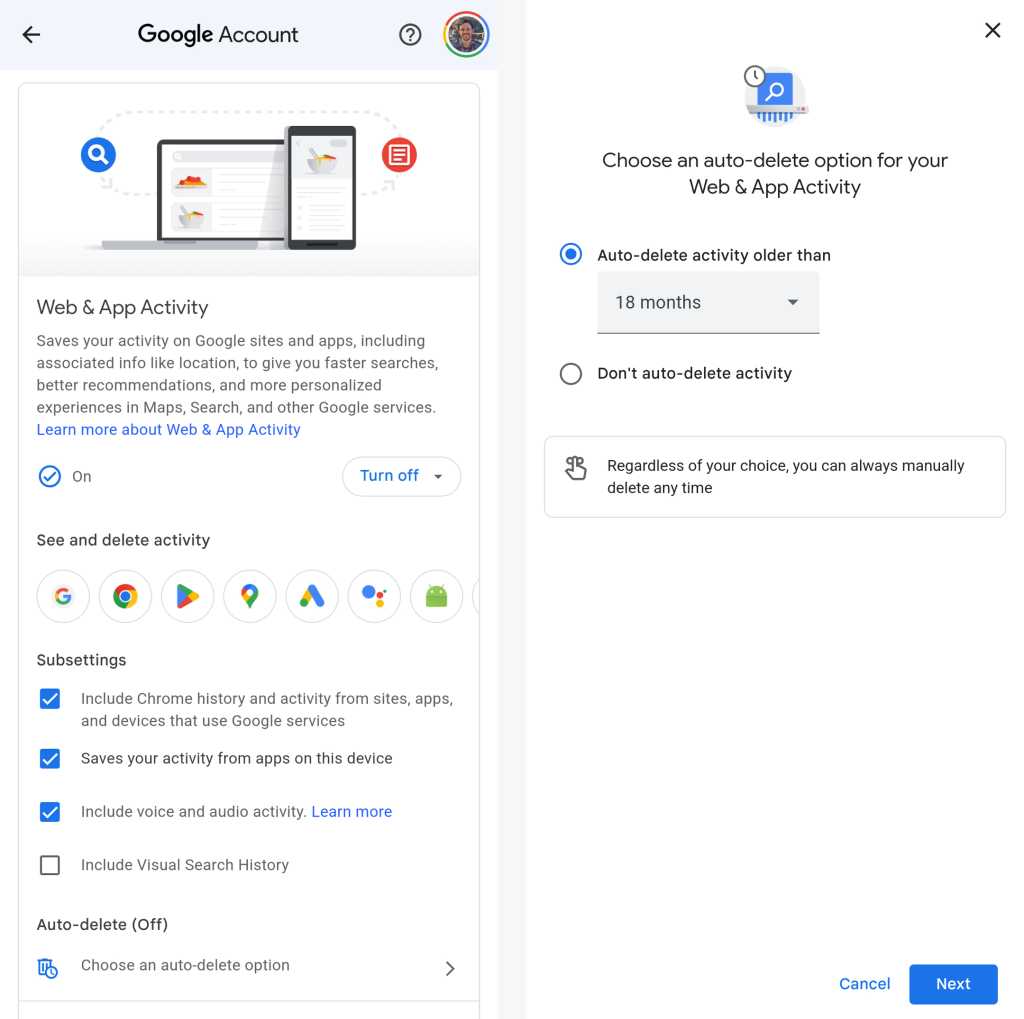
Once again, just like with the location history, you can also get more nuanced and instead ask Google to automatically delete this data on a rolling three-, 18-, or 36-month cycle. And you can specify certain areas of data that you do and don’t want included, too.

Deep within your Android device settings are all sorts of options for disabling or just scaling back the amount of activity Google stores about you.
JR Raphael / IDG
18. Disable your device backups
- Time required: 2 minutes
- Inconvenience level: 9/10
Last but not least, Android has the ability to back up your system data and then restore much of your system setup when the need arises. That’s a supremely handy option to have — but it invariably requires some of your information to be stored within Google Drive in order to work.
Specifically, Google maintains a record of what apps you have installed along with a limited amount of app setting data. It also stores your call history, phone settings, and in some cases your SMS messages for future use.
Disabling Android’s automatic backups will make your life significantly more difficult the next time you move to a new phone or reset your current phone, as everything from your previous setup will essentially be lost (or will need to be moved over manually, which is a pretty massive hassle).
If you’d rather reclaim the privacy required by this feature, however, you can turn the feature off by opening up the System section of your phone’s settings, tapping the Backup option, and flipping the toggle next to “Backup by Google One” into the off position.
On Samsung phones, the option is located within the Accounts and Backup section of the settings, under “Back up data” — beneath the “Google Drive” heading. Samsung also maintains its own separate and redundant backup system, which you’ll also see in this same settings section and can also disable, if you so choose.
As with any of these areas, only you can weigh out the added privacy against the lost convenience and figure out what arrangement makes the most sense for you. But now you know where to look — and you can make your own educated decisions.
This article was originally published in June 2020 and updated in December 2024.
Source link


