
- To create a full backup of Windows 11, open the “System Image Backup” settings in the Control Panel, click “Create a system image,” select the backup external storage destination, and start the backup process.
- You can also use the “wbAdmin” command to create a Windows 11 backup with Command Prompt.
UPDATED 3/17/2025: On Windows 11, creating a full backup to an external USB drive ensures you have a security copy of the entire system (including from secondary hard drives), which allows you to restore your computer in case of critical system problems, malware attacks like ransomware, hardware failure, or when upgrading the primary storage drive.
In addition, a backup can help you roll back to a previous installation after upgrading to a new feature update or an entirely new version, such as Windows 10 to Windows 11.
While Windows 11 has the “Windows Backup” tool, which focuses on safeguarding files and settings through cloud storage, it does not offer a full system image backup. However, the legacy “System Image Backup” tool, accessible through the “Backup and Restore (Windows 7)” feature, remains available for creating backups to external drives, capturing the entire system, including the operating system, applications, settings, and personal data.
It is important to note that “Backup and Restore (Windows 7)” is a deprecated feature on Windows 11, indicating that it is no longer under active development and may be removed in future updates. Microsoft advises considering third-party full backup solutions as alternatives. However, you can still use it to create temporary full backups to upgrade the system drive, protect your previous installation before updating to a new release of Windows, and more.
In this guide, I’ll outline the steps to create a full backup of Windows 11 to an external drive. You can also save a full backup to a network location with these instructions.
Important: You must connect a “USB hard drive” (big drive with the cable) or use a secondary internal hard drive. You cannot use a “USB flash drive” (also called a thumb drive) since they’re slow and incompatible with the feature.
Create full Windows 11 backup to external drive from System Image Backup
To create a full backup of Windows 11 to an external USB drive, use these steps:
-
Open Start on Windows 11.
-
Search for Control Panel and click the top result to open the app.
-
Click on System and Security.
-
Click on File History.
-
Click the “System Image Backup” option from the left pane.

-
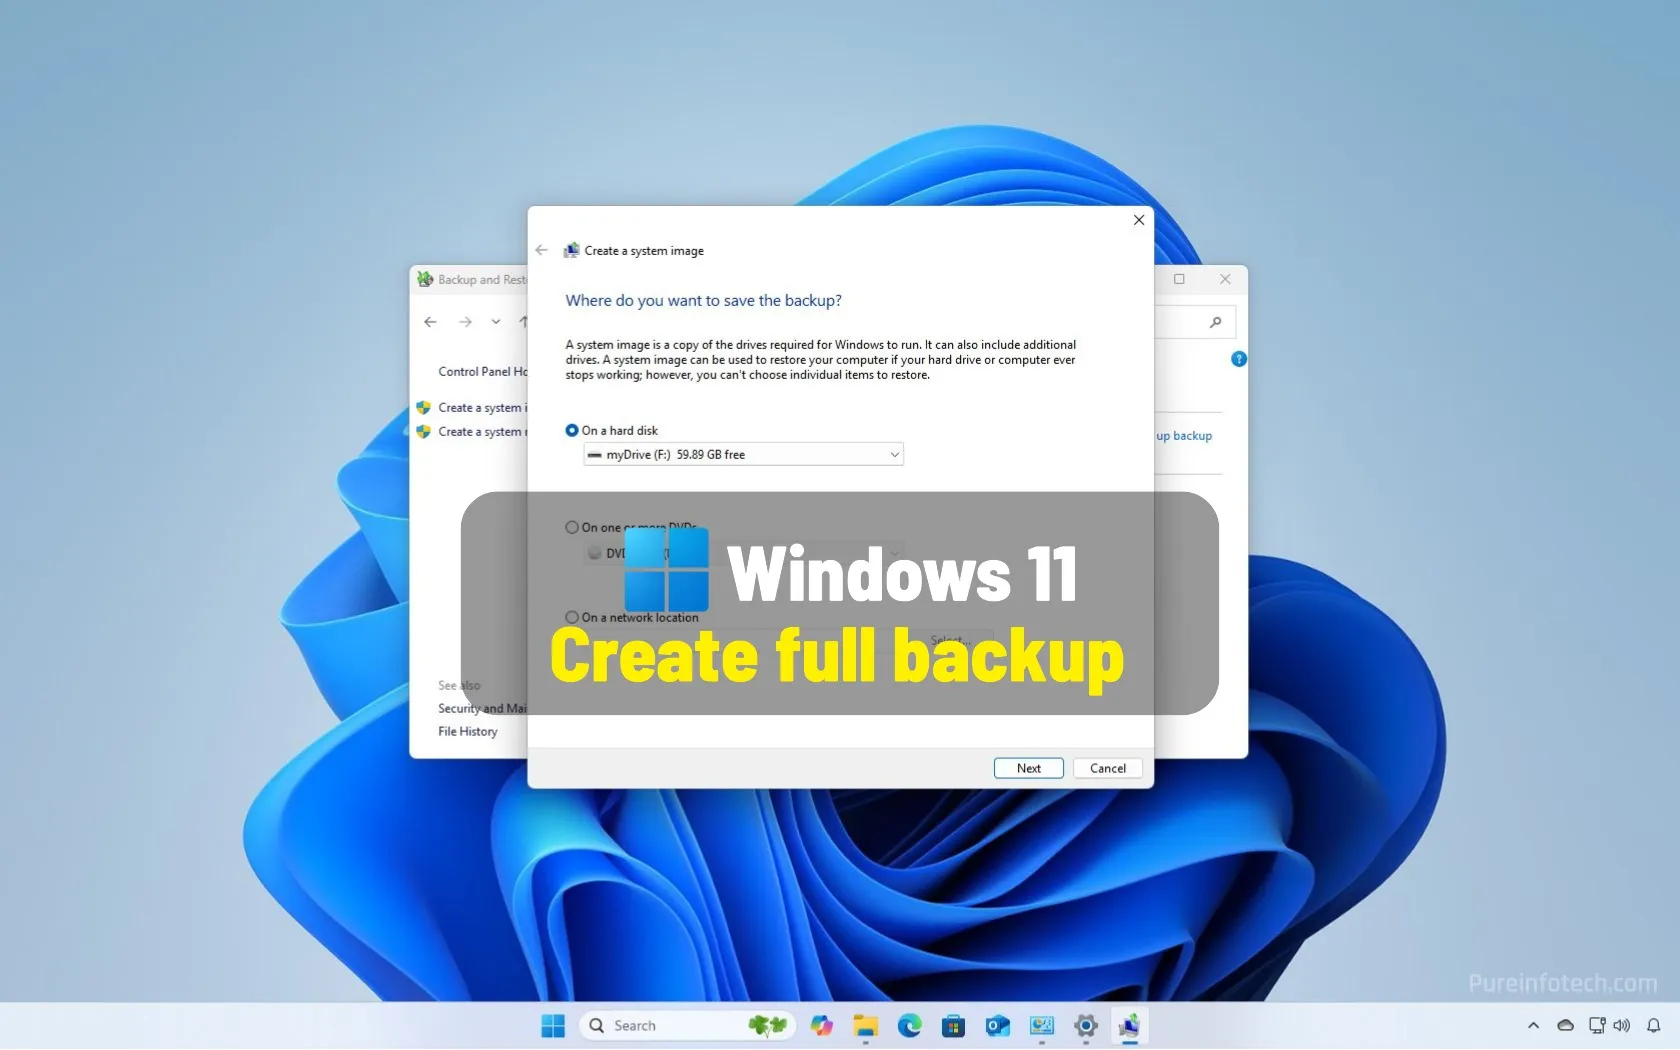
Click the “Create a system image” option from the left pane.

-
Select the external drive to save the Windows 11 backup.

-
Click the Next button.
-
Click the Start backup button.

-
Click the No button.
-
Click the Close button.


Once you complete the steps, a full backup of the Windows 11 device will be created to the external storage with the installation files, settings, applications, and personal files.
You will also be prompted to create a repair disk, but you can ignore this option since you can use the Windows 11 bootable media to access the recovery settings to restore the backup.
Create full Windows 11 backup to external drive from wbAdmin command
To create a backup on Windows 11 with the Command Prompt wbAdmin utility, use these steps:
-
Open Start.
-
Search for Command Prompt, right-click the top result, and select the Run as administrator option.
-
Type the following command to create a full backup with wbAdmin on Windows 11 and press Enter:
wbAdmin start backup -backupTarget:E: -include:C: -allCritical -quiet

In the command, change “E” in the “-backupTarget” option with the drive letter for the external drive to use for the backup.
-
(Optional) Type the following command to create a full backup that includes all the drives connected to the device, and press Enter:
wbAdmin start backup -backupTarget:E: -include:C:,D:,F: -allCritical -quiet
In the command, replace the drive letters on the option “-include:C:,E:,F:” with letters reflecting the device’s drives.

After you complete the steps, the backup will be saved to the external drive you specified in the command.
Restore full backup to same drive on Windows 11
Since both methods process the backup identically, you can use the same instructions to recover a device using a previous backup. If you don’t have access to the desktop, use these steps to boot the computer in the Windows Recovery Environment (WinRE) to use the System Image Recovery tool.
To restore Windows 11 from backup, use these steps:
-
Open Settings.
-
Click on System.
-
Click the Recovery page on the left side.
-
Click the Restart now button for the Advanced startup setting under the “Recovery options” section.

-
Click the Restart now button again.
-
Click on Troubleshoot.

-
Click on Advanced options.

-
Click on See more recovery options.

-
Click the “System Image Recovery” option.

-
Select the “Use the latest available system image” option to restore the Windows 11 backup.

-
Click the Next button.
-
Click the Next button again.

-
Click the Finish button.


After you complete the steps, the wizard will restore the computer’s full backup, restoring the operating system installation, settings, apps, and files since the last backup was created.
Restore full backup to new drive on Windows 11
If you have to restore a full backup to a new drive in the same computer after hardware failure or because you want larger capacity storage, you will have to replace the drive and then use a Windows 11 USB bootable media to access the Windows Recovery Environment to recover your system.
Although you can restore your previous installation on a new drive, you should know that this is only possible on the same computer. You cannot restore a full backup on a different device because the hardware will be different.
To restore a Windows 11 setup from a backup on a new hard drive, connect the USB bootable media and the storage device with the full backup and use these steps:
-
Power on the computer.
-
Press any key on the startup prompt.
Quick tip: To start a device with a bootable USB flash drive, you must change the BIOS settings. This process usually requires pressing one of the function keys (F1, F2, F3, F10, or F12), the ESC, or the Delete key. For more accurate instructions, visit your PC manufacturer’s support website. Also, this process will delete everything on the hard drive. As a result, it’s recommended to backup any files before proceeding.
-
Click the Next button on the “Windows Setup” page.
-
Click the Next button again.
-
Select the “Repair my PC” option.

-
Click the Next button.
-
Select your setup language.
-
Click on Troubleshoot.
-
Click the “System Image Recovery” option.

-
Click on the Windows 11 operating system option.
-
Select the “Use the latest available system image” option to restore the backup on a new hard drive.
-
Click the Next button.
-
Click the Next button again.
-
Click the Finish button.
-
Click the Yes button to confirm the deletion of the new drive.
-
Click the OK button to confirm that BitLocker has been disabled on the new drive (if applicable).
-
Click the Restart now button.

Once you complete the steps, the Windows 11 installation with your programs, settings, and files will be restored on the new hard drive.
You can now re-enable BitLocker from the Settings app on Windows 11 Home or from the Control Panel for devices running Windows 11 Pro.
If the new drive has a larger capacity, then you will have to either extend the Windows 11 installation partition or create a new partition with the unallocated partition. The easiest approach would be to create a new partition with the remaining space to store your data. However, if you want to allocate the unallocated space in the “C” drive, you will have to move the recovery partition using a third-party tool before you can make use of the space.
While a full backup is essential to any recovery plan, remember to be proactive because a backup can only restore data from the last time you created it. Also, you should use File History or a cloud storage service like OneDrive to keep an up-to-date file backup.
Alternatively, you can use third-party tools to back up Windows 11, including Macrium Reflect and Veeam. Macrium Reflect is a popular paid software for creating and restoring backups. This option used to be free, but a trial option has replaced it. Veeam is also a paid backup software, but there’s a free option with basic features that anyone can use.
Update March 17, 2025: This guide has been updated to ensure accuracy and reflect the drive requirements.
Source link
- Pin Up Casino – Azrbaycanda onlayn kazino Pin-Up.3656
- Chicken Road slot w kasynie online mechanika gry.915
- – Официальный сайт Pinco играть онлайн Зеркало и вход.5131
-
- казино и ставки в БК – зеркало сайта Mostbet.547
- Tiranga Game Online Gambling in India Deposit and Withdrawal.1062
- Официальный Сайт Играть в Онлайн Казино Pinco.5911
- – Официальный сайт Pinco играть онлайн Зеркало и вход.11674 (2)

