
- To create a winget script to install and update apps on Windows 11, use a batch file with a list of app IDs.
- The script checks if each app is installed. If not, it installs it, and if it is, it checks for updates and installs them.
- You can run the script manually, from the Startup folder, or as a scheduled task.
On Windows 11, you can create a simple script to automatically download, install, and update your favorite apps every time the system starts, and in this guide, I’ll show you exactly how to do it.
As someone who works extensively with virtual machines to test apps, settings, and configurations, I constantly reinstall the operating system to ensure a clean environment. One of the most time-consuming parts of the process is manually reinstalling all the essential applications I rely on every day.
To solve this, I turned to Windows Package Manager (winget), Microsoft’s command-line tool for managing apps. It’s fast and reliable, but I wanted something even more hands-off. So, I built a custom script that runs automatically at startup. It performs two tasks:
- If the app isn’t installed, the script installs it.
- If the app is already installed, it checks for updates and installs them when available.
In this guide, I’ll outline the steps to create and use this script. Whether you’re a developer, network administrator, or a power user looking to save time, this method will help you streamline app deployment and system setup on Windows 11.
Create a winget script to install and update apps on Windows 11
This is a three-step process. First, you have to create a list of all the apps you want on your computer, then you have to generate the script, and you have to decide how to run the script.
Generate a list of apps
To create a list of apps to install and update using winget, follow these steps:
-
Open Start.
-
Search for Command Prompt (or Terminal), right-click the top result, and choose the Run as administrator option.
-
Type the following command to find the application identification number and press Enter:
winget search APP-NAME
Once you complete the steps, the command will output the apps that match the query. Usually, you want to use a single word that helps you find the app. If the name has a space, use “quotation marks.” Otherwise, the search won’t work.
Also, if you’re using a quotation, you’ll be telling the app to look for the exact match, so make sure the query is correct. (This is not a search engine.)
For example, if I want to find the winget information for the “VLC” app, I use the winget search vlc command.
Repeat the steps and note the ID value for each application, as you’ll need this information to craft the custom script.
Create the winget script
To create a batch file to install and update apps, follow these steps:
-
Open Start.
-
Search for Notepad and click the top result to open the app.
-
Copy and paste the following code into the text file:
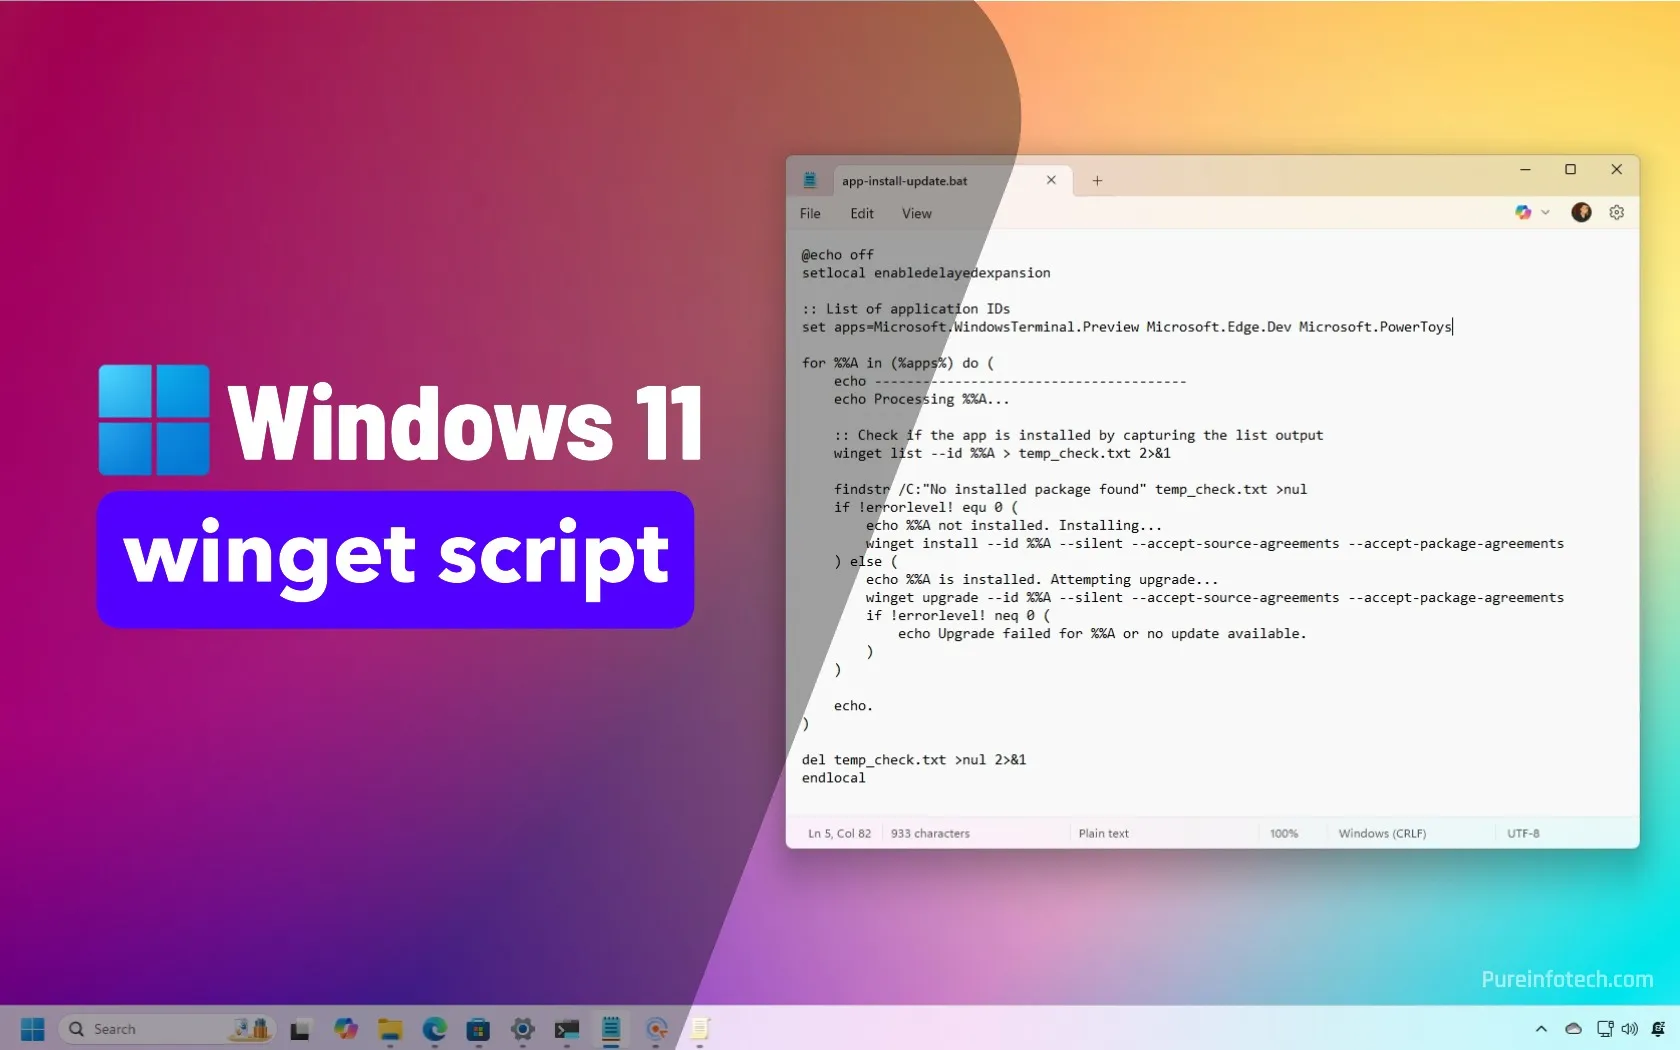
@echo off setlocal enabledelayedexpansion :: List of application IDs set apps=Microsoft.WindowsTerminal.Preview Microsoft.Edge.Dev Microsoft.PowerToys for %%A in (%apps%) do ( echo --------------------------------------- echo Processing %%A... :: Check if the app is installed by capturing the list output winget list --id %%A > temp_check.txt 2>&1 findstr /C:"No installed package found" temp_check.txt >nul if !errorlevel! equ 0 ( echo %%A not installed. Installing... winget install --id %%A --silent --accept-source-agreements --accept-package-agreements ) else ( echo %%A is installed. Attempting upgrade... winget upgrade --id %%A --silent --accept-source-agreements --accept-package-agreements if !errorlevel! neq 0 ( echo Upgrade failed for %%A or no update available. ) ) echo. ) del temp_check.txt >nul 2>&1 endlocal -
In the “set apps=” section, annotate the applications you want to install and update on your computer, and use a space to separate each application.
Quick note: I’m including three examples in this line, but remember to update this section to include your applications.
-
Click on File and choose the Save As option.
-
Select the location to store the file.
Quick tip: If you use OneDrive, you can upload the file to the cloud so you have access to the script from all your computers.
-
Confirm a name for the script and use the .bat file extension.

-
Click the Save button.

After you complete the steps, you can run the script manually by right-clicking the “.bat” file and using the “Run as administrator” option, or you can create a trigger to run the batch file automatically.
Here’s a detailed breakdown of the batch script and how each piece works:
Initial setup
@echo offsuppresses command echoing.setlocal enabledelayedexpansionenables “delayed variable expansion” so variables within parentheses can be accessed in real-time using!VAR!instead of%VAR%.
Defines the app list
set apps =defines the list of winget app IDs to process in the loop.
Look through each app
for %%A in (%apps%) do ()for each ID (%%A) in the apps list, the enclosed commands run sequentially.
Check app installation
winget listwrites output totemp_check.txtbecause the command tool doesn’t have a way to check if an app is already installed.findstrsearches that file for the phrase “No installed package found.” It setsERRORLEVELto 0 if found, else 1.!errorlevel!helps to get the correct error code inside the loop.
Install or upgrade app
- If the app isn’t installed (
errorlevel = 0), runwinget install. - If it is installed, run
winget upgrade, and on failure (errorlevel ≠ 0) report that the upgrade failed or no update was available.
Clean and terminate script
delremoves the temporary file.endlocalrestores the pre-script environment, ending delayed expansion.
Set up the script
You have three options to run the batch script. You can run it manually, add it to the “Startup” folder to allow the system to run it automatically every time you sign in to your account, or you can create a scheduled task with the Task Scheduler.
Manually
If you want to run the script manually, follow these steps:
-
Right-click the “.bat” file and select the Run as administrator option.


You can also run it directly through Command Prompt or PowerShell.
This option is ideal for testing or occasional use, but it requires manual initiation every time.
Add to the Startup folder
To launch the script automatically from the “Startup” folder, follow these steps:
-
Open Start.
-
Search for Run and click the top result to open the app.
-
Type the following command to open the folder and press Enter:
shell:startup

-
Copy and paste a shortcut for the .bat file into the folder.


After you complete the steps, the script will run every time you sign in.
This option is easy to set up, but runs only when a user signs in, not at system boot. Also, you will have to confirm the installation for each app that requires elevation.
Create a scheduled task
To create a scheduled task to run the winget script, follow these steps:
-
Open Start.
-
Search for Task Scheduler and click the top result to open the app.
-
(Optional) Right-click the “Task Scheduler Library” folder and select the New Folder option.
-
Confirm a name for the folder – for example, My Tasks.
-
Right-click the “My Tasks” folder and click the Create Task option.

-
Click on the General tab.
-
In the “Name” field, type a descriptive name for the task, such as “My Apps.”

-
Select the “Run whether the user is logged on or not” option under the “Security options” section.
-
Check the “Run with highest privileges” option.
-
Click on the Triggers tab.
-
Click the New button.
-
Select a trigger (such as “At logon,” “At startup,” or on a schedule like daily) under the “Begin the task” setting.

-
Configure the schedule settings as necessary.
Quick note: For simplicity, you may want to choose the “At startup” option.
-
Click the OK button.
-
Click on the Actions tab.
-
Click the New button.
-
Select the Start a program option under the “Actions” setting.
-
In the “Program/script” setting, type the following command:
cmd.exe

-
In the “Add arguments (optional)” setting, type the following command:
/c "C:\path\to\YOUR-SCRIPT.bat"
-
Click the OK button.
-
Click the Conditions tab.
-
Under “Power,” clear the “Stop if the computer switches to battery power” and “Start the task only if the computer is on AC power” options.
-
Click the OK button.
-
Confirm the password for your account.
-
Click the OK button.


Once you complete the steps, a system restore point will be created on your specified schedule.
Source link
-

-

-

-

-

-

-

-


