
- To create a Windows 11 24H2 bootable USB for unsupported hardware, open Rufus, select the USB flash drive, click “Select,” choose the ISO file, click Open, click “Start,” and choose the “Remove requirement for 4GB+ RAM, Secure Boot and TPM 2.0” and the “Remove requirement for an online Microsoft account” options, and click “OK.”
- You can use USB bootable media to perform a clean installation. If you want to perform an in-place upgrade, you’ll have to edit the Registry before the Windows Setup could work.
UPDATED 10/7/2024: The Rufus tool allows you to create a bootable USB flash drive to install Windows 11 24H2 on unsupported hardware, and in this guide, I will show you how to complete this process.
If you have a computer running Windows 10 or another version of the operating system, but it doesn’t meet the hardware requirements to upgrade to Windows 11 24H2 (2024 Update), you can use the Rufus tool to build a custom installation media that bypasses (most) the hardware requirements, including the minimum memory requirement, Secure Boot, and TPM 2.0.
The tool also allows you to disable and bypass the internet requirements to set up a Windows 11 installation without a Microsoft account using a local account. Furthermore, starting on version 24H2, the setup enables BitLocker automatically during installation, and if this is something you don’t want, Rufus includes an option to prevent the system from turning on the feature.
You will still need a computer with at least TPM 1.2 and a processor with the “POPCNT” (Population Count) instruction. Otherwise, the computer won’t boot properly if this feature is missing at the time of the version 24H2 upgrade.
In this guide, I will outline the steps to use Rufus to create a bootable USB to install the Windows 11 2024 Update on virtually any hardware.
Create unsupported hardware Windows 11 24H2 USB with existing ISO file
To create a Windows 11 24H2 bootable USB for unsupported hardware using an existing ISO file, connect a USB flash drive of at least 8GB and use these steps:
-
Click the link to download the latest version under the “Download” section.
-
Double-click the executable to launch the tool.
-
Choose the USB flash drive from the “Device” setting.
-
Click the Select button.
-
Select the Windows 11 24H2 ISO file.
-
Click the Open button.
-
Continue with the default settings after the download.
-
(Optional) Specify a name for the drive under the “Volume label” setting.
-
Click the Start button.
-
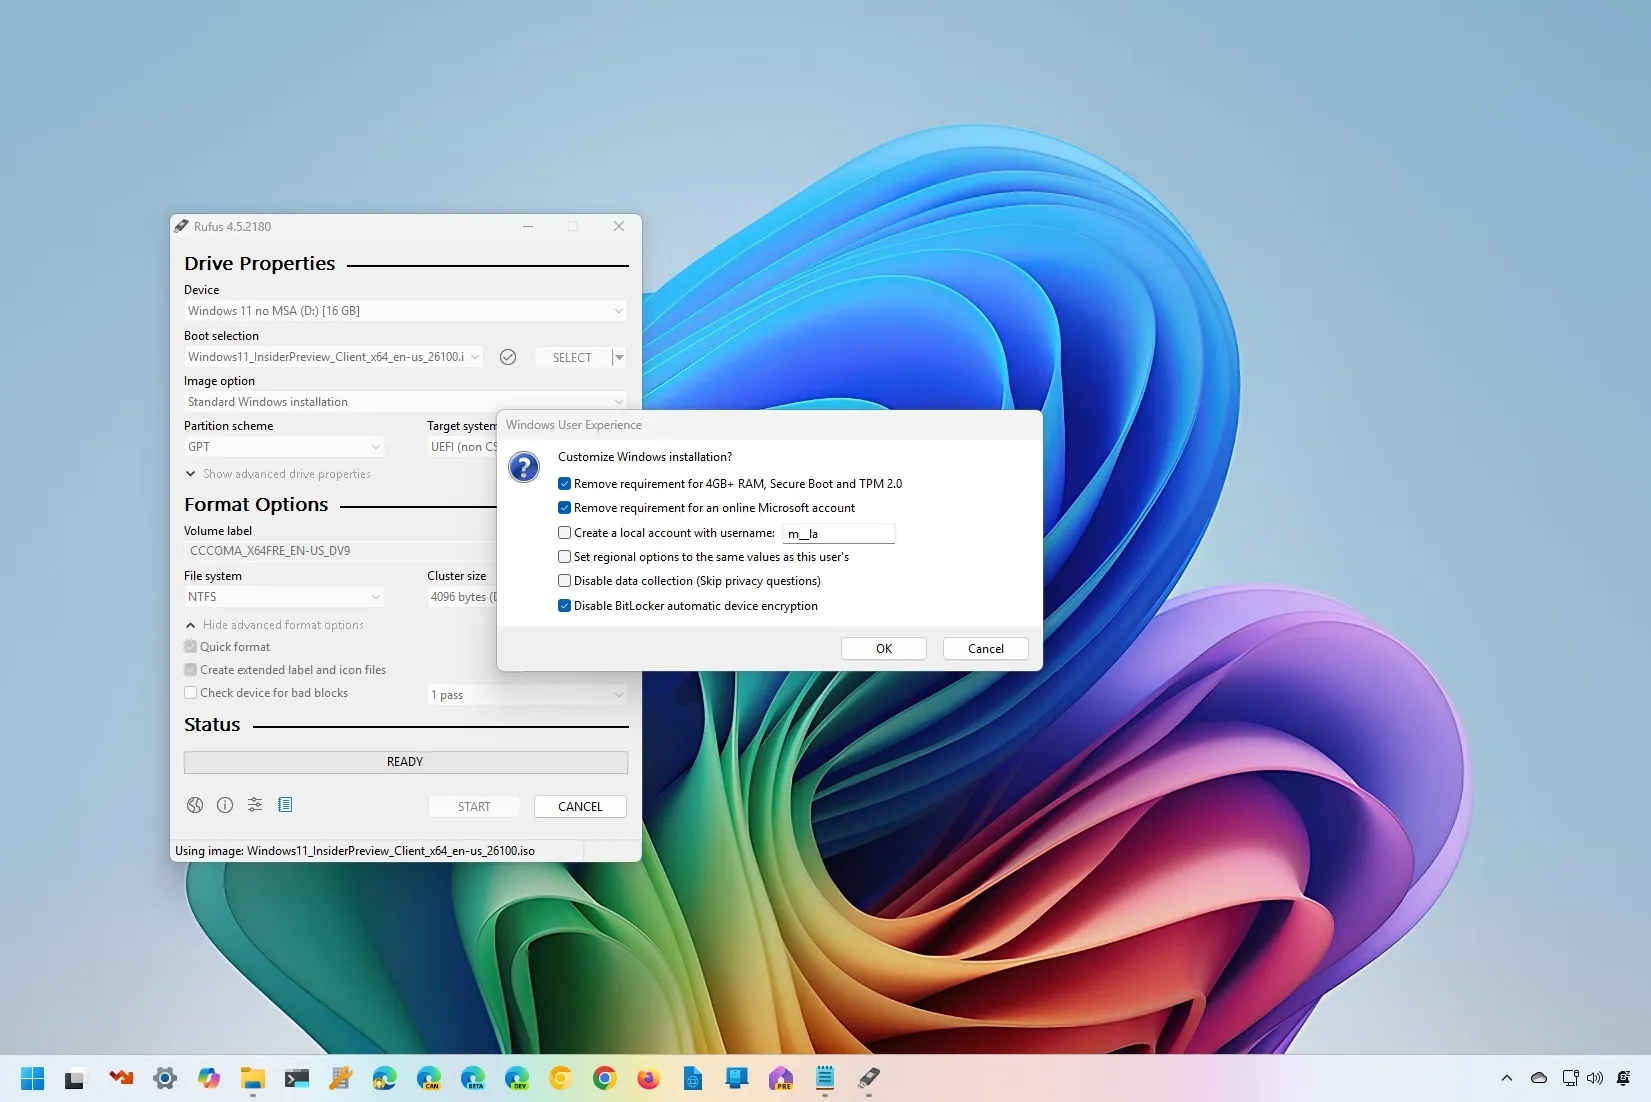
Check the “Remove requirement for 4GB+ RAM, Secure Boot and TPM 2.0” option to install version 24H2 on unsupported hardware.

-
Check the “Remove requirement for an online Microsoft account” option to bypass the internet requirement and create a local account.
-
(Optional) Check the “Create a local account with username” option and specify an account name to create a local account automatically.
-
Check the “Disable BitLocker automatic device encryption” option to prevent the setup from enabling BitLocker during the installation.
-
Click the OK button.

After you complete the steps, Rufus will create a USB bootable media that bypasses the hardware requirements to install the Windows 11 2024 Update on virtually any computer hardware.
Create unsupported hardware Windows 11 24H2 USB downloading ISO file
To create a Windows 11 24H2 bootable USB for unsupported PCs downloading ISO files with Rufus, use these steps:
-
Click the link to download the latest version under the “Download” section.
-
Double-click the executable to launch the tool.
-
Click the Settings button (third button from the left) at the bottom of the page.

-
Use the “Check for updates” drop-down menu and select the Daily option under the “Settings” section.

-
Click the Close button.
-
Click the Close button again.
-
Open Rufus again.
-
(Optional) Use the drop-down menu and select the USB flash drive to create the installation media under the “Device” section.
-
Use the drop-down menu and select the “Disk or ISO image” option under the “Boot selection” section.
-
Click the down-arrow button (on the right side) and select the Download option.

-
Click the Download button.
-
Select the Windows 11 option.

-
Click the Continue button.
-
Select the “24H2” option to choose the Windows 11 2024 Update under the “Release” section.
-
Click the Continue button.
-
Select the Windows 11 Home/Pro/Edu option.
-
Click the Continue button.
-
Select the language of Windows 11.
-
Click the Continue button.
-
Select the x64 architecture option.
-
Click the Download button.
-
Select the location to save the Windows 11 24H2 ISO file automatically.
-
Continue with the default settings after the download.
-
(Optional) Specify a name for the drive under the “Volume label” setting.
-
Click the Start button.
-
Check the “Remove requirement for 4GB+ RAM, Secure Boot and TPM 2.0” option to install version 24H2 on unsupported hardware.
-
Check the “Remove requirement for an online Microsoft account” option to bypass the internet requirement and create a local account.
-
(Optional) Check the “Create a local account with username” option and specify an account name to create a local account automatically.
-
Check the “Disable BitLocker automatic device encryption” option to prevent the setup from enabling BitLocker during the installation.
-
Click the OK button.


Once you complete the steps, the tool will begin creating the installer for Windows 11 24H2 for unsupported devices.
In-place upgrade bypass commands
Although you can use the offline installer to perform a clean installation of the Windows 11 2024 Update on virtually any device, at the time of this writing, there’s a problem that prevents you from using a USB bootable media from starting an in-place upgrade from the desktop experience with an older version of the operating system.
The developer is aware of the issue, and it’s offering a workaround that involves running a few commands to edit the Registry before running the “setup.exe” file to launch the Windows Setup. (Eventually, these commands will run automatically in future releases of the Rufus tool.)
To start the Windows 11 24H2 installation process for unsupported hardware using the USB bootable media created using Rufus, use these steps:
-
Open Start.
-
Search for Command Prompt (or Windows Terminal), right-click the top result, and select Run as administrator.
-
Type the following command to delete the “CompatMarkers” key and press Enter:
reg.exe delete "HKLM\SOFTWARE\Microsoft\Windows NT\CurrentVersion\AppCompatFlags\CompatMarkers" /f 2>NUL
-
Type the following command to delete the “Shared” key and press Enter:
reg.exe delete "HKLM\SOFTWARE\Microsoft\Windows NT\CurrentVersion\AppCompatFlags\Shared" /f 2>NUL
-
Type the following command to delete the “TargetVersionUpgradeExperienceIndicators” key and press Enter:
reg.exe delete "HKLM\SOFTWARE\Microsoft\Windows NT\CurrentVersion\AppCompatFlags\TargetVersionUpgradeExperienceIndicators" /f 2>NUL
-
Type the following command to add a new multi-string value to “HwReqChk” under “AppCompatFlags” and press Enter:
reg.exe add "HKLM\SOFTWARE\Microsoft\Windows NT\CurrentVersion\AppCompatFlags\HwReqChk" /f /v HwReqChkVars /t REG_MULTI_SZ /s , /d "SQ_SecureBootCapable=TRUE,SQ_SecureBootEnabled=TRUE,SQ_TpmVersion=2,SQ_RamMB=8192,"
-
Type the following command to add a new DWORD value to “MoSetup” under “Setup” and press Enter:
reg.exe add "HKLM\SYSTEM\Setup\MoSetup" /f /v AllowUpgradesWithUnsupportedTPMOrCPU /t REG_DWORD /d 1
Once you complete the steps, the commands will delete specific registry keys under the “AppCompatFlags” path. The “/f” switch forces the deletion, and “2>NUL” suppresses any error output.
Also, the “HwReqChk” value is being added as a multi-string (“REG_MULTI_SZ”) with specific hardware requirement checks. The “MoSetup” value is adding a DWORD entry to allow upgrades even with unsupported TPM or CPU.
If you want to undo the changes, you will have to recreate the deleted keys with these commands:
reg.exe add "HKLM\SOFTWARE\Microsoft\Windows NT\CurrentVersion\AppCompatFlags\CompatMarkers"reg.exe add "HKLM\SOFTWARE\Microsoft\Windows NT\CurrentVersion\AppCompatFlags\Shared"reg.exe add "HKLM\SOFTWARE\Microsoft\Windows NT\CurrentVersion\AppCompatFlags\TargetVersionUpgradeExperienceIndicators"
Then, you will have to delete the added values with these commands:
reg.exe delete "HKLM\SOFTWARE\Microsoft\Windows NT\CurrentVersion\AppCompatFlags\HwReqChk" /v HwReqChkVars /freg.exe delete "HKLM\SYSTEM\Setup\MoSetup" /v AllowUpgradesWithUnsupportedTPMOrCPU /f
Update October 7, 2024: This guide has been updated to ensure accuracy and reflect changes to the process.
Source link
-

- B7 Casino NL — Bonus €450 en 250 gratis spins.2447
- 7Slots Casino – 7Slots Casino giri.30
- 1xbet مصر رهانات رياضية وألعاب كازينو.1693
- 1xbet .581
- Fortune Tiger Slot Cassino.227 (2)
- Fortune Tiger Jogo de Cassino.642 (2)
- Fortune Tiger Jogo de Cassino.642 (2)
