

UPDATED 2/13/2025: On Windows 11, formatting internal or external hard drives is straightforward and essential for various scenarios. When connecting a new hard drive, it’s recommended to erase all data and apply a compatible file system, enabling the operating system to read and write data efficiently. If you’re retiring a storage drive, formatting ensures your files are erased, preventing unauthorized access. Additionally, the ability to format a drive on Windows 11 can help fix errors and other logical issues.
While the process might seem tedious, Windows 11 offers several methods to format a drive. You can use the Settings app, File Explorer, Disk Management, or execute commands through Command Prompt and PowerShell. These options provide flexibility, allowing you to choose the method that best suits your needs.
Comparison of formatting methods
Here is a quick breakdown of the different ways you can format a drive in Windows 11:
- Settings: This is the most user-friendly option for beginners. It’s great for formatting storage drives but with limited customization.
- File Explorer: Best for quickly formatting external drives. It is simple and fast but lacks advanced options.
- Disk Management: This is great for internal and external drives. It offers more control over partitions but may feel complex for beginners.
- Command Prompt: Ideal for advanced users. It provides the most flexibility but requires command-line knowledge.
- PowerShell: Useful for scripting and automation. Powerful but requires familiarity with PowerShell commands.
What you need to know before formatting
It’s important to understand that the formatting process erases all files on the drive. As a result, ensure to back up any important data before proceeding.
You also have to choose the right file system:
- NTFS: Best for Windows-only use, supports large files and permissions.
- exFAT: Ideal for external drives, works on both Windows and macOS.
- FAT32: Compatible with most devices but has a 4GB file size limit.
On Windows 11, you can choose the file system depending on the type of storage connected to your computer. For example, when formatting a secondary internal hard drive, you can only choose the “NTFS” option.
If you’re connecting an external USB hard drive, then you can choose between the “NTFS” and “exFAT” options. On the other hand, the “FAT32,” “NTFS,” and “exFAT” options are only available for USB flash drives.
These are the differences between quick format and full format:
- Quick format: Erases files but does not check for bad sectors. It’s faster but less thorough.
- Full format: Scans for bad sectors, but it takes longer but ensures drive health.
You would use the quick option to clean the drive and use it again. On the other hand, the full format option is more appropriate when connecting a new drive or you’re trying to get rid of the drive or the computer.
In this guide, I’ll teach you the different ways to format an internal or USB external hard drive on Windows 11.
Format hard drive on Windows 11 from Settings
On Windows 11, depending on whether the HDD or SSD already has a partition or not, the format steps will be slightly different.
Format drive with existing partition
To format an internal or external drive with an existing partition on Windows 11, follow these steps:
-
Open Settings on Windows 11.
-
Click on System.
-
Click the Storage tab.
-
Click on “Advanced storage settings.”
-
Click the “Disks & volumes” setting.
-
Select the hard drive from the list.
-
Click the Properties button.

-
Click the Format button.

-
Confirm a label for the storage drive (as it will appear on File Explorer).
-
Select the NTFS option for the “File System” setting.

-
(Optional) Check the “Enable file and folder compression” option to save space when storing files.
Quick note: Unless you are storing files that will benefit from compression, you don’t need to enable this feature.
-
Click the Format option.


Once you complete the steps, Windows 11 will format the drive and make it available through File Explorer.
Format drive without partition
To format a new drive without a partition, follow these steps:
-
Open Settings.
-
Click on System.
-
Click the Storage tab.
-
Click on “Advanced storage settings.”
-
Click the “Disks & volumes” setting.

-
Select the hard drive.
-
Select the “Unallocated” space, click the Create volume button, and choose the “Create Simple Volume” option.

-
Confirm a label for the drive in the “Label” setting.
-
Select the drive letter to make it available on File Explorer in the “Drive Letter” setting.
-
Select the NTFS option in the “File System” setting.

-
(Optional) Specify how much storage to assign to the drive in the “Size” setting.
-
(Optional) Click on Advanced.
-
Check the “Perform a quick format” option. (If you don’t select this option, the operation could take a long time.)
-
(Optional) Check the “Enable file and folder compression” option to save space when storing files.
-
Click the Format option.


After you complete the steps, a new partition will be created and formatted using the specified settings.
Format hard drive on Windows 11 from File Explorer
To format an internal or USB drive through File Explorer, follow these steps:
-
Open File Explorer.
-
Click on This PC from the left navigation pane.
-
Right-click the drive under the “Devices and drives” section and select the Format option.

-
Select the NTFS option in the “File System” setting.

-
Confirm the drive’s name in the “Volume label” setting.
-
Check the Quick Format option.
-
Click the Start button.


Once you complete the steps, the drive will be available in File Explorer.
If the hard drive doesn’t have a partition or drive letter, it won’t appear in File Explorer. In this case, you can use the new “Disks & volumes” settings or the legacy “Disk Management” tool to format the storage.
Format hard drive on Windows 11 from Disk Management
You can format a drive with or without a partition using the legacy Disk Management utility.
Format drive with partition
To format a hard drive with an existing partition with Disk Management, follow these steps:
-
Open Start.
-
Search for Disk Management and click the top result to open the app.
-
Right-click the drive and select the Format option.

-
Confirm the drive’s name in the “Volume label” setting.
-
Select the NTFS option in the “File System” setting.

-
Check the “Perform a quick format” option.
-
(Optional) Check the “Enable file and folder compression” option to save space when storing files.
-
Click the OK button.


After you complete the steps, the existing partition (also referred to as a volume) will be re-formatted, deleting any previous data.
Format drive without partition
If the drive doesn’t have a partition, follow these steps:
-
Open Start.
-
Search for Disk Management and click the top result to open the app.
-
Right-click the drive and select the “New Simple Volume” option.

-
Click the Next button.
-
(Optional) Specify how much storage to assign to the drive.

-
Click the Next button.
-
Select the “Assign the following driver” option and choose the letter for the drive.

-
Click the Next button.
-
Select the “Format this volume with the following settings” option.
-
Select the NTFS option in the “File System” setting.
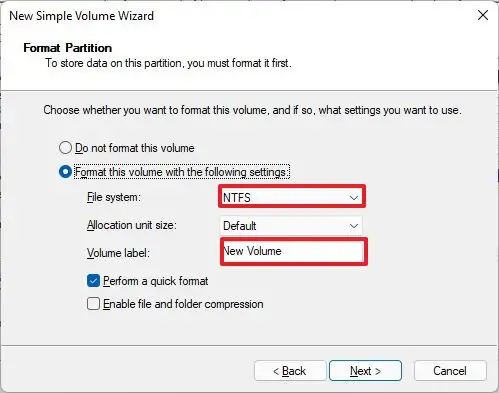
-
Confirm the drive’s name in the “Volume label” setting.
-
Check the “Perform a quick format” option.
-
Click the Next button.
-
Click the Finish button.

Once you complete the steps, the tool will create a partition and format it using the specified file system.
Format hard drive on Windows 11 from Command Prompt
To format a drive with the Diskpart command-line tool, follow these steps:
-
Open Start.
-
Search for Command Prompt, right-click the top result, and select the Run as administrator option.
-
Type the following command to open Diskpart and press Enter:
diskpart
-
Type the following command to determine the drive to format and press Enter:
list disk
-
Type the following command to select the storage and press Enter:
select disk 3
In the command, replace “3” with the number of the flash drive you want to use.
-
Type the following commands to delete everything from the USB thumb drive and press Enter:
clean

-
Type the following command to create a primary partition and press Enter:
create partition primary
-
Type the following command to select the new partition and press Enter:
select partition 1
-
Type the following command to make the selected partition active and press Enter:
active
-
Type the following command to make the hard drive bootable and press Enter:
format FS=NTFS quick
-
Type the following command to assign a volume and a drive letter for the USB flash drive and press Enter:
assign letter=X
In the command, change “X” for any available letter you want to use.
-
Type the following command to quit the tool and press Enter:
exit

After completing the steps, the drive will be erased, formatted, and mounted with the specified drive letter.
Format hard drive on Windows 11 from PowerShell
To format a hard drive with PowerShell commands on Windows 11, use the steps:
-
Open Start.
-
Search for PowerShell, right-click the result, and select the Run as administrator option.
-
Type the following command to identify the drive to repair and press Enter:
Get-Disk
-
Type the following command to wipe out the drive on Windows 11 and press Enter:
Get-Disk 3 | Clear-Disk -RemoveData
In the above command, change “3” with the disk number of the drive you want to format (see step 3). If you specify the number incorrectly, you could wipe out the wrong drive, causing data loss.
-
Type A to confirm that you want to wipe the specified drive and press Enter.
-
Type the following command to initialize the disk with the default GUID Partition Table (GPT) partition scheme and press Enter:
Initialize-Disk -Number 3
In the above command, change “3” with the disk number of the drive you want to format (see step 3).
Important: Although it’s recommended to use a GPT partition scheme if required, you can use the Master Boot Record (MBR) scheme using this command:
Initialize-Disk -Number 1 -PartitionStyle MBR. -
Type the following command to format and create a new partition on the drive, and press Enter:
New-Partition -DiskNumber 3 -UseMaximumSize | Format-Volume -FileSystem NTFS -NewFileSystemLabel myDrive
In the above command, change “3” with the disk number of the drive you want to format on Windows 11 and “myDrive” with the name to use for the storage.
-
Type the following command to assign a drive letter to the disk drive and press Enter:
Get-Partition -DiskNumber 3 | Set-Partition -NewDriveLetter H
In the above command, change “3” to the disk number of the drive you want to format and “H” to the letter assigned to the storage. If you get the “Set-Partition: The requested access path is already in use” error message, run the command one more time or specify a different drive letter.


Once you complete the steps, the PowerShell commands will delete the current partition and create a new one with the file system and drive letter you specified.
What methods did you use? Did you have any questions? Let me know in the comments.
Update February 13, 2025: This guide has been updated to ensure accuracy and reflect changes to the process.
Source link
- Polskie kasyna online z turniejami dla graczy.596
- Najlepsze Kasyna Online w Polsce w 2025.10590 (2)
- Gioco Plinko nei casin online in Italia.2170
- – Официальный сайт Pinco Casino.8053 (2)
- Casino Mostbet Azrbaycan.1032
-

- B7 Casino NL — Bonus €450 en 250 gratis spins.2447
- 7Slots Casino – 7Slots Casino giri.30
