How to install Optional Features on Windows 11
- To install optional features on Windows 11, open Settings > System > Optional features, click “View features,” select the feature, click “Next,” and “Install.”
- Alternatively, open Settings > System > Optional features > More Windows Features, choose the feature, and click “Install.”
- You also have the option to install optional features through PowerShell and Command Prompt using the
DISMand theEnable-WindowsOptionalFeaturecommands.
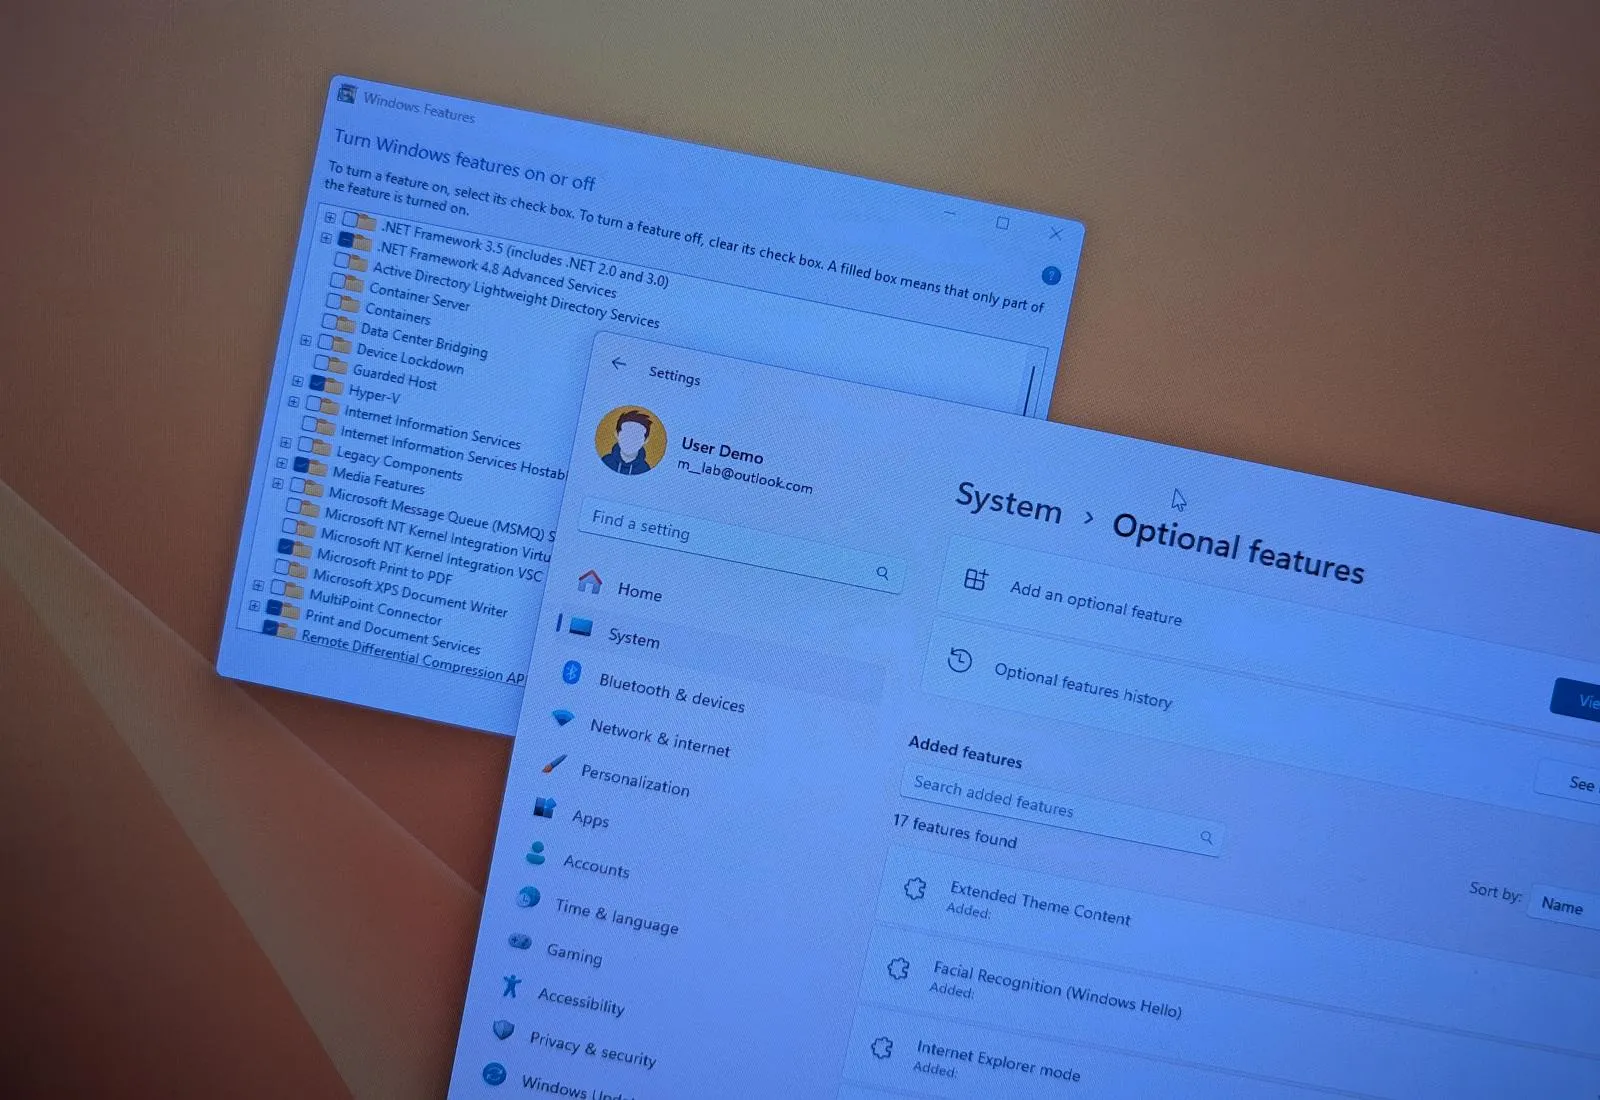
UPDATED 10/28/2024: On Windows 11, “Optional Features” are components that are not essential to operate the system, but they can add extra functionalities. By default, the operating system comes with some of these features installed, such as Internet Explorer mode, Notepad, Print Management, Windows Media Player, Facial Recognition, and others.
However, you can always install more (for example, XPS Viewer, Wireless Display, Microsoft Quick Assist, Windows Storage Management, etc.) or remove those you no longer use.
If you don’t find the feature you want to install in the Settings app, you can also use the legacy “Windows Features” tool to add different components, such as Hyper-V, .NET, Windows Subsystem for Linux, and many others.
In this guide, I will show you the steps to install additional features on Windows 11 and provide instructions for uninstalling those optional features. These instructions apply to all versions of Windows 11. However, the Control Panel, PowerShell, and Command Prompt steps also work on Windows 10. You can choose any of the methods to install or uninstall features. Usually, the Settings app and Control Panel methods are easiest for most users.
Install Optional Features on Windows 11
Windows 11 allows you to install optional features in at least two ways, including the Settings app and Control Panel (if you have to add legacy features).
Add optional features via Settings
To install optional features on Windows 11, use these steps:
-
Open Settings on Windows 11.
-
Click on System.
-
Click the Optional features page.
-
Click the “View features” button in the “Add an optional feature” setting.
-
Select the optional feature to install on Windows 11 (for example, Graphics). Quick note: You can select the item for more information about the feature.

-
Click the Next button.
-
Click the Install button.
Once you complete the steps, the components will download and install on your computer.
Add legacy optional features via Control Panel
To turn on optional features through the “Windows Features,” use these steps:
-
Open Settings.
-
Click on System.
-
Click the Optional features page.
-
Click the “More Windows features” option under the “Related settings” section.

-
Check the features to add to Windows 11 (for example, Hyper-V, Windows Sandbox, and Windows Subsystem for Linux).

-
Click the OK button.
-
Click the Restart now button.
After you complete the steps, the components for the feature will be installed on the computer.
Uninstall Optional Features on Windows 11
Similar to adding features, you can use the Settings app or Control Panel to uninstall a specific feature.
Remove optional features via Settings
To uninstall optional features from your computer, use these steps:
-
Open Settings.
-
Click on System.
-
Click the Optional features page.
-
Select the optional feature to remove from Windows 11 under the “Installed features” section.
-
Click the Uninstall button.

After you complete the steps, the feature will be removed from Windows 11.
Remove legacy optional feature via Control Panel
To turn off optional features through the Control Panel, use these steps:
-
Open Settings.
-
Click on System.
-
Click the Optional features page.
-
Click the “More Windows features” option under the “Related settings” section.
-
Clear the feature to remove from Windows 11.

-
Click the OK button.
-
Click the Restart now button.
Once you complete the steps, the components for the feature will be removed from the computer.
Install Optional Features from PowerShell or Command Prompt
On Windows 11, you can also use commands to add or remove optional features with PowerShell and Command Prompt. However, the PowerShell option is only available for managing legacy optional features, not on-demand capabilities.
Add optional features with commands
To install optional features with PowerShell or Command Prompt on Windows 11, use these steps:
-
Open Start.
-
Search for PowerShell or Command Prompt, right-click the top result, and choose the Run as administrator option.
-
Type the following command to view the available option features and press Enter:
dism /Online /Get-Capabilities

-
Confirm the feature identifier. For example, XPS.Viewer~~~~0.0.1.0.
-
Type the following command to install the optional feature and press Enter:
dism /Online /Add-Capability /CapabilityName:XPS.Viewer~~~~0.0.1.0

In the command, change “XPS.Viewer~~~~0.0.1.0” for the identifier of the feature you want to install.
Once you complete the steps, the components will download and install on your computer.
Add legacy optional features with commands
To add legacy features with commands, use these steps:
-
Open Start.
-
Search for PowerShell, right-click the top result, and choose the Run as administrator option.
-
Type the following command to view the available legacy features and press Enter:
Get-WindowsOptionalFeature -Online

-
Confirm the feature name. For example, MultiPoint-Connector.
-
Type the following command to install the legacy feature and press Enter:
Enable-WindowsOptionalFeature –FeatureName "MultiPoint-Connector" -All -Online

In the command, change “MultiPoint-Connector” for the identifier of the feature you want to install.
-
Type “Y” and press Enter to restart (if applicable).
After you complete the steps, the features’ components will be installed on the device.
Uninstall Optional Features from PowerShell or Command Prompt
You can also use PowerShell and Command Prompt to remove previously installed features.
Remove optional features with commands
To uninstall optional features from PowerShell or Command Prompt on Windows 11, use these steps:
-
Open Start.
-
Search for PowerShell or Command Prompt, right-click the top result, and choose the Run as administrator option.
-
Type the following command to view the available option features and press Enter:
dism /Online /Get-Capabilities
-
Confirm the feature identifier. For example, XPS.Viewer~~~~0.0.1.0.
-
Type the following command to uninstall the optional feature and press Enter:
dism /Online /Remove-Capability /CapabilityName:XPS.Viewer~~~~0.0.1.0

In the command, change “XPS.Viewer~~~~0.0.1.0” for the identifier of the feature you want to uninstall.
Once you complete the steps, the feature will be removed from the computer.
Remove legacy optional features with commands
To uninstall legacy optional features through PowerShell, use these steps:
-
Open Start.
-
Search for PowerShell, right-click the top result, and choose the Run as administrator option.
-
Type the following command to view the available legacy features and press Enter:
Get-WindowsOptionalFeature -Online
-
Confirm the feature name to remove. For example, MultiPoint-Connector.
-
Type the following command to uninstall the legacy feature and press Enter:
Disable-WindowsOptionalFeature –FeatureName "MultiPoint-Connector" -Online

In the command, change “MultiPoint-Connector” for the identifier of the feature you want to remove.
-
Type “Y” and press Enter to restart (if applicable).
After you complete the steps, the optional feature should now be removed from Windows 11.
Update October 28, 2024: These instructions have been updated to ensure accuracy and reflect changes to the process.
Source link