
- To map a network drive on Windows 11, open File Explorer, click “See more,” choose “Map network drive,” and specify the drive letter, location, and credentials.
- From Command Prompt, you can execute the “net use Z: \\DEVICE-NAME-OR-IP\SHARED-FOLDER” command.
- From PowerShell, you run the “New-PSDrive -Name “DRIVER-LETTER” -PSProvider “FileSystem” -Root “\\DEVICE-NAME-OR-IP\SHARED-FOLDER” -Persist” command.
- It’s important not to run the command consoles as an administrator, as this will prevent the drive from appearing in File Explorer.
Windows 11 provides multiple methods for mapping a network drive to your computer, such as using File Explorer, PowerShell, or Command Prompt. This guide will walk you through these processes and demonstrate how to disconnect a mapped drive when it’s no longer needed.
Mapping a network drive involves connecting to a shared folder on the network, allowing Windows 11 to access its contents as if it were a local drive. Once configured, the storage appears under “Network locations” in the “This PC” section of File Explorer.
If you need to disconnect from the network resource, Windows 11 offers straightforward options to remove the network drive using the same tools.
In this guide, I will teach you the steps to map a drive on Windows 11.
Map network drive on Windows 11
On Windows 11 Pro and Home, you have multiple ways to map a network folder to your computer, and here’s how.
Method 1. Using File Explorer
To map a network drive with File Explorer on Windows 11, use these steps:
-
Open File Explorer on Windows 11.
-
Click on This PC from the left pane.
-
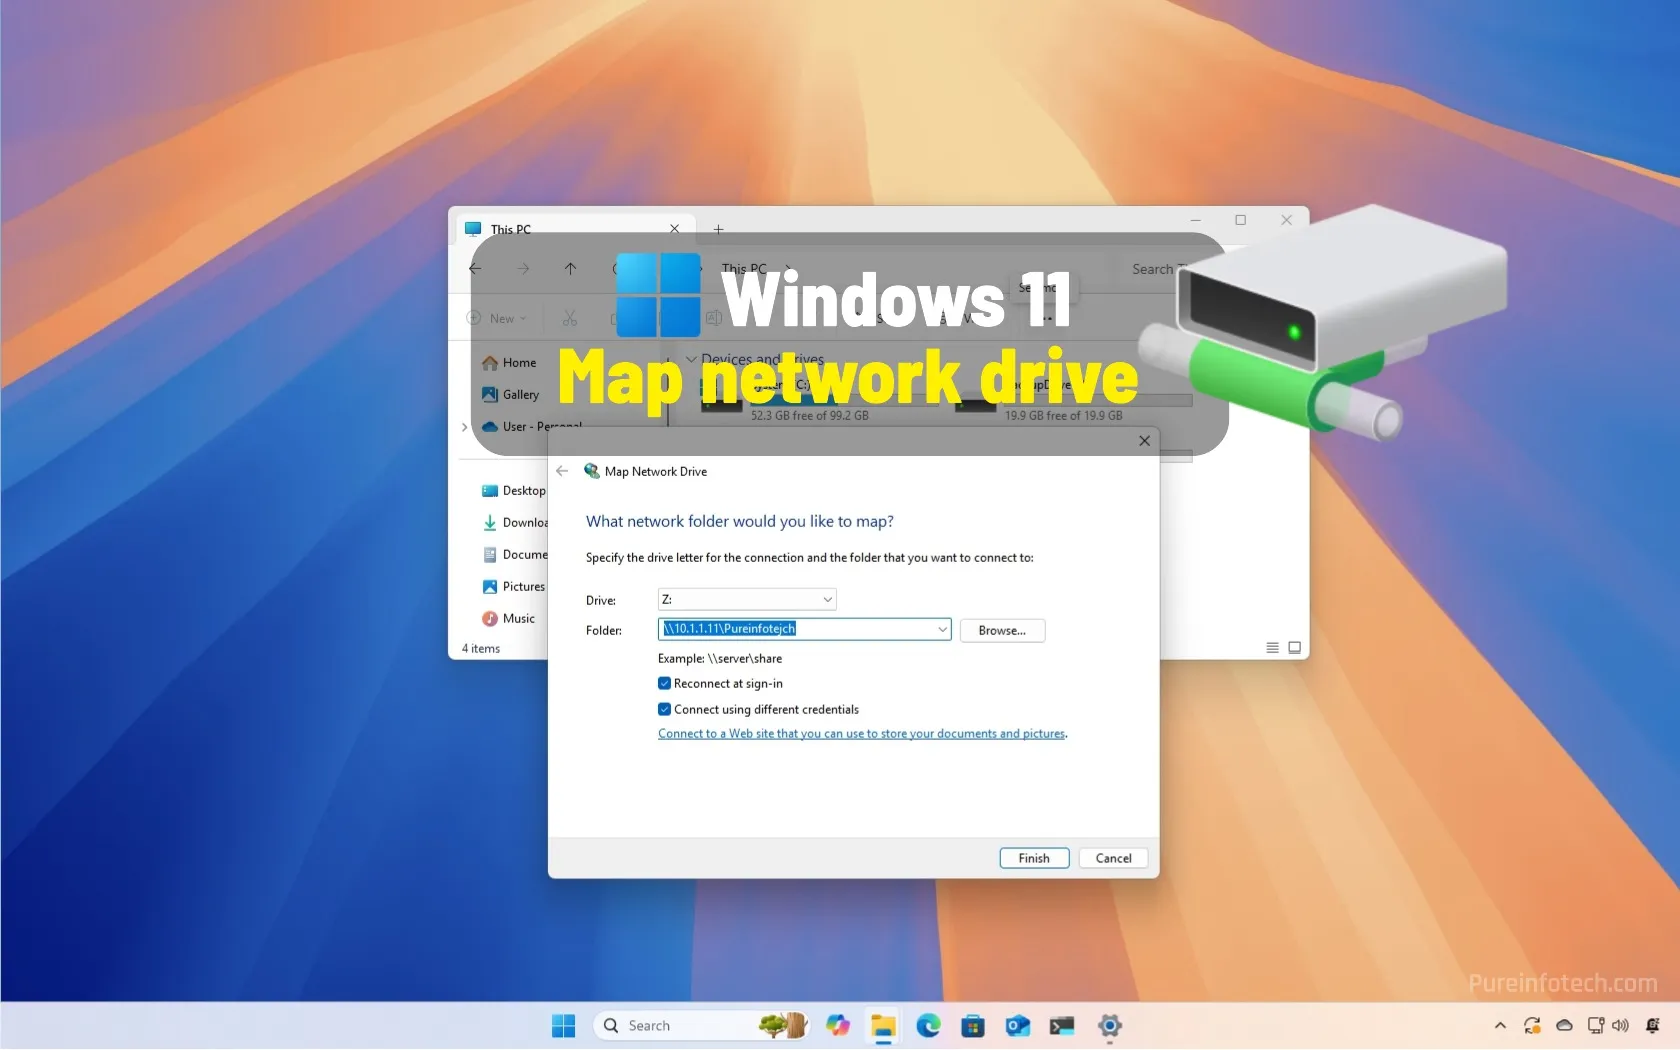
Click the See more (three-dotted) button in the command bar and select the “Map network drive” option.
-
Choose a letter to assign the drive from the “Drive” drop-down menu.
-
Confirm the network path to the shared folder in the “Folder” setting. (You can also click the Browse button to browse the folder to map as a network drive and click the OK button.)

-
Check the “Reconnect at sign-in” option to make the connection permanent.
-
Check the “Connect using different credentials” option if the credentials differ from the account you already use on Windows 11.
-
Click the Finish button.
-
Confirm the network account credentials (if applicable).
-
Click the OK button.

Once you complete the steps, the network drive will become available on File Explorer.
If you cannot connect to the network drive, use the IP address instead of the computer name. However, if the remote device uses a dynamic IP address configuration, it may change in the future, and you may need to reconnect again.
Also, if the device providing the resources uses a Microsoft account with the passwordless option, you will need to create a local account on that device to connect. Otherwise, the mapping won’t work.
Method 2. Using Command Prompt
To map a network drive through Command Prompt on Windows 11, use these steps:
-
Open Start.
-
Search for Command Prompt and click the top result to open the console.
Quick tip: You don’t have to run the command console as an administrator. If you do, the map network will not show on File Explorer.
-
Type the following command to map a drive assigning drive letter manually and press Enter:
net use Z: \\DEVICE-NAME-OR-IP\SHARED-FOLDER
In the command, replace “Z” with the drive letter that has not already been used. Then, replace “DEVICE-NAME-OR-IP” and “SHARED-FOLDER” with the computer name or IP address of the device hosting the shared folder and the name of the share. For example, this command maps the ShareFiles folder to the computer with the “Z” drive letter:
net use Z: \\COMPUTER\ShareFiles

-
Type the following command to map a drive assigning drive letter automatically and press Enter:
net use * \\DEVICE-NAME-OR-IP\SHARED-FOLDER
In the command, the (*) option automatically assigns a randomly available drive letter. Then, replace “DEVICE-NAME-OR-IP” and “SHARED-FOLDER” with the computer name or IP address of the device hosting the shared folder and the name of the share. For example, this command maps the ShareOne folder to the computer:
net use * \\COMPUTER\ShareFiles

-
Type the following command to map a drive providing authentication details and press Enter:
net use Z: \\DEVICE-NAME-OR-IP\SHARED-FOLDER PASSWORD /user:USERNAME /persistent:yes
In the command, replace “Z” with the drive letter that has not already been used. Then, change “DEVICE-NAME-OR-IP” and “SHARED-FOLDER” for the computer name or IP address of the device hosting the shared folder and the name of the share. The “PASSWORD” and “USERNAME” must be replaced with the credentials to authenticate with the remote machine. The “persistent” option allows the folder to stay mapped after reboot. For example, this command maps the ShareFiles folder, providing the user credentials and making the mapping persistent:
net use Z: \\COMPUTER\ShareFiles password /user:admin /persistent:yes


After you complete the steps, the network shared folder will map on Windows 11, appearing in File Explorer.
Method 3. Using PowerShell
To map a network drive with PowerShell commands, use these steps:
-
Open Start.
-
Search for PowerShell and click the top result to open the console.
Quick tip: You don’t have to run the command console as an administrator. If you do, the map network will not show on File Explorer.
-
Type the following command to map the network drive assigning letter manually and press Enter:
New-PSDrive -Name "DRIVER-LETTER" -PSProvider "FileSystem" -Root "\\DEVICE-NAME-OR-IP\SHARED-FOLDER" -Persist
In the command, replace “DRIVER-LETTER” with a drive letter that has not already been used. Then, change “DEVICE-NAME-OR-IP” and “SHARED-FOLDER” for the computer name or IP address of the computer hosting the shared folder and the name of the share. For example, this command maps the ShareFiles folder to the computer with the “Z” drive letter:
New-PSDrive -Name "Z" -PSProvider "FileSystem" -Root "\\COMPUTER\ShareFiles" -Persist


Once you complete the steps, the shared folder will mount as a network drive on the computer and appear on File Explorer.
From PowerShell with password
To map a network drive providing the account name and password, use these steps:
-
Open Start.
-
Search for PowerShell and click the top result to open the console.
-
Type the following command to create a variable to store the account information and press Enter:
$cred = Get-Credential -Credential USERNAME

Quick tip: If you are mapping a drive in Active Directory, specify the user name like this:
network\admin. -
Confirm the account password.
-
Click the OK button.
-
Type the following command to map a drive assigning drive letter manually and press Enter:
New-PSDrive -Name "E" -Root "\\DEVICE-NAME-OR-IP\SHARED-FOLDER" -Persist -PSProvider "FileSystem" -Credential $cred
In the command, replace “DRIVER-LETTER” with the drive letter that has not already been used. Then, change “DEVICE-NAME-OR-IP” and “SHARED-FOLDER” for the computer name or IP address of the device hosting the shared folder and the name of the share. For example, this command maps the “ShareFiles” folder to the computer with the “X” drive letter:
New-PSDrive -Name "X" -Root "\\COMPUTER\ShareFiles" -Persist -PSProvider "FileSystem" -Credential $cred

Once you complete the steps, the command will map the shared folder with your specified credentials.
When you try to connect using credentials, you will always get prompted to provide a password manually. To avoid this step, you could store the password in an encrypted file on the computer and query that file using PowerShell. Or you can speed up the process by holding the remote host account name and password in “Credential Manager” and then using the same command without the -Crendtial option like this: New-PSDrive -Name "E" -Root "\\vm-beta\ShareOne" -Persist -PSProvider "FileSystem"
You can create a new entry in Credential Manager using this command: cmdkey /add:pcname /user:network\username /pass:password
Disconnect network drive on Windows 11
You also have different methods to disconnect a network. However, it’s always recommended to disconnect the drive the same way it was originally connected.
Method 1. Using File Explorer
To disconnect a network drive on Windows 11, use these steps:
-
Open File Explorer.
-
Click on This PC from the left pane.
-
Right-click the network drive (select See more options) and choose the Disconnect option under the “Network Locations” section.


After you complete the steps, the network drive will no longer be available on the computer.
Method 2. Using Command Prompt
To disconnect a network drive on Windows 11 with Command Prompt, use these steps:
-
Open Start.
-
Search for Command Prompt and click the top result to open the console.
-
Type the following command to disconnect a mapped network drive and press Enter:
net use z: /Delete

In the command, replace “Z” for the drive letter of the map you want to remove.
-
(Optional) Type the following command to disconnect all the mapped network drives and press Enter:
net use * /Delete
Once you complete the steps, the mapped drives will be disconnected and no longer accessible from File Explorer.
Method 3. Using PowerShell
To disconnect and remove a mapped network drive with PowerShell on Windows 11, use these steps:
-
Open Start.
-
Search for PowerShell and click the top result to open the console.
-
Type the following command to view all the mapped drives and press Enter:
Get-PSDrive -PSProvider "FileSystem"
-
Type the following command to disconnect the mapped network drive and press Enter:
Remove-PSDrive -Name DRIVE-LETTER
In the command, replace DRIVE-LETTER for the drive letter of the mapping. For example, this command disconnects the “X” drive:
Remove-PSDrive -Name X

-
(Optional) Type the following command to disconnect multiple mappings and press Enter:
Get-PSDrive DRIVER-LETTER-1, DRIVE-LETTER-2 | Remove-PSDrive
In the command, replace “DRIVER-LETTER-1” and “DRIVE-LETTER-2” with the drive letters you want to disconnect. For example, this command disconnects the “E” and “F” drives:
Get-PSDrive E, F | Remove-PSDrive

Once you complete the steps, the network mapping will no longer be available on the computer.
What method did you use to add the network drive on Windows 11? If you have any questions, you can tell me in the comments.
Update March 21, 2025: This guide has been updated to ensure accuracy and reflect changes to the process.
Source link
-

-

-

-

-

-

-

-


