
On Windows 11, it’s possible to extend the partition containing the operating system, apps, and files to use the remaining unallocated space on the hard drive, and in this guide, I’ll explain the proper process to complete this configuration without losing your data.
A typical installation of Windows 11 has three partitions, including the EFI (Extensible Firmware Interface) partition, which is a crucial component of the system’s boot process, the “C:” drive, which contains the operating system, apps, and files, and the Recover Partition, which includes the tools to troubleshoot and resolve system issues.
If the hard drive still has some unallocated space, you won’t be able to extend the primary partition because the remaining space is non-contiguous, as the Recovery Partition is next to it. This usually happens if you create the partitions manually or replace the system hard drive with another one with a larger capacity, and you used a cloning or backup tool to transfer the installation to the new drive.
Regardless of the reason, you can still extend the main setup volume to make the additional space usable. However, you would have to delete the Recovery Partition, extend the “C:” drive, and then recreate the Recovery Partition at the end of the drive to complete this process.
In this guide, I will explain how to correctly increase the size of the system partition on Windows 11 to use the remaining unallocated space when the Recovery Partition is next to it.
Extend the ‘C’ system drive on Windows 11
To extend the “C” drive on Windows 11, follow these steps:
-
Open Start.
-
Search for Command Prompt, right-click the top result, and choose the Run as administrator option.
-
Type the following command to disable the Windows Recovery Environment (WinRE) and press Enter:
reagentc /disable
Quick note: This command disables the recovery environment and moves the “Winre.wim” image from the “Recovery Partition” to the “Recovery” folder in the “C” drive.
-
Type the following command to launch DiskPart and press Enter:
diskpart
-
Type the following command to list the system drives and press Enter:
list disk
-
Type the following command to select the “C” drive and press Enter:
select disk 0
-
Type the following command to list the partitions and press Enter:
list partition
-
Type the following command to select the Recovery Partition and press Enter:
select partition X
In the command, replace “X” with the number that corresponds to the Recovery Partition on your setup.
-
Type the following command to delete the recovery partition and press Enter:
delete partition override
-
Open Settings.
-
Click on Storage.
-
Click on Advanced storage settings under the “Storage management” section.
-
Click on Disks & volumes.

-
Select the Windows 11 volume and click the Properties option.

-
Click the Change size button.

-
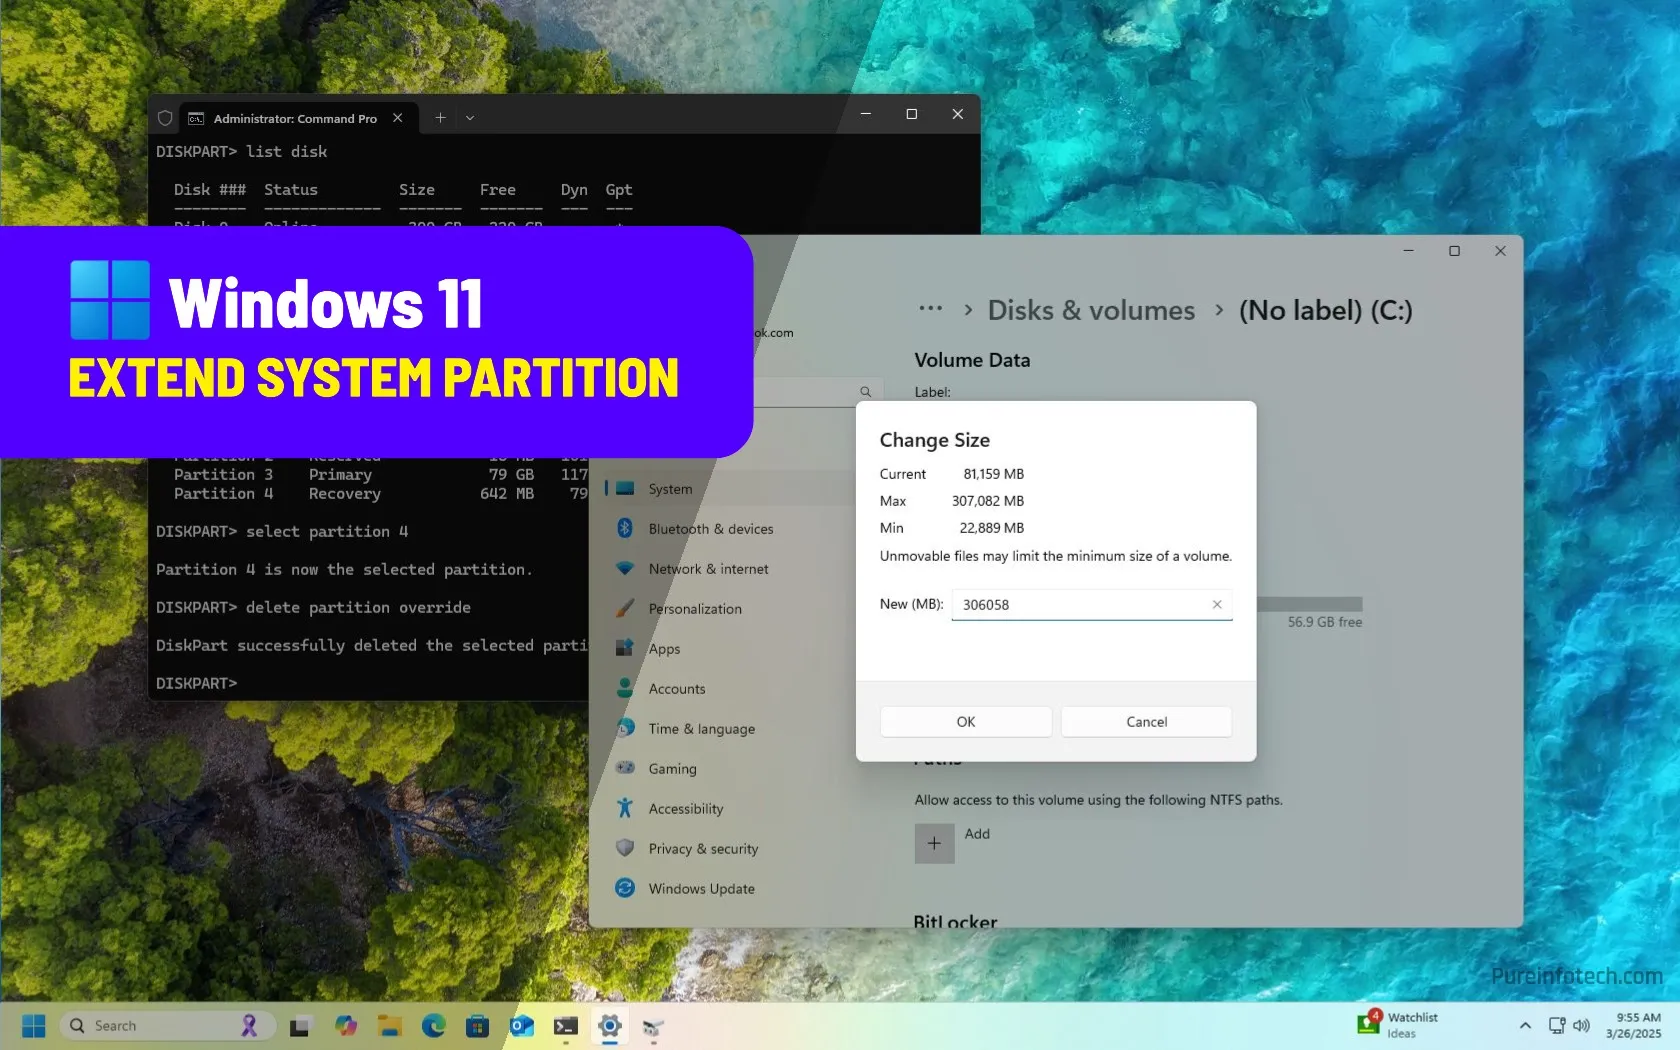
Confirm the “Max” value in the New (MB) setting to indicate the total size of the partition (C:) where Windows 11 is installed, but leave at least 1024MB (1GB) to recreate the Recovery Partition. For example, if the maximum size of the partition that can be used is 307082, then subtract 1024, and use that as the new number (306058).

-
Click the OK button.
-
In Command Prompt, type the following command to create a new partition and press Enter:
create partition primary

-
Type the following command to format the partition and press Enter:
format fs=ntfs quick
-
Type the following command to register the new partition as the Recovery Partition in the system and press Enter:
set id=de94bba4-06d1-4d40-a16a-bfd50179d6ac override
-
Type the following command to lock and prevent users from modifying this partition and press Enter:
gpt attributes=0x8000000000000001
-
Type the following command to close the DiskPart tool and press Enter:
exit
-
Type the following command to enable WinRE and press Enter:
reagentc /enable
Quick note: This action will also copy the “Winre.wim” from the “Recovery” folder to the “Recovery Partition.”
-
Type the following command to confirm the Windows Recovery Environment is working correctly, and press Enter:
reagentc /info


After you complete the steps, the “C:” drive will extend to the remaining space, and the new Recovery Partition will be created next to the partition with the Windows 11 setup.
If the “winre.wim” file is missing or you’re dealing with errors, you can create the Recovery Partition using the “winre.wim” file available inside the “install.wim” file from the Windows 11 ISO file.
Why You Can Trust Pureinfotech
The author combines expert insights with user-centric guidance, rigorously researching and testing to ensure you receive trustworthy, easy-to-follow tech guides. Review the publishing process.
Source link
-

-

-

-

-

-

-

-


