If you’re running Windows 11 23H2 (or an older release) on unsupported hardware, you can still upgrade to Windows 11 24H2 through an in-place upgrade without losing your files, apps, or settings. In this guide, I’ll walk you through two methods to complete the upgrade, based on my experience testing Windows setups on unsupported devices.
However, if you’re coming from Windows 10, I strongly recommend performing a clean installation instead of an in-place upgrade. While both approaches are technically possible, a clean install on older or unsupported systems delivers the best performance and stability.
To bypass Microsoft’s hardware checks, you have two main options:
- Run the setup with a special command using Command Prompt. This method uses the ISO file stored locally on your drive and is generally faster since it doesn’t rely on a USB drive.
- Create a bootable USB with Rufus. This tool includes options to skip system checks and is especially useful if you prefer booting from external media.
While both methods are effective, the Command Prompt approach is usually quicker. It launches setup directly from your hard drive, avoiding the slower read and write speeds of a USB flash drive. Rufus remains a great alternative, but you have to expect a slightly longer setup time due to USB performance limitations.
Proceeding with the upgrade on unsupported hardware places your device in what Microsoft classifies as an “unsupported state.” This means you may encounter bugs or unexpected issues, system updates are not guaranteed, and you won’t find support from Microsoft.
In other words, use these methods at your own risk. This is an advanced setup for users who are comfortable troubleshooting Windows installations.
Also, regardless of how you proceed, your system must meet minimum functional requirements:
- A TPM chip version 1.2 (not necessarily TPM 2.0).
- A processor that supports the POPCNT (population count) instruction.
Most CPUs released in 2008 or later meet these criteria, but it’s always wise to double-check using tools like CPU-Z.
In this guide, I’ll outline the steps to install Windows 11 on unsupported hardware through an in-place upgrade.
Upgrade unsupported hardware to Windows 11 using Command Prompt
To upgrade from an older version to the latest release of Windows 11 on an unsupported hardware, follow these steps:
-
Select the Windows 11 option under the “Download Windows 11 Disk Image (ISO) for x64 devices” section.
-
Click the Download button.
-
Select the installation language.

-
Click the Confirm button.
-
Click the Download button to save the Windows 11 ISO file on the computer.

-
Open File Explorer (Windows key + E).
-
Open the Windows 11 ISO file location.
-
Right-click the ISO file, select the Open with submenu, and choose the Windows Explorer option.
-
Confirm the letter for the drive with the installation files.
-
Open Start.
-
Search for Command Prompt, right-click the top result, and choose the Run as administrator option.
-
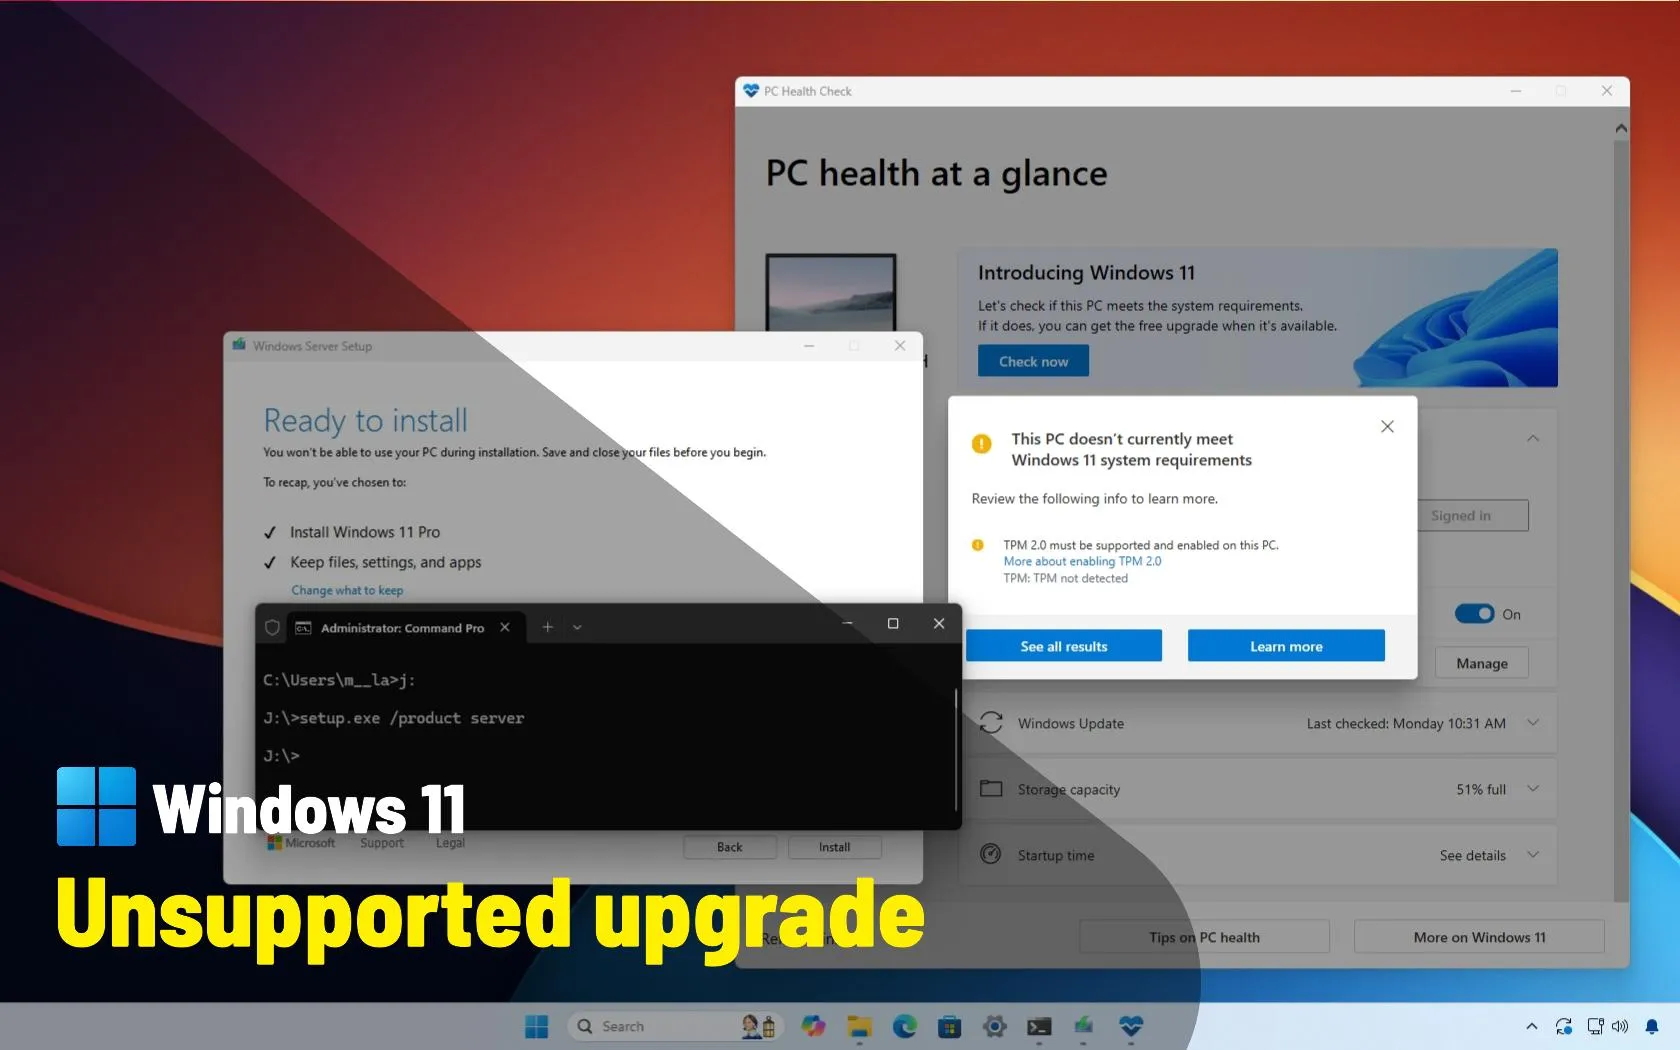
Type the following command to open the location with the installation files and press Enter:
J:
In the command, change the letter “J” to the letter that corresponds to your drive.
-
Type the following command to run the Windows 11 setup, bypassing the hardware requirements, and press Enter:
setup.exe /product server

-
(Optional) Click the “Change how Windows Setup downloads updates” option.

-
Select the “Not right now” option.

-
Click the Next button.
-
Check the “Keep files, settings, and apps” option.
-
Click the Install button.


After you complete the steps, the setup will continue with the upgrade process. Since this is an in-place upgrade, you won’t have to complete the Out-of-box Experience (OOBE), and your files, settings, and apps will be kept.
While this command works to upgrade an older version of Windows 11 to version 24H2, it’s important to mention that there will be times when it may not work. You may end up with a message about the setup not being able to determine if your computer is compatible. You can try the command a few more times, but if it doesn’t work, you should try a different method.

Upgrade unsupported hardware to Windows 11 using Rufus
To perform an in-place upgrade on unsupported hardware using the Rufus tool, follow these steps:
-
Under the ” Download ” section, click the link to download the latest version of the tool to your computer.
-
Right-click the executable and choose the Open option to launch the tool.
-
Choose the USB flash drive from the “Device” setting.
-
Click the Select button.

-
Select the Windows 11 ISO file.
-
Click the Open button.
-
Select the “Standard Windows Partition” option in the “Image option” setting.
-
Select the GPT option in the “Partition scheme” setting.
-
Select the UEFI (non CSM) option in the “Target system” setting.
-
Under the “Volume label” section, specify a descriptive name for the Windows 11 bootable USB flash drive – For example, Windows 11 Bypass.
-
Use the default settings for the File system and Cluster size options.
-
Check the Quick format option.
-
Check the “Create extended label and icon files” option.
-
Click the Start button.
-
Check the “Remove requirement for 4GB+ RAM, Secure Boot and TPM 2.0” option to bypass hardware requirements.

-
Check the “Remove requirement for an online Microsoft account” option to bypass the internet requirement and create a local account.
-
Check the “Create a local account with username” option and specify an account name to create a local account automatically, bypassing this part of the setup.
-
(Optional) Check the “Disable BitLocker automatic device encryption” option to prevent the setup from enabling BitLocker during the installation.
-
Click the OK button.
-
Open File Explorer.
-
Select the recently created Windows 11 USB flash drive from the left pane.
-
Double-click the Setup.exe file to launch the operating system setup.
-
(Optional) Click the “Change how Windows Setup downloads updates” option.
-
Select the “Not right now” option.
-
Click the Next button.
-
Check the “Keep files, settings, and apps” option.
-
Click the Install button.


Once you complete the steps, the computer with unsupported hardware will upgrade to the latest version of Windows 11, keeping your files, apps, and settings.
Source link
-

-

-

-

-
-

-

-