- To enable File History on Windows 11 (or 10), connect the external USB hard drive to your computer, open Control Panel > System and Security > File History, and click the “Turn on” button to create a file backup.
- To use a network location, open “Select drive” and click the “Add network location” option.
- It’s still possible to add custom folder locations using the “Libraries” feature on File Explorer.
On Windows 11 (and 10), “File History” is a legacy feature that allows you to create a file backup on an external or network drive to recover files in case of they’re lost, corrupted, or deleted.
File History backs up your files in the “Documents,” “Pictures,” “Videos,” “Music,” and “Desktop” folders, including the OneDrive files locally stored on the device by default. However, it’s no longer possible to include additional folder locations in the backup unless you add other folders as library locations on File Explorer.
Although you can still use File History to create automated file backups, on Windows 11, Microsoft is no longer exposing the feature through the Settings app because it wants you to subscribe to OneDrive to keep the files backed up in the cloud. However, if you prefer a local solution, you can still use the feature through the Control Panel.
In this guide, I will teach you the steps to set up File History on an external drive or network folder on Windows 11 as well as on Windows 10.
Set up File History backup to an external USB drive
To create a file backup on Windows 11 (or 10) using File History, connect an external drive and use these steps:
-
Open Start.
-
Search Control Panel and select the top result to open the app.
-
Click on System and Security.
-
Click on File History.
-
Click the “Turn on” button if the backup drive already shows in the list.

Quick tip: If you want to use another drive, click the “Select drive” option on the left to change the settings.
-
(Optional) Click the Advanced Settings option from the left pane.
-
Choose how often File History should create incremental backups of your files using the “Save copies of files” setting under the “Advanced settings” section.

-
Choose the backup retention using the “Keep saved versions” setting.
-
Click the Save changes button.
-
(Optional) Click the Exclude Folders option from the left pane.
-
Click the Add button.

-
Select the folder location to exclude from the backup.
-
Click the Select Folder button.
-
Click the Save changes button.


Once you complete the steps, File History will begin backing up your files in the external storage.
On the “Advanced Settings” page, you will also find the “Event logs” section with an option to open the Event Viewer, where you can check errors and other events generated by File History.
If you want to include files from OneDrive, you must configure them to be available without an internet connection. You can do this by selecting and right-clicking the files and folders and choosing the “Always keep on this device” option. Otherwise, the feature will ignore the file because it is technically not locally available on the device.
If you want to stop File History, you can use the same instructions outlined above, but in step 5, click the “Turn off” button.
Set up File History backup to a network folder
To create a file backup to a network folder with File History, use these steps:
-
Open Start.
-
Search Control Panel and select the top result to open the app.
-
Click on System and Security.
-
Click on File History.

-
Click the Select drive option from the left pane.

-
Click the “Add network location” option.

-
Select the network folder to backup files with File History.
-
Click the Select Folder button.
-
Click the OK button.
-
Click the “Turn on” button to enable File History on Windows 11 (or 10).

-
(Optional) Click the Advanced Settings option from the left pane.
-
Choose how often File History should create incremental backups of your files using the “Save copies of files” setting under the “Advanced settings” section.
-
Choose the backup retention using the “Keep saved versions” setting.
-
Click the Save changes button.
-
(Optional) Click the Exclude Folders option from the left pane.
-
Click the Add button.
-
Select the folder location to exclude from the backup.
-
Click the Select Folder button.
-
Click the Save changes button.


After you complete the steps, the feature will create a backup of your files to the network location.
Add additional folders to File History
In the past, File History included an option to help you add custom folder locations other than the default profile folders and libraries, but the option has been removed. However, it’s possible to include custom locations (for example, from folders in secondary drives) as long as you include the location in one of the system libraries.
To add more folder locations to File History, use these steps:
-
Open File Explorer (Windows key + E).
-
Open the folder to include it in File History.
-
Press and hold the “Shift” key and right-click the folder, choose the “Include in library,” and then select the “Create new library” option.

- (Optional) Press and hold the “Shift” key and right-click the newly created library and choose the Rename option.
-
Confirm a name like “File History” and press Enter.
-
(Optional) Open another folder location to add to File History.
-
Press and hold the “Shift” key and right-click the folder, choose the “Include in library,” and then select the “File History” library.

Once you complete the steps, the File History will now include the custom folder locations in the backup process.
As a personal note. I have tried modifying the “Config1.xml” file (available on %UserProfile%\AppData\Local\Microsoft\Windows\FileHistory\Configuration) to include additional folder locations manually, but the feature kept resetting the configuration to the default settings. As such, I’m not including it as an option.
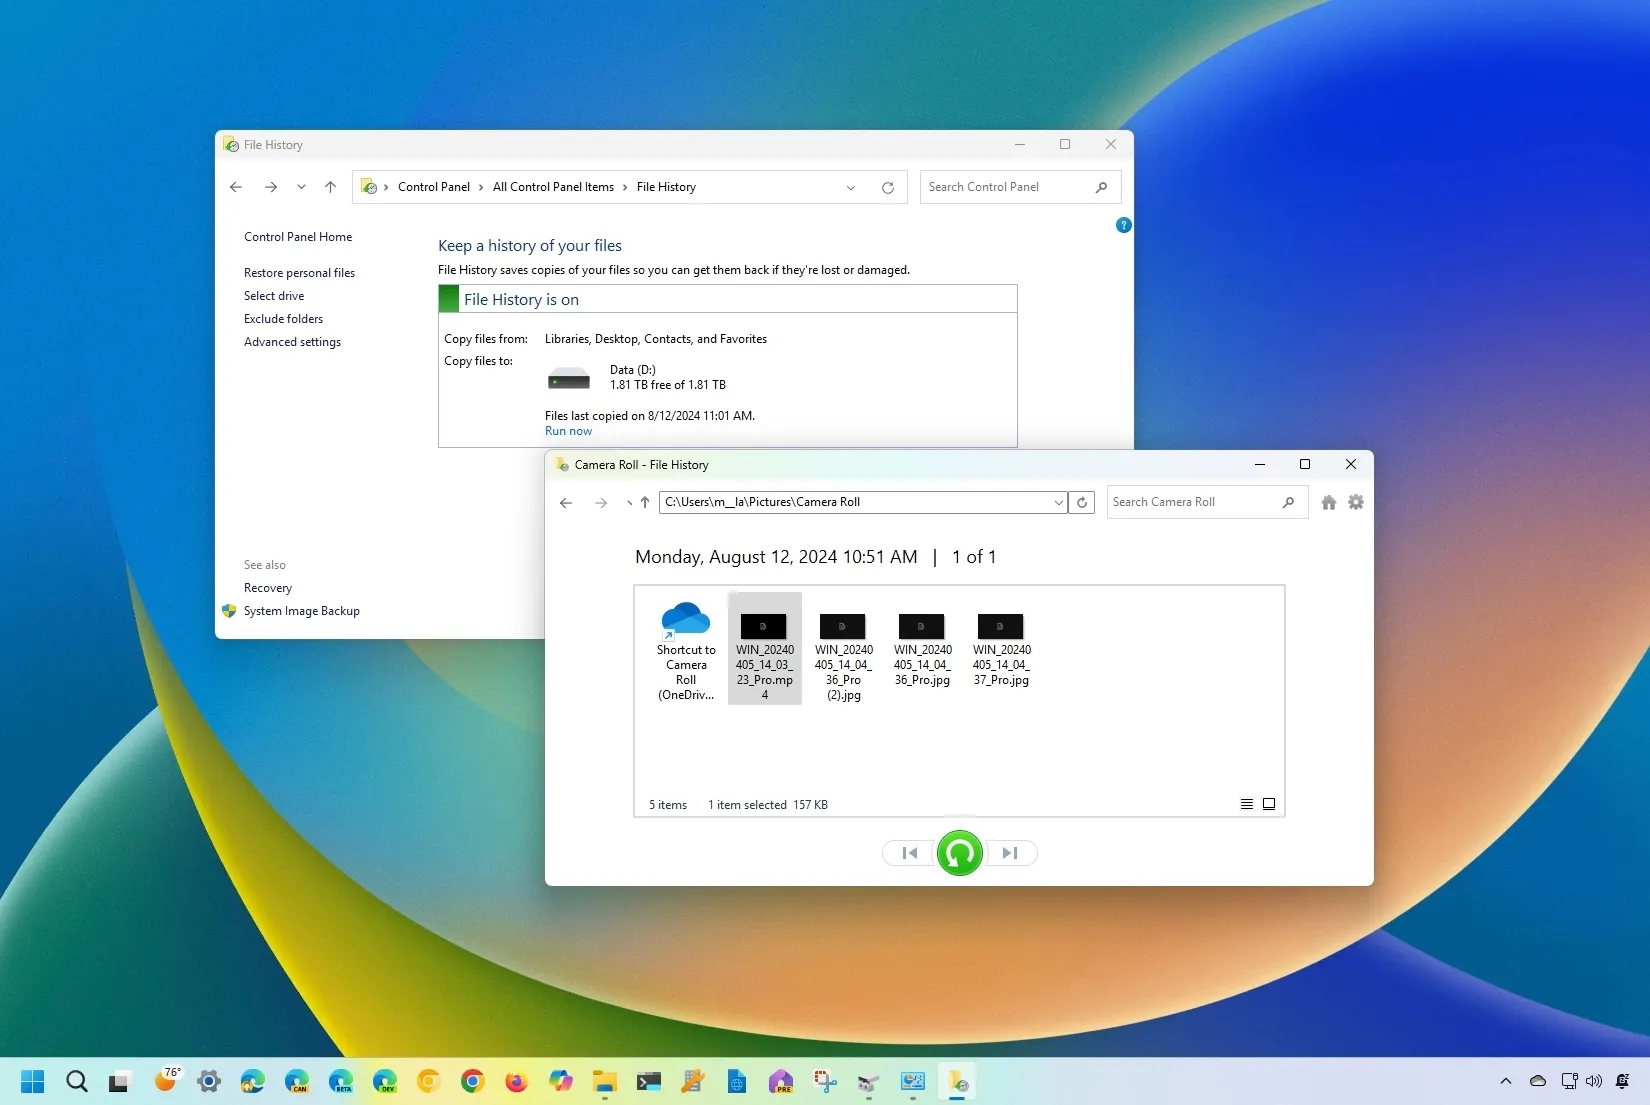
Restore files from File History on Windows
To restore files backed up with File History, use these steps:
-
Open Start.
-
Search Control Panel and select the top result to open the app.
-
Click on System and Security.
-
Click on File History.
-
Click the Restore personal files option from the left pane.

-
Use the navigation buttons to move to a point in time to restore your files.
-
Select the content that you want to recover.
-
Click the green button to restore your files to their default location.

Quick tip: You can also click the gear button in the top-right corner and use the Restore option to restore files to an alternate location.


Once you complete the steps, the files will be restored to the specified location on Windows 11.
It’s important to note that File History is designed to recover files occasionally. This means that this feature is perfect for restoring one or a group of files after accidental deletion or modification. However, the feature is not meant to recover all of your files after performing a clean installation of Windows 11 or restoring all of your files since you will have problems reconfiguring the feature. If you manage to make the feature work, restoration could take a long time if you have a lot of files.
Source link
-

-

-

-

-
-

-

-