
Although it’s nice to start afresh with a new or newly reset Mac, there are several essential changes that I make every time. It’s good to have mainstays like the dock, trackpad gestures, and hot corners set up as you like (while disabling some of macOS more irritating features).
These are the tweaks I make to help improve multitasking, reduce distractions, and streamline my everyday macOS experience.
1
Set Up the Dock
The Dock is useful for accessing your most often-used apps and folders, but it does take up space, especially on a 13-inch MacBook.
Go to Settings > Desktop & Dock to see all the options. I enable “Automatically hide and show the Dock,” which keeps the Dock hidden by default. I keep the position as “Bottom,” set the size to fairly small, and turn off magnification. It makes the Dock unobtrusive, but still practical.
There are many other ways to customize the Mac Dock to really bring it under control.
2
Activate Hot Corners
Hot Corners are a helpful but often overlooked macOS feature. They let you trigger certain actions when you move your mouse pointer into one of the four corners of the screen.
For example, you can quickly clear your windows out of the way to access your desktop, get an overview of all your open windows, or instantly lock the screen. There are 10 options in total.

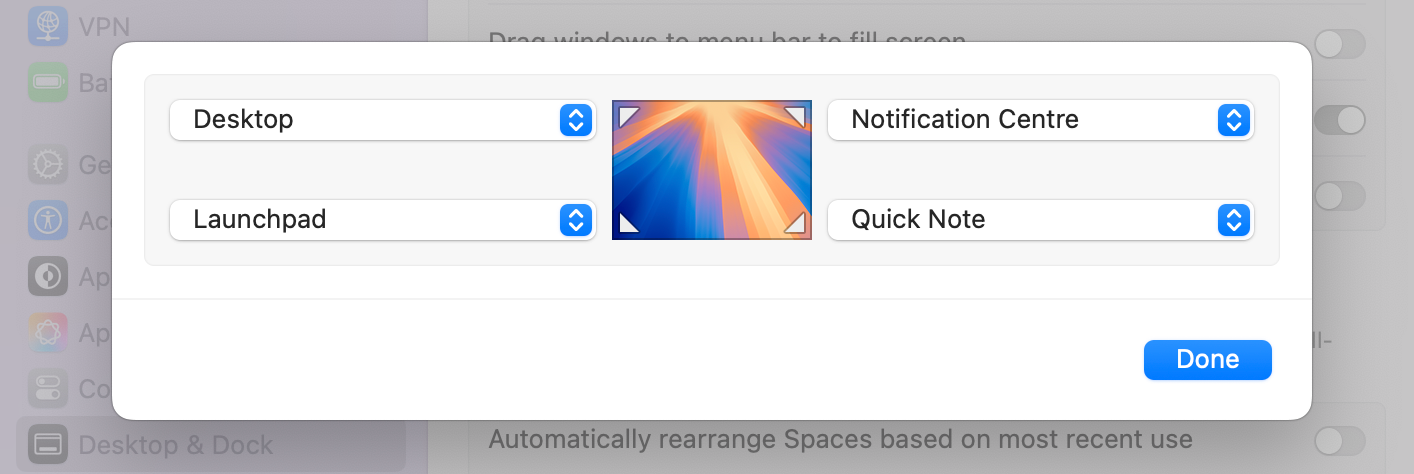
Set them up at Settings > Desktop & Dock > Hot Corners. You can experiment with how you set them up, but here’s what I use:
- Top Left: Show desktop
- Top Right: Show notifications
- Bottom Left: Open Launchpad
- Bottom Right: Create a Quick Note
3
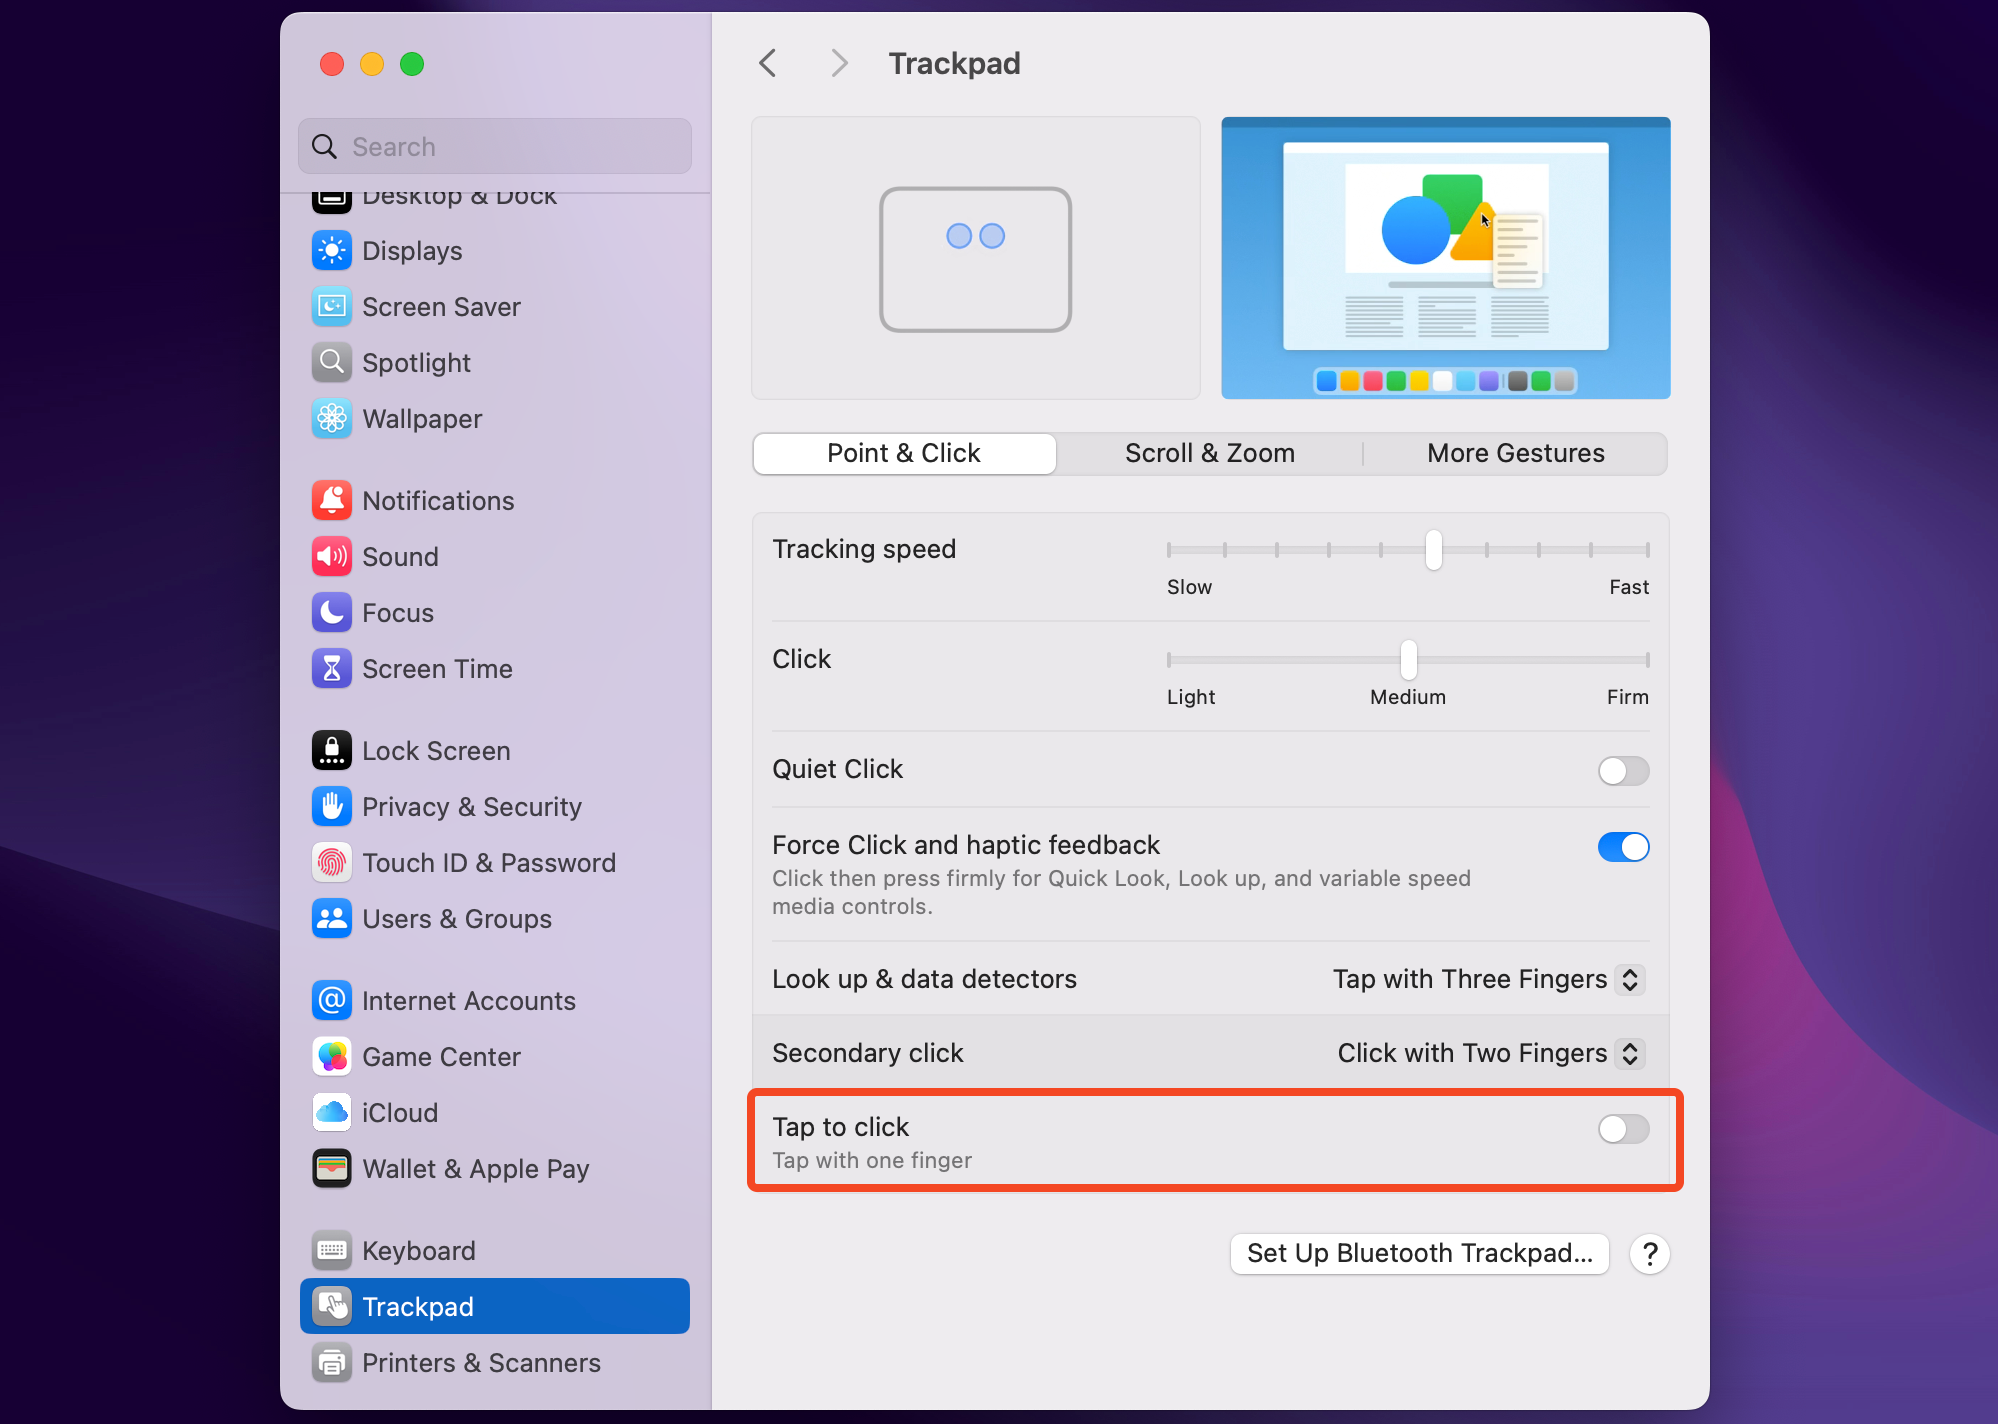
Configure Trackpad Gestures
The MacBook trackpad supports swiping, tapping, and force-clicking, and is multi-touch-capable. It’s highly customizable and will help you navigate macOS smoothly.
I like to keep mine simple. I keep “Tap to click” disabled because I activate it too easily; I use “Click with Two Fingers” for my Secondary Click (right-click) option, and I avoid the gestures that need four fingers or a thumb. Play around with the options to see what works for you.

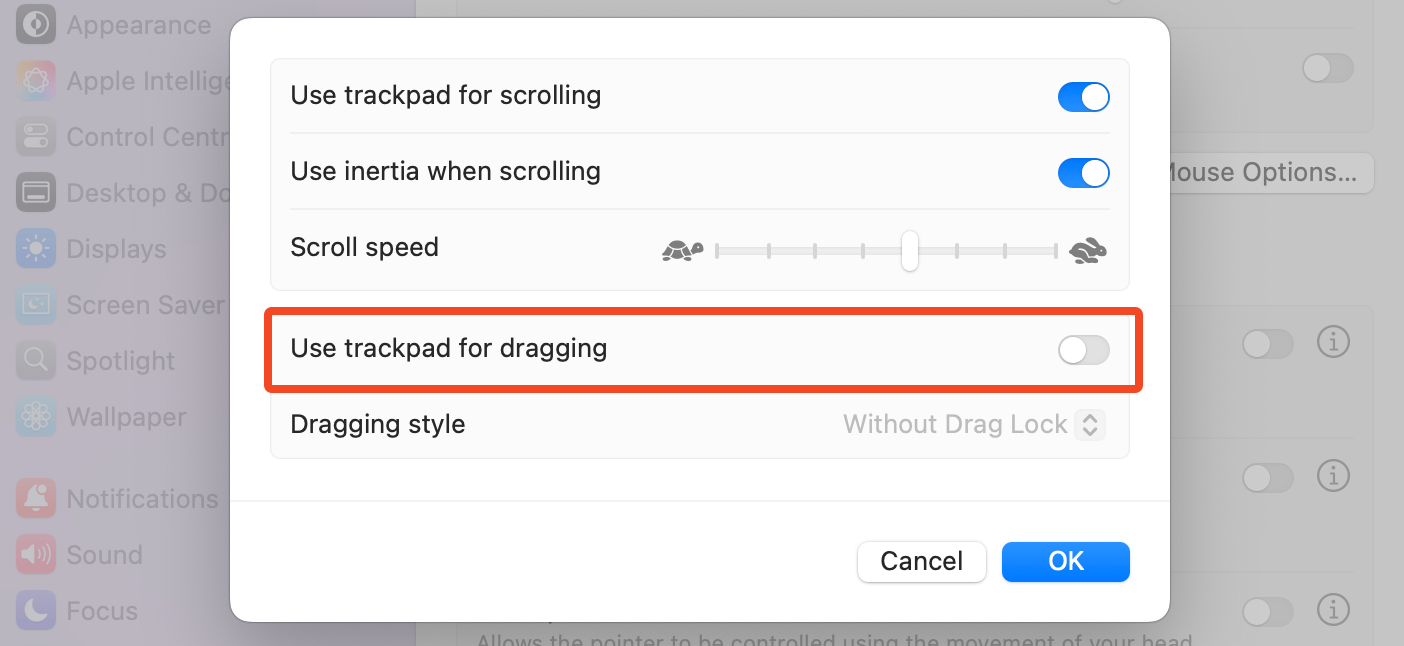
There’s another hidden trackpad gesture that you might want to try. Go to Settings > Accessibility > Pointer Control > Trackpad Options. The “Use trackpad for dragging” option lets you move icons or make selections by dragging on your trackpad as if it were a touchscreen, rather than needing to click and drag as you usually would. It’s not for me, but many people like it.

4
Enable Night Shift
Night Shift reduces the blue light coming from your display, which supposedly helps you get a better night’s sleep. It certainly reduces glare and is easier on your eyes when using your Mac in low-light conditions.
Go to Settings > Displays > Night Shift and set the Schedule to “Sunset to Sunrise.” This automatically enables Night Shift every evening.


5
Turn on Low Power Mode
Low Power Mode optimizes macOS for better battery performance. You can enable it on a MacBook at Settings > Battery. Set Low Power Mode to “Only on Battery” for the best results.

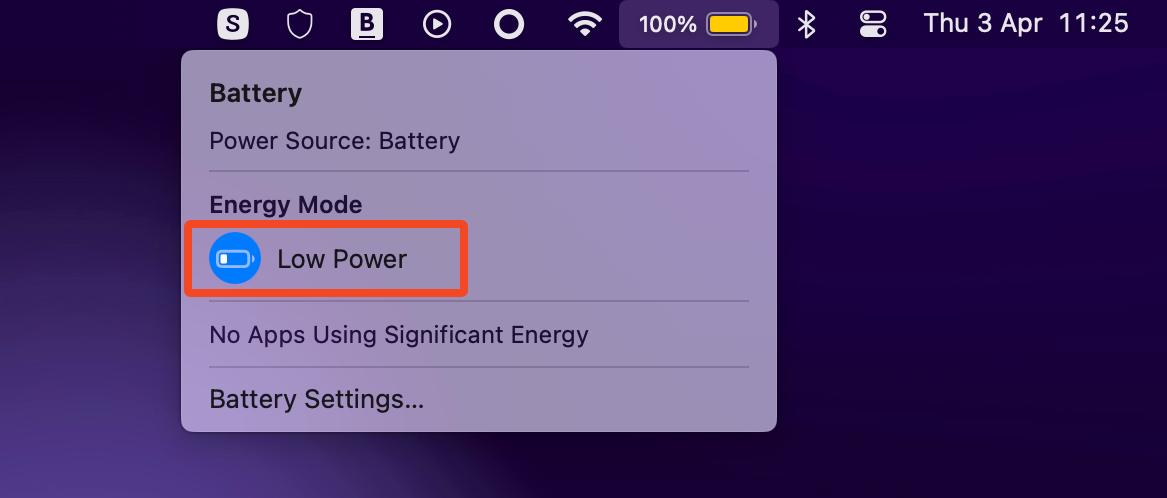
The change makes minor tweaks like lowering the screen brightness, and makes the fans run quieter on a MacBook Pro. The main effect is that the Mac runs a little slower. You won’t notice it in “normal” use. But if you’re running processor or graphics-intensive tasks, you might want to disable the mode temporarily via the battery icon in the menu bar.
6
Customize Control Center and the Menu Bar
Control Center is the iOS-style quick settings panel you access through the menu bar. It includes things like Wi-Fi and Bluetooth controls, and you can add more if you want them. Do this at Settings > Control Center.

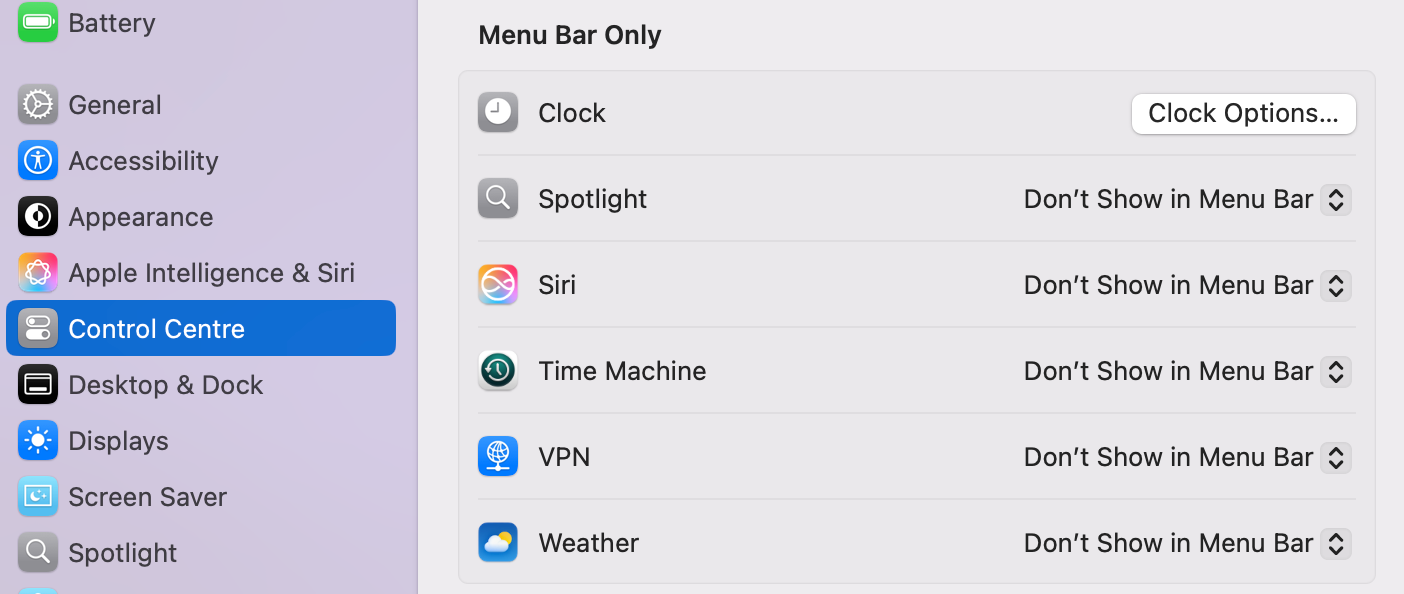
You can also place icons on the menu bar for even quicker access. I add the battery percentage icon, and have Now Playing set to “Show When Active” to give me a convenient Spotify control. To avoid clutter, I leave everything else disabled, including Spotlight, which I use via the Command+spacebar keyboard shortcut, Siri, which I don’t use on a Mac, and Time Machine, which happily runs in the background anyway.

Apps will often put their own icons in your menu bar. If you see any you don’t want, hold down the Command key, then click and drag the icon away.
7
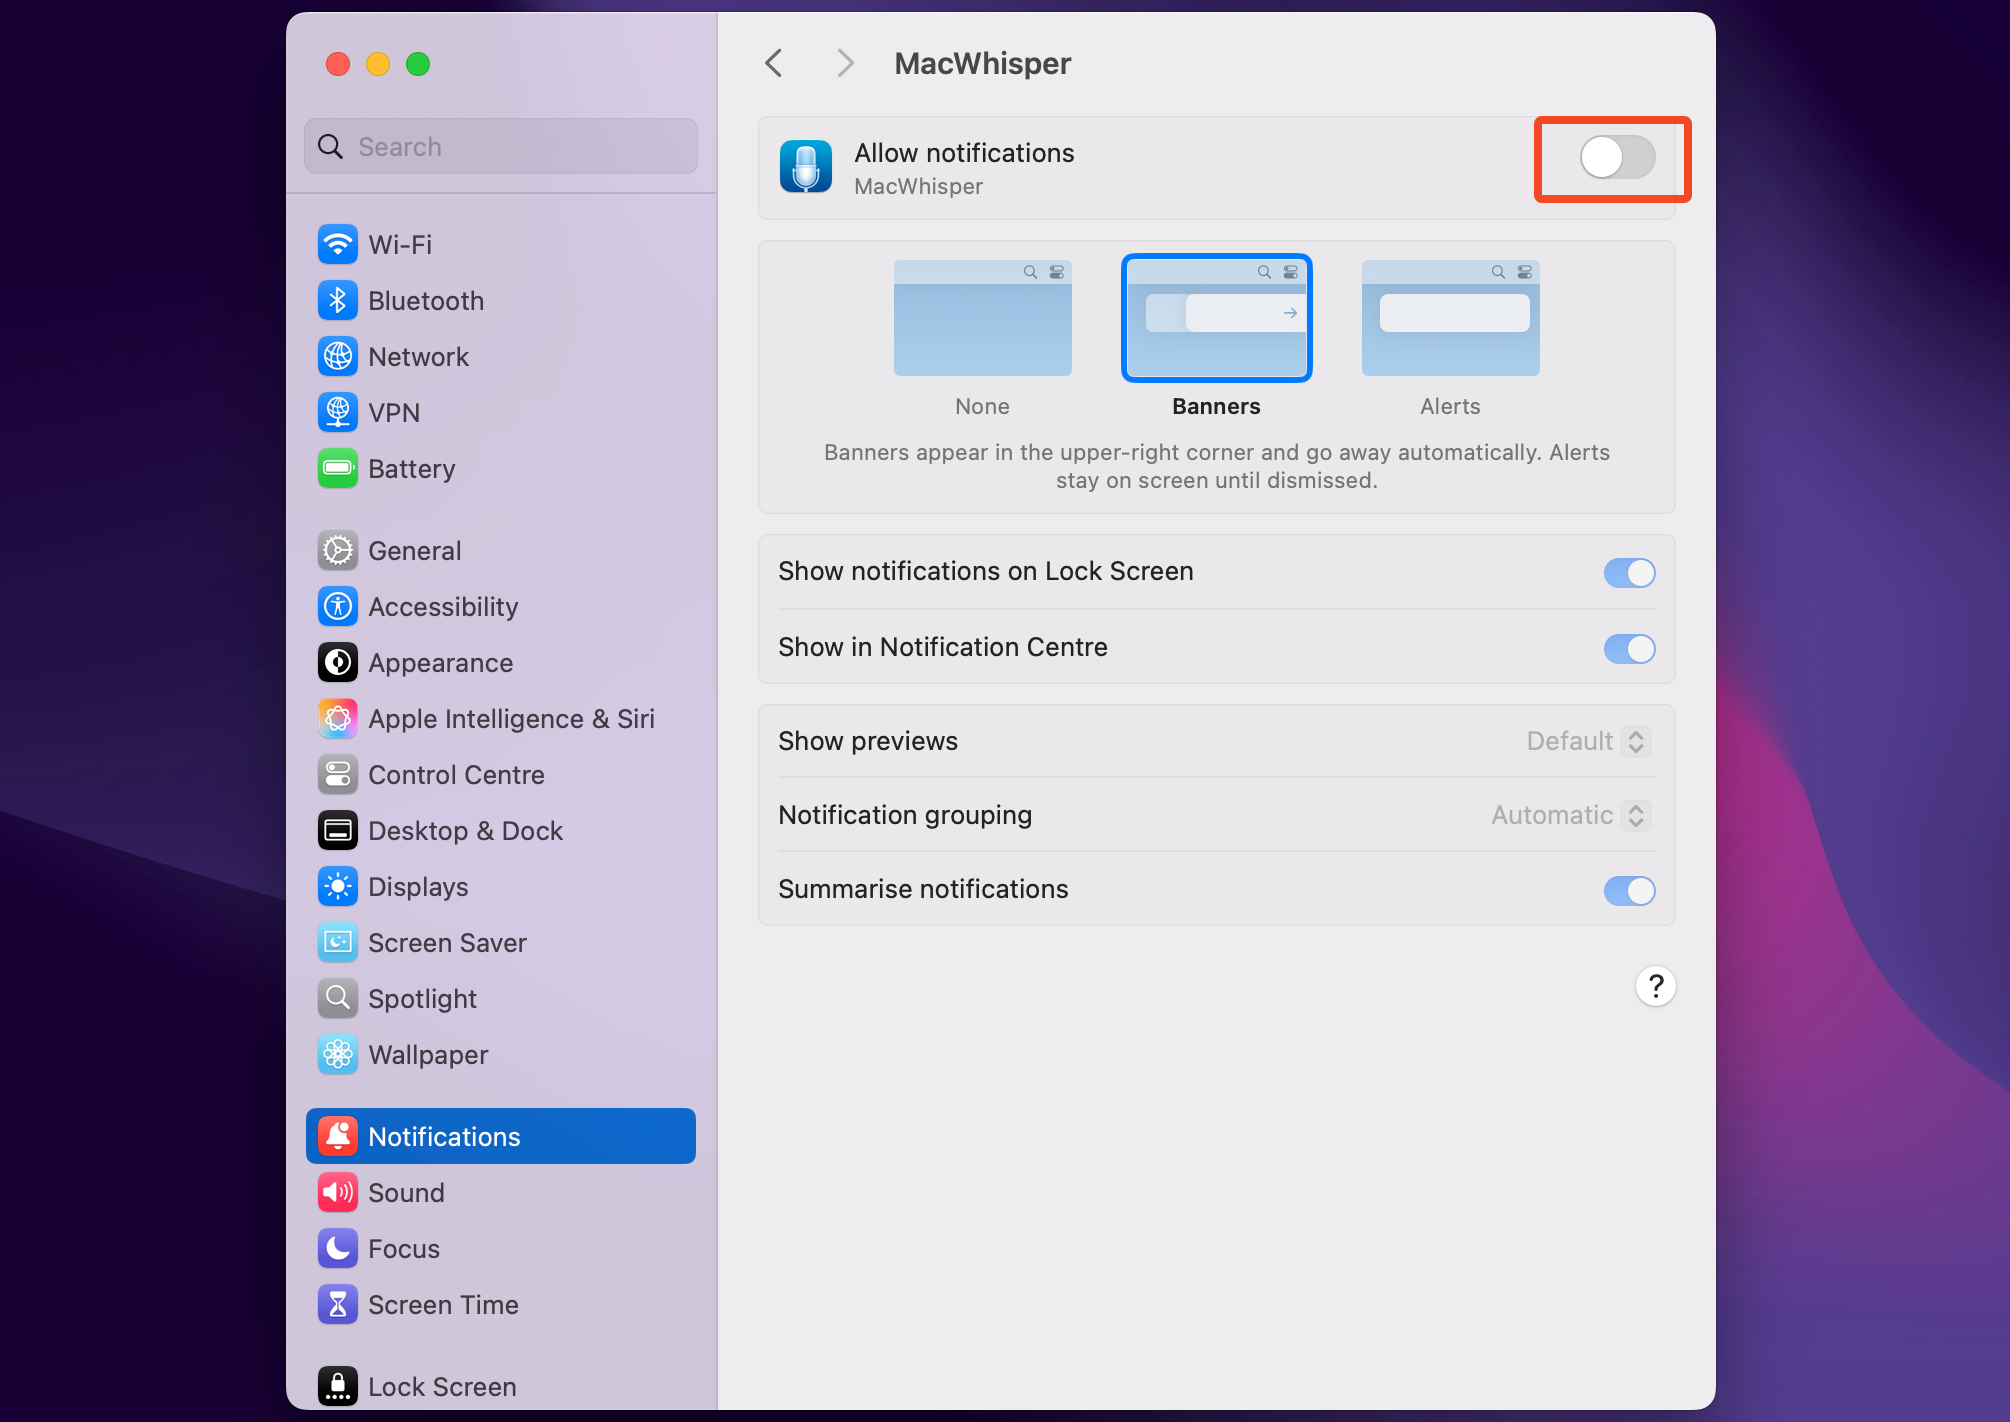
Turn Off Most Notifications
A constant barrage of notifications gets annoying fast. Fortunately, macOS lets you rein it in tightly.
Go to Settings > Notifications to see all the apps you’ve got that can send notifications. Click each one to set whether you want to allow them and how you want them to look and sound. I turn almost all of mine off, apart from messaging apps.

8
Disable Autocorrect
Autocorrect is fine for casual texting, but I keep it turned off on my Mac. As someone who writes a lot, I don’t want it changing words without me realizing it, especially for unusual words or product names that are not found in the dictionary.
To disable it, go to Settings > Keyboard, and under Text Input, click “Edit.” Now disable the options labeled “Correct spelling automatically,” “Capitalize words automatically,” and the latest one, “Show inline predictive text.”


9
Set Up Spaces
Spaces are a form of virtual desktop in macOS. They’re vital for multitasking, as you can split your open apps across multiple Spaces rather than juggling all your open windows on the same desktop.
To use Spaces, open Mission Control by hitting F3 or through a trackpad gesture. Click the + button to add a new virtual desktop. You can add as many as you like—I have five (plus full screen apps).

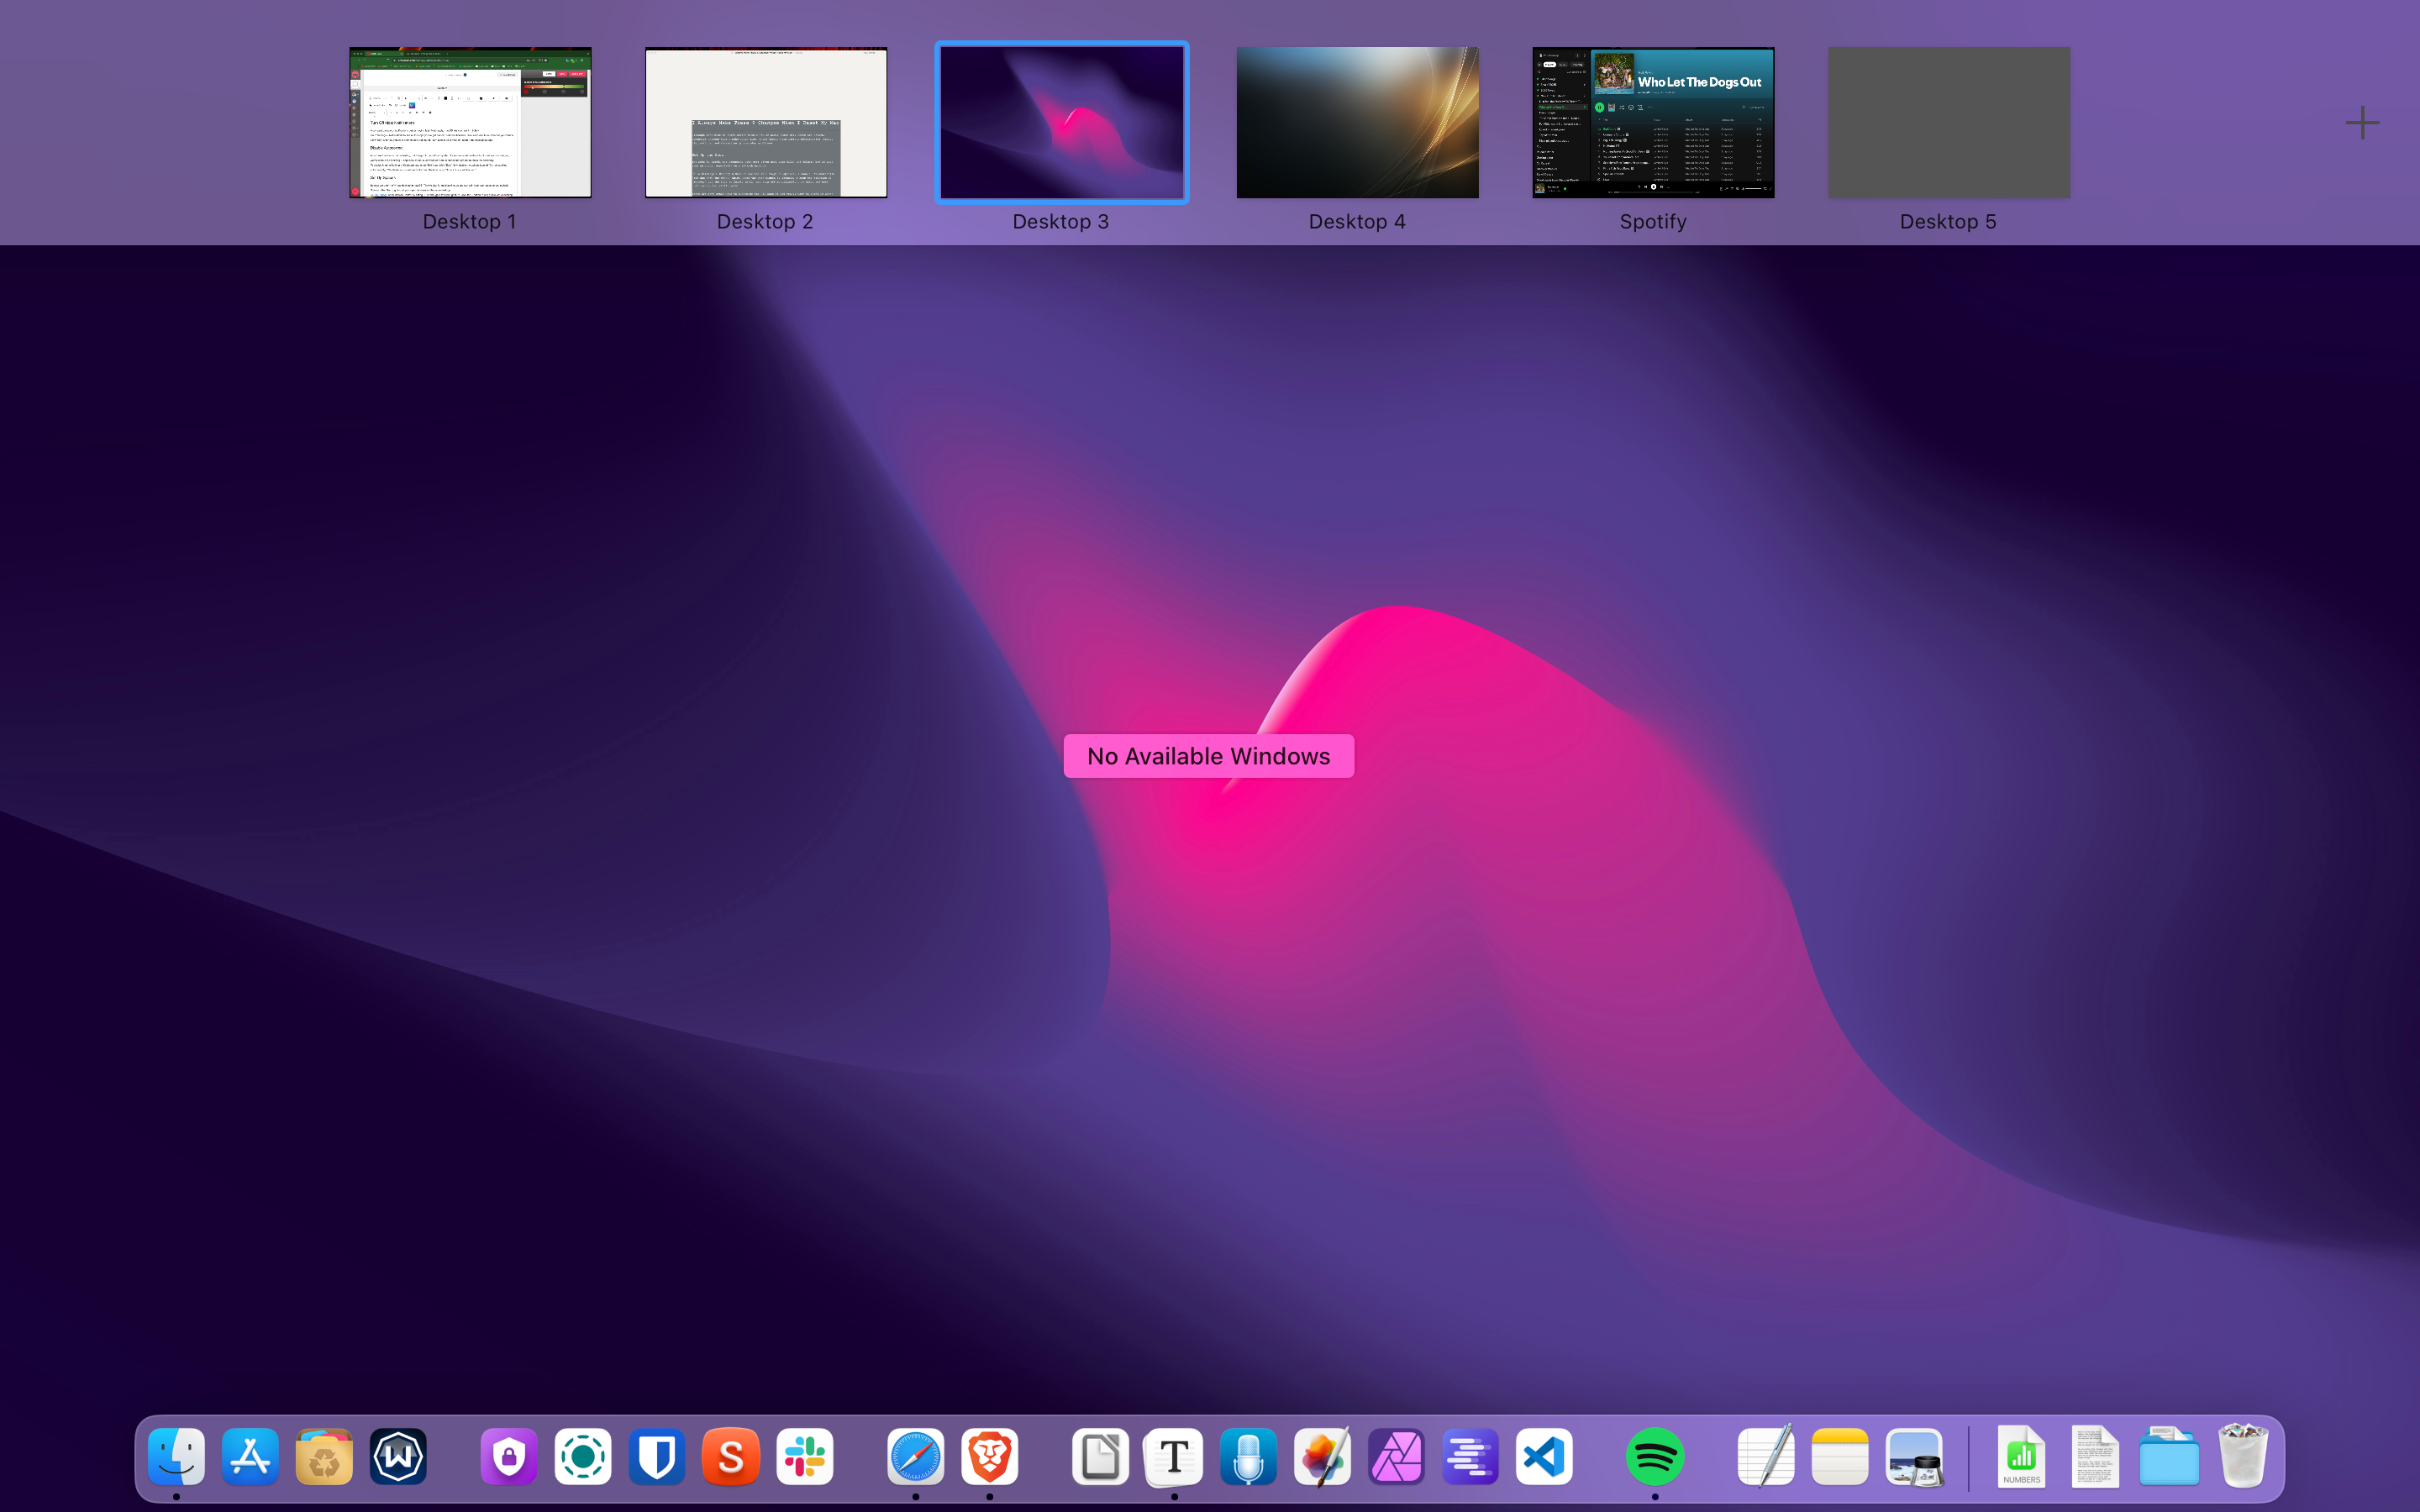
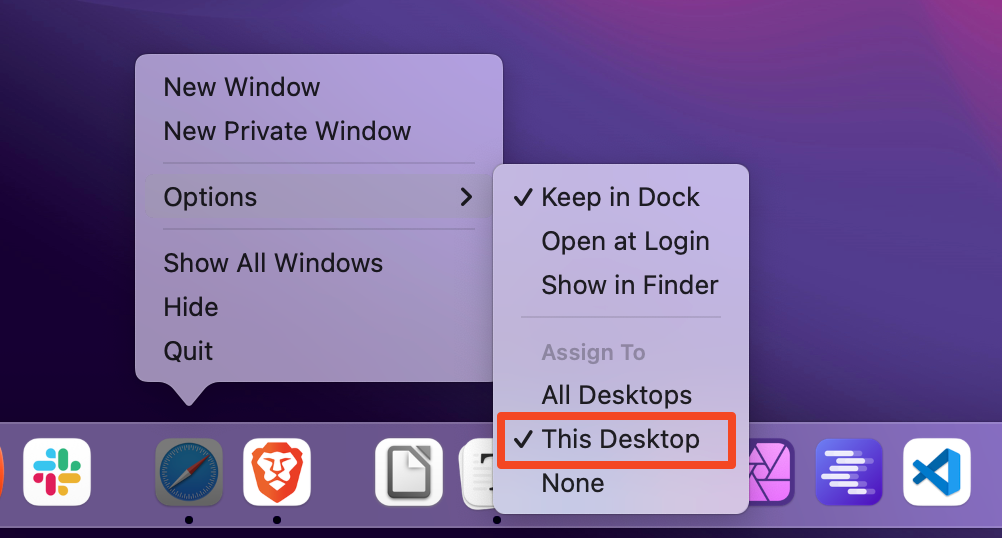
To make them more functional, you can assign apps to open in specific Spaces. To do that, open the Space by holding Control and using the cursor keys or by swiping the trackpad. Right-click on an app in the Dock and select Options > This Desktop.
Now, every time you open that app, it will switch to its assigned Space.

There are many ways to tweak your Mac to suit how you work. As well as these changes I think are useful, macOS has many other hidden features worth exploring.
Source link
-

-

-

-

-

-
-

-


