Calendars are helpful for keeping track of critical dates, tasks, and appointments. While many digital calendar options exist, Excel allows you to create one that suits your style and schedule. With just a few clicks, you can build a custom calendar, either using a template or starting from scratch.
Why Build Calendars in Excel?
An Excel calendar functions like a regular calendar but is created using Microsoft Excel. It can be used to plan your day, week, or specific tasks, and it can even be printed if needed.
Adding a calendar to your Excel sheet helps in planning future activities. For example, if you run a business, you can track employee hours or determine who’s available for certain tasks using an Excel calendar.
A weekly or monthly Excel calendar can also enhance team communication by providing everyone with a shared space to view schedules and make updates without constant back-and-forth communication. It’s also useful for leaving notes or reminders.
Unlike regular calendars, Excel calendars offer more customization. You can resize rows and columns to fit your text, add colors, label projects or employees, and adjust fonts and styles to suit your needs.
Excel also provides a pre-built calendar template, which you can customize for personal or business use—whether it’s for an academic schedule or a social media content calendar.
How to Build a Calendar in Excel
Creating a calendar in Excel is easy, and you can either use a template or design one from scratch. While templates are convenient, building a calendar from scratch enables you to personalize it according to your particular needs.
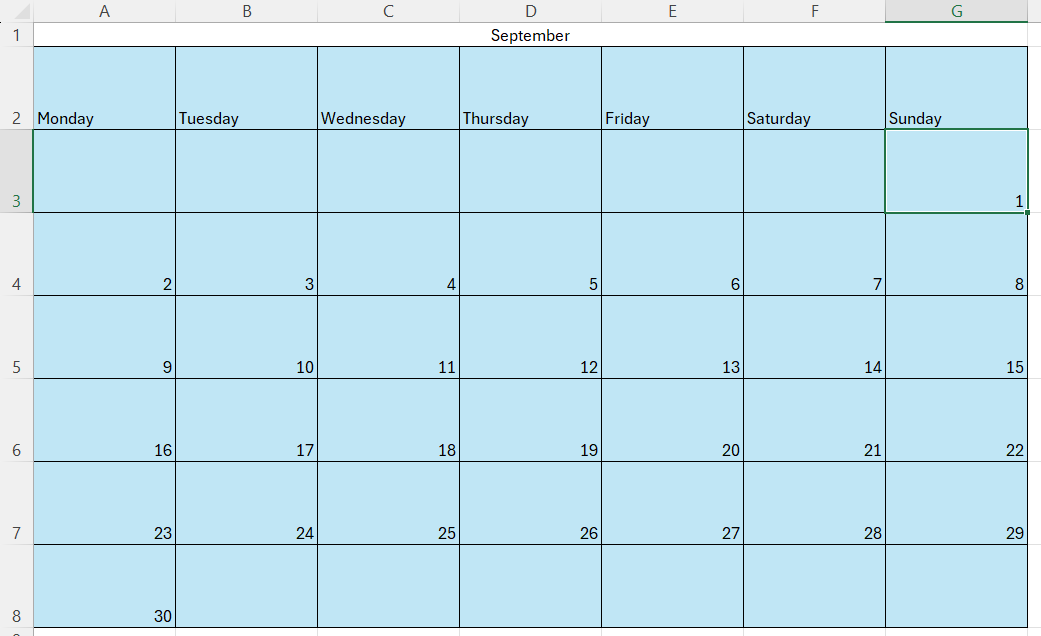
To begin, open Excel and leave the first row blank. In the second row, type the weekdays across the cells, starting with Monday in A2, Tuesday in B2, and continuing until Sunday in G2.
Alternatively, you can use Excel’s autofill feature by typing Monday in A2, and then dragging the fill handle to G2 to complete the week.
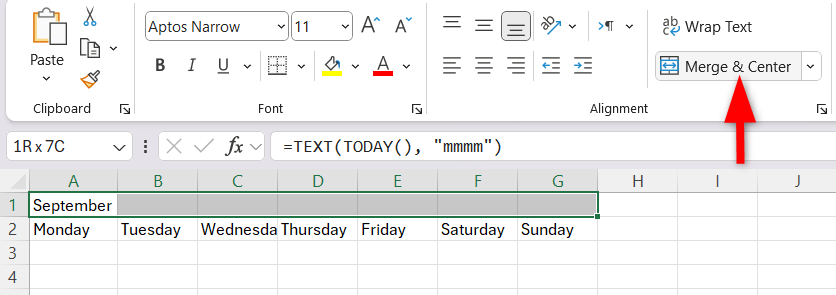
Now, create a month title. In cell A1 (in the first row), type the following formula to display the current month’s name:
=TEXT(TODAY(), "mmmm")
Similarly, for the following month, use the EDATE function to add one month:
=TEXT(EDATE(TODAY(), 1), "mmmm")
Continue this pattern for all other months, increasing the second argument in EDATE by 1 each time.
Now, merge all the first-row columns from A1 to G1 by clicking “Merge & Center” in the Alignment menu.
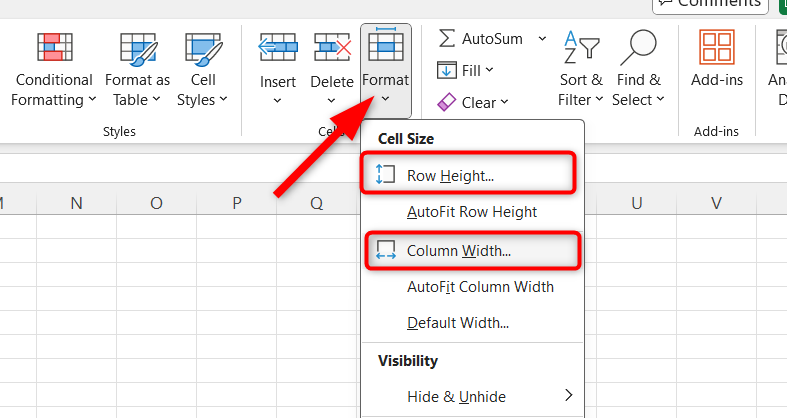
Next, format all the grid columns of the calendar. Simply, select the cells from A2 to G8, then go to the “Home” tab. Then, under the Cells group, choose “Format” and set the column width and height to your preferred size.
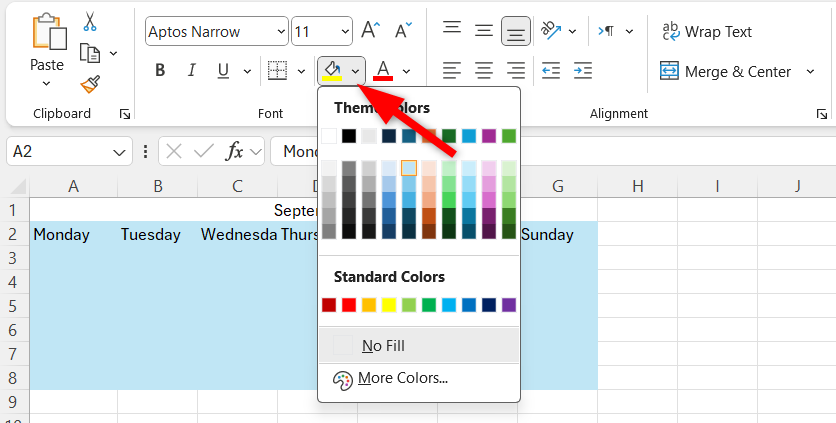
Again, select all the cells from A3 to G8, go to the “Home” tab, and choose a background color.
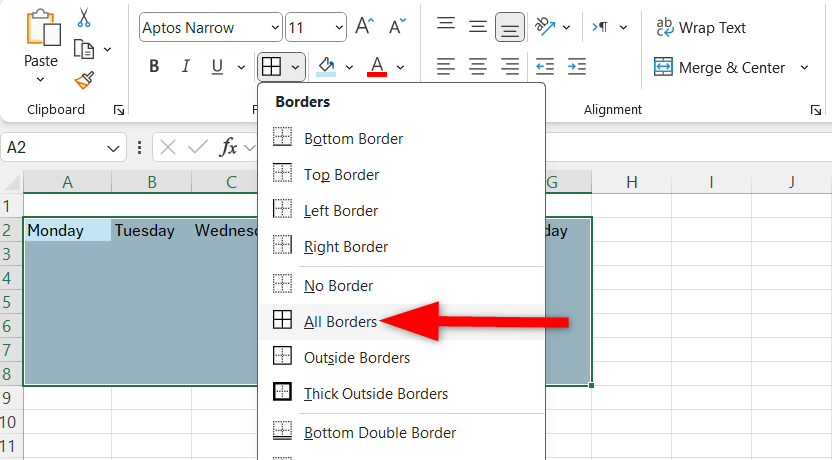
Also, apply borders by opening the “Borders” menu and selecting “All Borders.”
Lastly, input the days of the month. Identify which weekday the 1st of the month falls on, and enter the numbers in the corresponding cells.
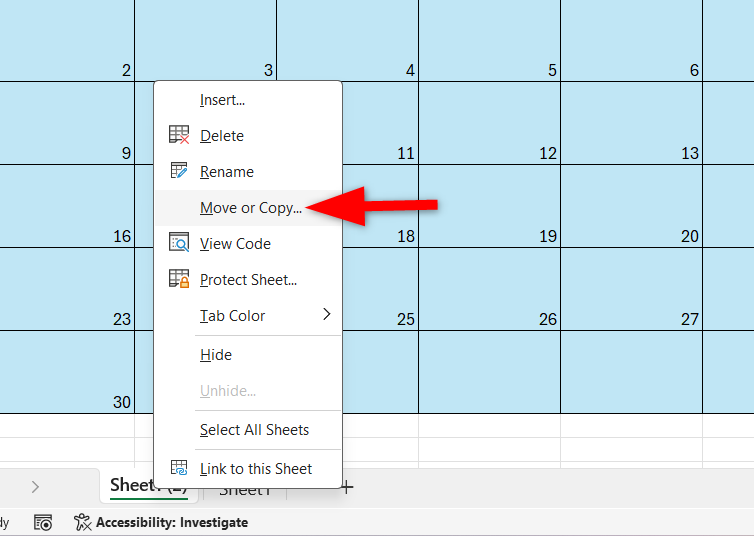
Once you’ve completed one month, copy the worksheet to create the next. To do that, simply right-click the active sheet tab, choose “Move or Copy.”
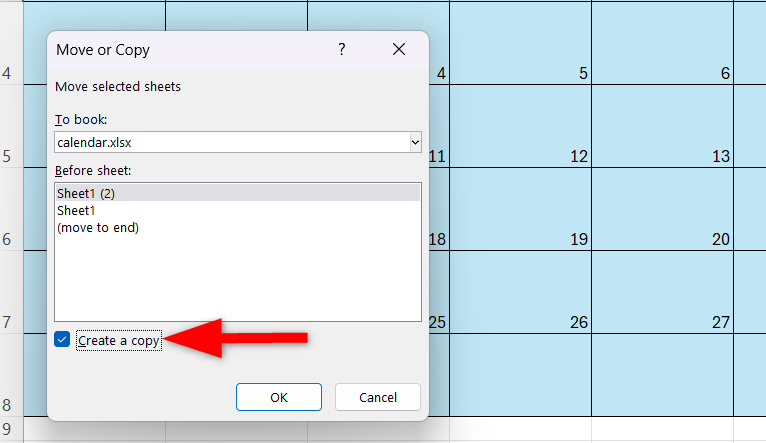
Check the “Create a copy” option and click “OK.”
Rename the new sheet and adjust the dates accordingly. Repeat this process for all other months.
Additionally, you can display the current date in any cell outside the calendar grid. Simply click on a cell outside the grid and type
=TODAY()
. This will automatically update to show today’s date.
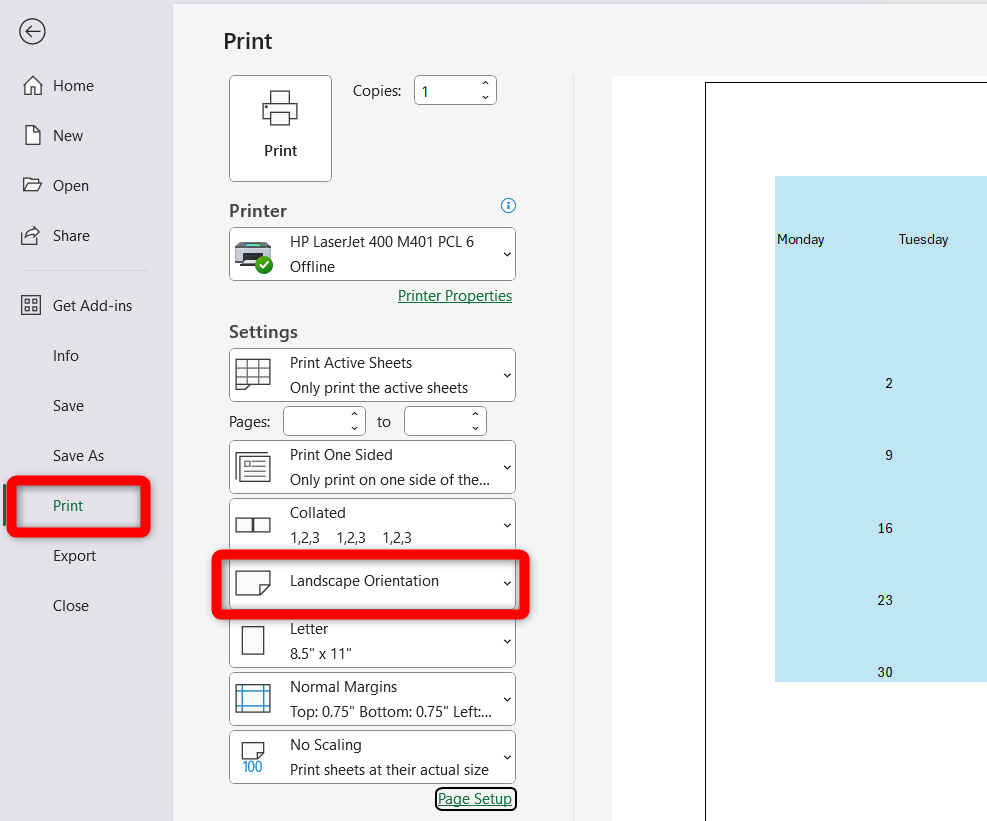
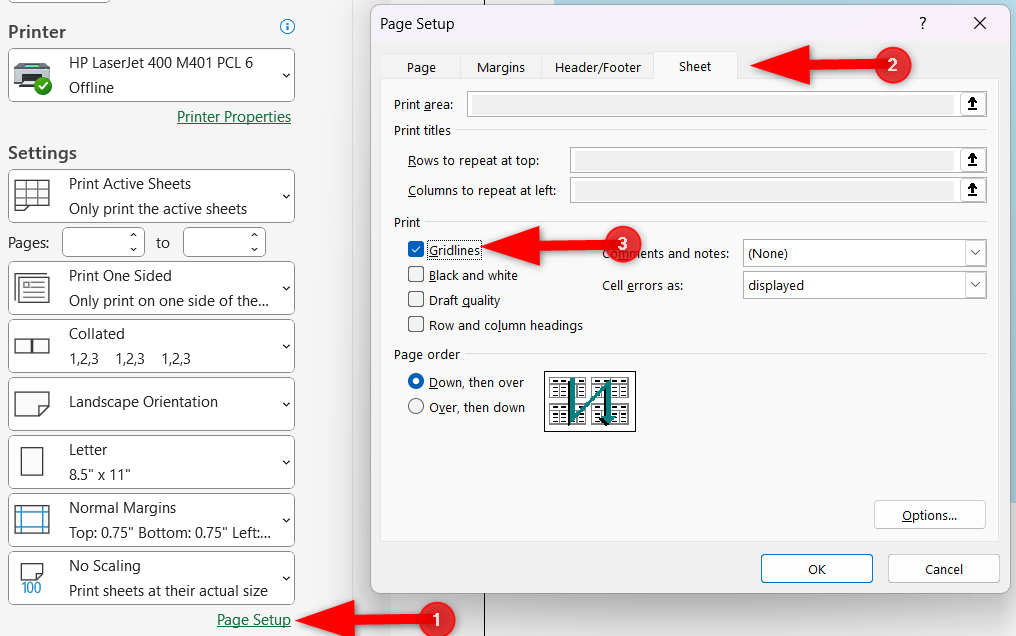
To print your calendar, go to File > Print, change the orientation to landscape.
Further, you can enable Gridlines to your printing calendar by going to Page Setup > Sheet > Gridlines.
Moreover, you can adjust the scaling as needed, so the entire calendar fits on one page.
Use Excel Calendar Templates
The simplest way to create a calendar in Excel is by importing a premade template. You can find both yearly and monthly calendars that can be customized for a specific year or reused. One feature I love about these Excel templates is how effortlessly they adjust the dates and days when you change the starting month or year.
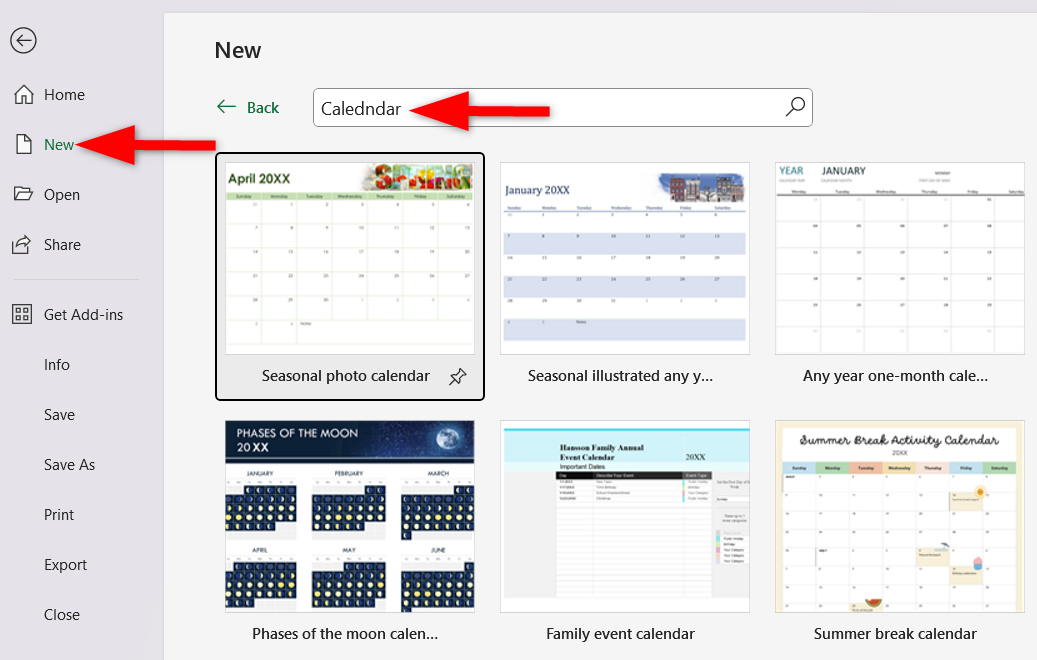
While you can access templates from Microsoft’s website, Excel itself provides built-in templates. To access and use them, simply open Excel and navigate to the “File” tab. Then, go to the “New” section and enter “Calendar” into the search bar. This will display a variety of calendar templates.
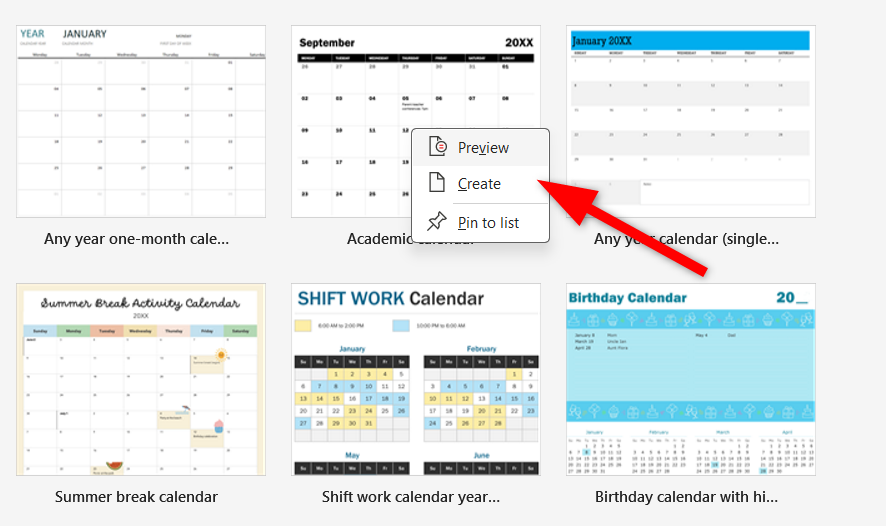
Look at the templates available and choose one that works perfectly for you. For example, you can choose an “Academic Calendar” for school purposes. However, before inserting it, preview the calendar to ensure it meets your needs. If not, you can step back and select another one.
Once you’ve chosen a template, hit the “Create” button to generate the calendar, or simply double-click on the template. You can rename the file by double-clicking the sheet tab at the bottom.
You may have customization options, like changing dates, colors, or layout, based on the template you pick.
Furthermore, you can update the year by typing it into the designated area, and all the months will adjust automatically. There’s also an option to select whether the week begins on Monday or Sunday. You can even add comments on specific dates, like noting a holiday on a Friday.
Create a Calendar Using VBA Code
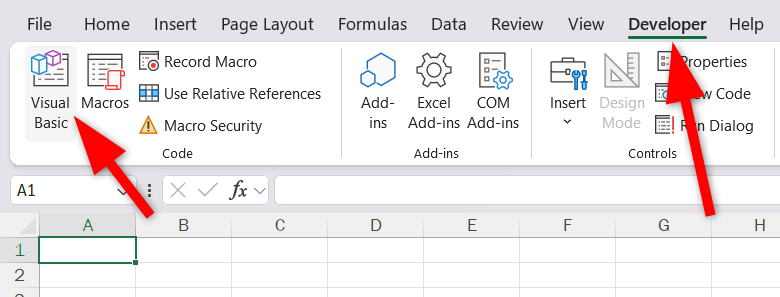
For those who prefer working with code, Excel offers an automatic way to create a calendar using Visual Basic. You can do that by pasting and running the VBA code in the VBA editor from the Developer tab. However, if you haven’t accessed this option before, you need to activate it from the Excel options settings.
Simply go to File > Options > Customize Ribbon. In the right column, navigate and tick the box next to “Developer” to ensure it’s visible in the Excel ribbon.
After activating the Developer tab, navigate to the section and select “Visual Basic.”
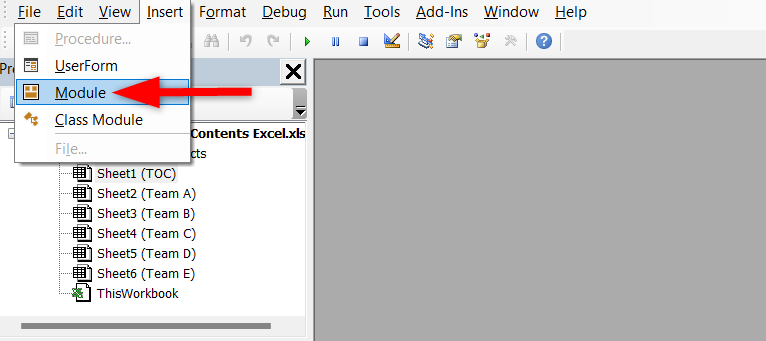
Go to the Insert > Module.
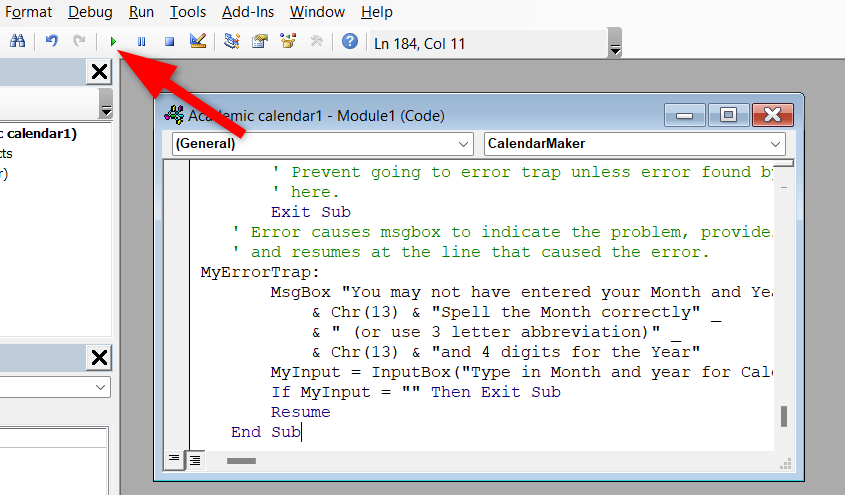
Copy and paste the calendar-making code from this Microsoft guide into the module and run the code.
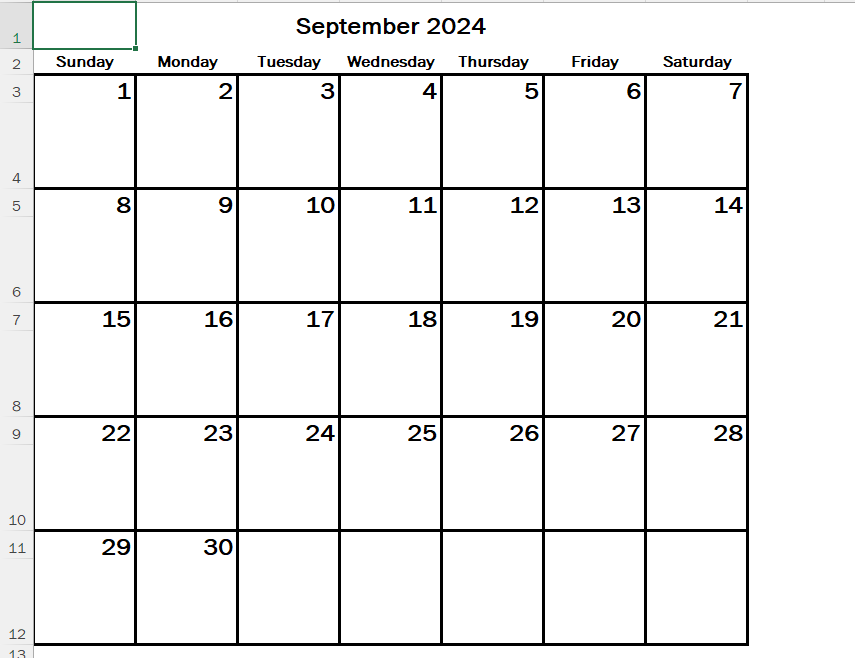
That’s it! Excel will generate the calendar on the sheet.
You can also use a free Excel add-in for a quick and easy solution. Head to the “Add-Ins” menu under the “Home” tab and search for a calendar. There are various calendar options available for you to choose from.
Source link


