I couldn’t wait and forced the Windows 11 24H2 install, skipping the line, and it worked
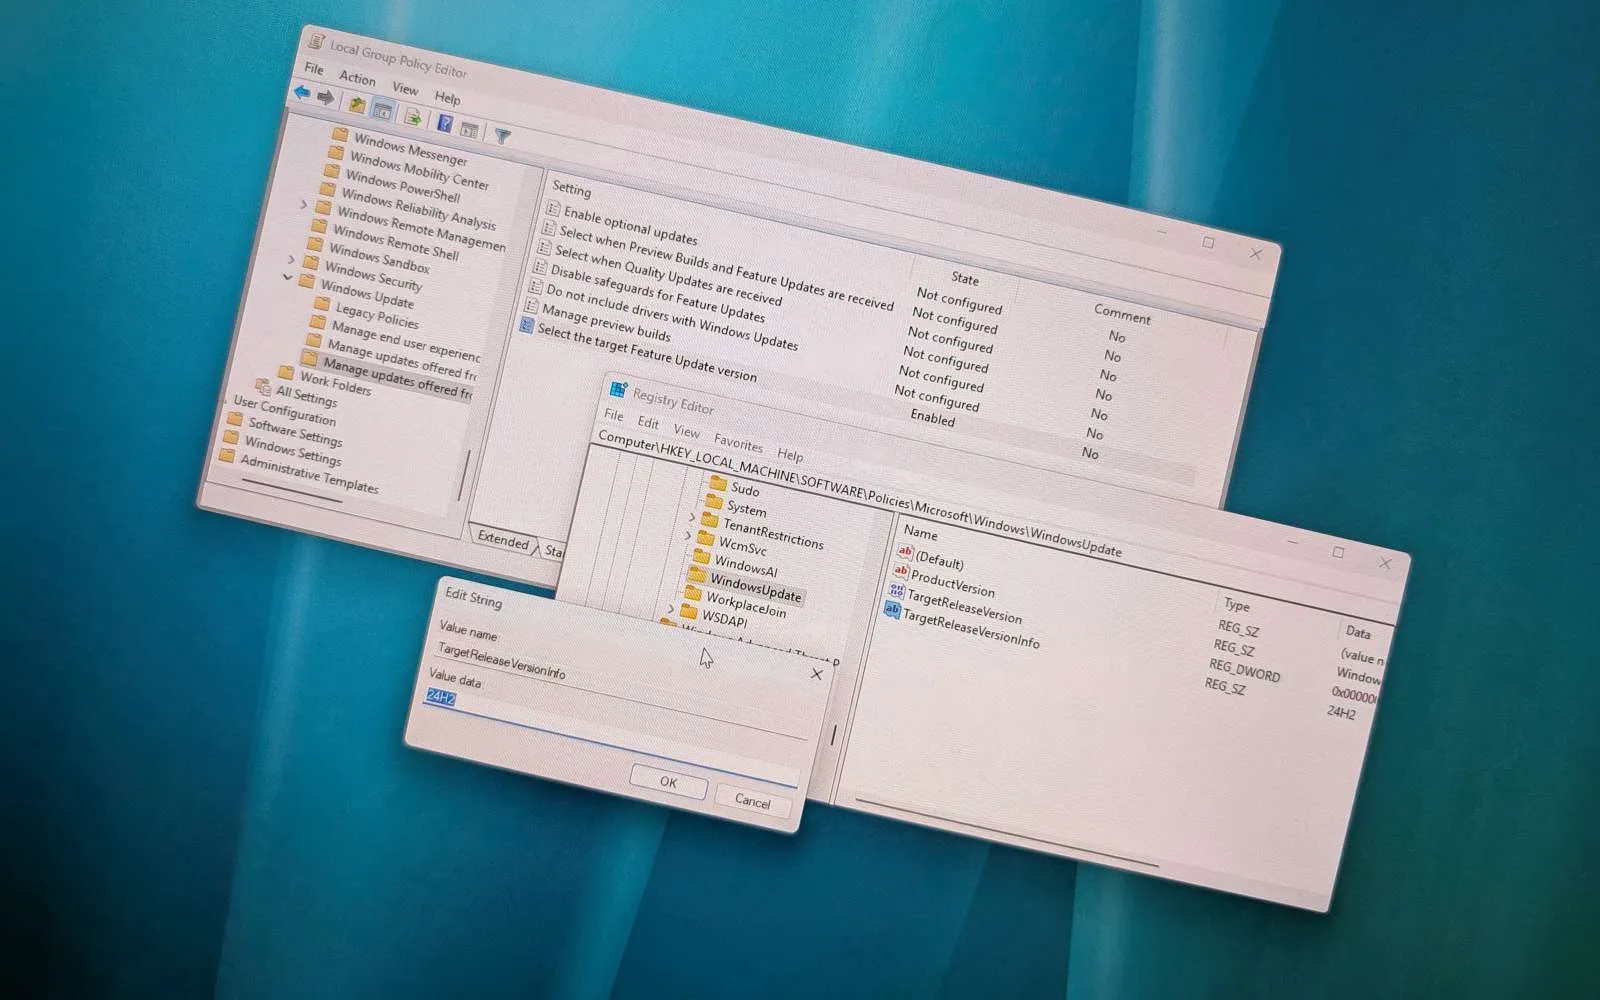
- To force the Windows 11 24H2 upgrade in the Pro edition, enable the “Select the target Feature Update version” policy and configure it to “Windows 11” and “24H2” using the Group Policy Editor.
- On Windows 11 Home, you must modify the “ProductVersion,” “TargetReleaseVersionInfo,” and “TargetReleaseVersion” entries in the “WindowsUpdate” key in the Registry to skip the line and upgrade immediately.
If you want to upgrade, you can force the Windows 11 24H2 (2024 Update) download immediately, skipping the waiting line when the feature update isn’t yet available through the “Windows Update” settings page. You can do this using Group Policy and the Registry.
Although Windows 11 24H2 became officially available on October 1, 2024, the feature update is rolling out gradually, starting with devices that are known to have a smooth upgrade experience. This means the new version will take some time before it reaches every device meeting the hardware requirements.
However, you can configure your current setup to download version 24H2 immediately without waiting by managing the Windows Update using the “Select target Feature Update version” policy through the Group Policy Editor on Windows 11 Pro. On the other hand, if you have a device running Windows 11 Home, you can modify the “WindowsUpdate” Registry key to force the upgrade.
It’s important to note that if your device isn’t receiving the feature update through the “Windows Update” settings, it could be that your hardware and software configuration is still not fully compatible. If this is the case, I wouldn’t recommend forcing version 24H2 on your computer until the option to upgrade appears automatically on the “Windows Update” settings page.
In addition, since the feature update became available, Microsoft has published a number of known issues affecting version 24H2. Furthermore, users have been reporting various problems after the upgrade.
Finally, this is not the only way to force the upgrade to Windows 11 24H2. You can also use the Installation Assistant and mount the ISO file to File Explorer to launch the setup.
In this guide, I will show you the steps to skip the queue and upgrade your computer immediately to Windows 11 24H2. When testing this process, I used a clean installation of Windows 11 23H2 on compatible hardware that wasn’t receiving the update (in the United States). This approach may or may not work for older versions of Windows 11 and in different geographical locations. Also, these methods won’t force the new version on unsupported hardware.
Force upgrade to Windows 11 24H2 using Group Policy
To force the upgrade to Windows 11 24H2 with Group Policy, use these steps:
-
Open Start on Windows 11.
-
Search for gpedit and click the top result to open the Group Policy Editor.
-
Browse the following path:
Computer Configuration > Administrative Templates > Windows Components > Windows Update > Manage updates offered from Windows Update
-
Right-click the “Select the target Feature Update version” policy and choose the Edit option.
-
Check the Enabled option.
-
Confirm the “Windows 11” operating system name for the product version to receive.
-
Confirm the “24H2” version under the “Options” section for the “Target Version for Feature Update” setting.

-
Click the Apply button.
-
Click the OK button.
-
Restart the computer.
-
Open Settings.
-
Click on Windows Update.
-
Click the “Check for updates” button.

Quick note: You will notice that the “Get the latest updates as soon as they’re available” setting is now grayed out as the system settings have been changed.
-
Click the Restart now button to continue with the upgrade process.
Once you complete the steps, the feature update will automatically download and install on your computer.
After the upgrade, you can remove the configuration on Computer Configuration > Administrative Templates > Windows Components > Windows Update > Manage updates offered from Windows Update by choosing the “Not configured” option for the “Select target Feature Update version” policy.
Force upgrade to Windows 11 24H2 using Registry
To install Windows 11 24H2, skipping the queue with the Registry, use these steps:
-
Open Start.
-
Search for regedit and click the top result to open the Registry.
-
Browse the following path:
HKEY_LOCAL_MACHINE\Software\Policies\Microsoft\Windows
-
Right-click the Windows (folder) key, select the New submenu, and choose the Key option.
-
Name the WindowsUpdate and press Enter.
-
Right-click the WindowsUpdate (folder) key, select the New submenu, and choose the String Value option.

-
Name the new key ProductVersion and press Enter.
-
Right-click the newly created key and choose the Modify option.

-
Change the value to Windows 11.

-
Click the OK button.
-
Right-click the WindowsUpdate (folder) key, select the New submenu, and choose the DWORD (32-bit) Value option.
-
Name the key TargetReleaseVersion and press Enter.
-
Right-click the newly created key and choose the Modify option.
-
Change the value to 1.

-
Click the OK button.
-
Right-click the WindowsUpdate (folder) key, select the New submenu, and choose the String Value option.
-
Name the key TargetReleaseVersionInfo and press Enter.
-
Right-click the newly created key and choose the Modify option.
-
Change the value to 24H2.

-
Click the OK button.
-
Restart your computer.
-
Open Settings.
-
Click on Windows Update.
-
Click the “Check for updates” button.
-
Click the Restart now button to continue with the upgrade process.
After you complete the steps, the new version of Windows 11 will be applied using a complete reinstallation.
Once the upgrade is complete, you can remove the configuration on HKEY_LOCAL_MACHINE\Software\Policies\Microsoft\Windows\WindowsUpdate by carefully deleting the “ProductVersion,” “TargetReleaseVersionInfo,” and “TargetReleaseVersion” keys or changing their values to their defaults.
Although you can upgrade immediately without waiting for the feature update to arrive automatically, the device may not receive all the intended new features since Microsoft will continue rolling them out gradually. For example, the company plans to roll out a second wave of features with the November 2024 update, and at the time of writing, there’s no schedule for when those features powered by AI will become available. Also, the majority of the AI features will require a Copilot+ PC.
Source link