I Have Been an Apple User for 10 Years and Here’s How I Make the Most out of Apple’s Ecosystem
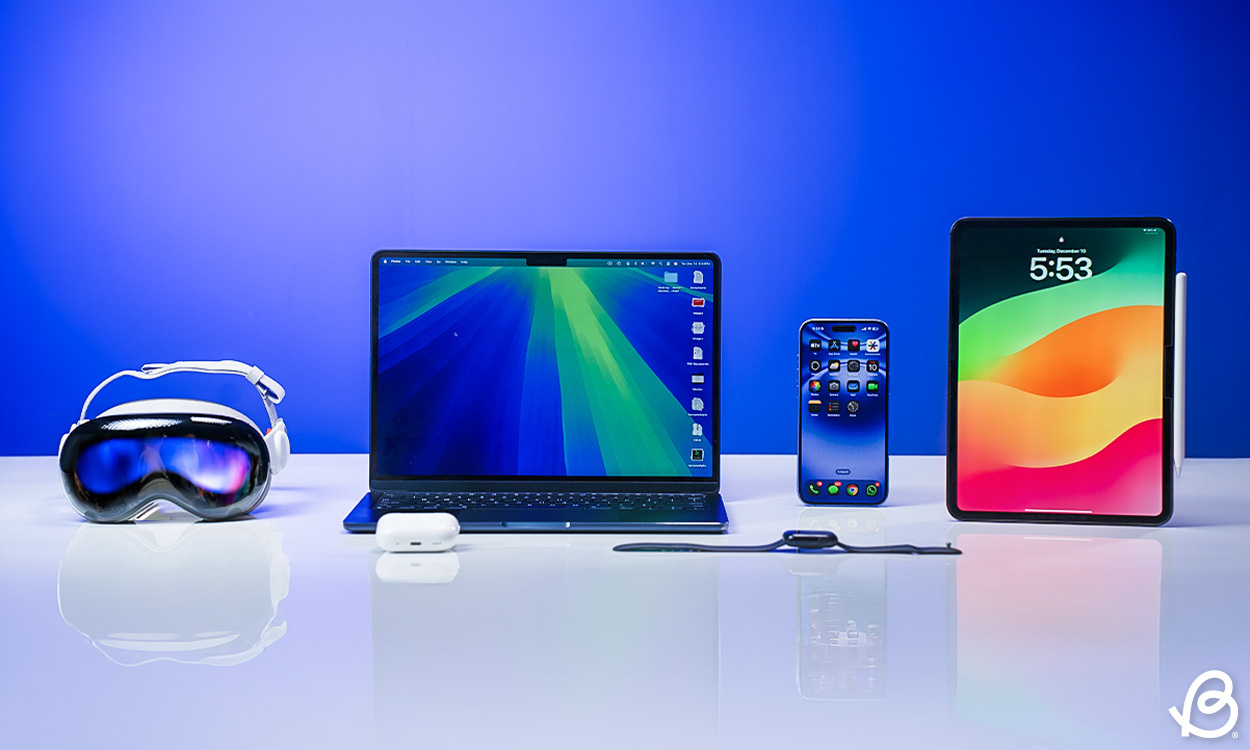
I’m an Apple superfan and have invested heavily in the Apple ecosystem. I started with an iPhone, then bought a Mac and iPad, and now I’ve got a device from almost every lineup. Ten years down, I’m happily tied to the Apple ecosystem, and it has made my everyday life a lot easier. The Apple Ecosystem offers seamless connectivity between devices that can make incredible things happen. There are many reasons to love the Apple ecosystem. Right from the ability to switch your AirPods depending on the device you’re using to access all your photos and files across your gear, Apple offers an array of convenient features.
After using Apple devices for more than a decade now, I’ve curated a list of the 13 best features that can help you unleash the true power of the Apple ecosystem. If you’ve invested in multiple Apple devices or are planning to do so, this guide will help you make enjoy a connected experience.
Note:
To enjoy the true capabilities of Apple Ecosystem, make sure to sign in with the same Apple ID on your devices.
1. Sync Everything with iCloud Drive
One of the strongest suites of the Apple Ecosystem is how connected everything is. When you’ve signed in with the same Apple ID on your Apple devices, you can sync your files, contacts, photos, and everything else across your devices, including iPhone, iPad, and Mac. There are several cloud-based services like Google Drive and Microsoft One that give you the liberty to back up your iPhone and access all your documents on the go. Apple’s iCloud gives a solid advantage if you’ve invested in the Apple ecosystem. It lets you sync your files across all your devices, including your desktop.
With iCloud Drive, all your documents, folders, and files are automatically synced across your devices where you’ve signed in with the same Apple ID. So, any time you add a new document to your Mac or a new file on your iPhone, it will be automatically uploaded to iCloud. You can anytime access your documents, folders, and projects via the Files app on your device. This helps you keep your files up to date across your Apple devices.
To sync your files with iCloud, you have to do the following:
- On your iPhone, go to Settings -> [Your Name] -> iCloud and tap on See All. Here, tap on iCloud Drive and turn on Sync this iPhone. Do the same on your iPad.
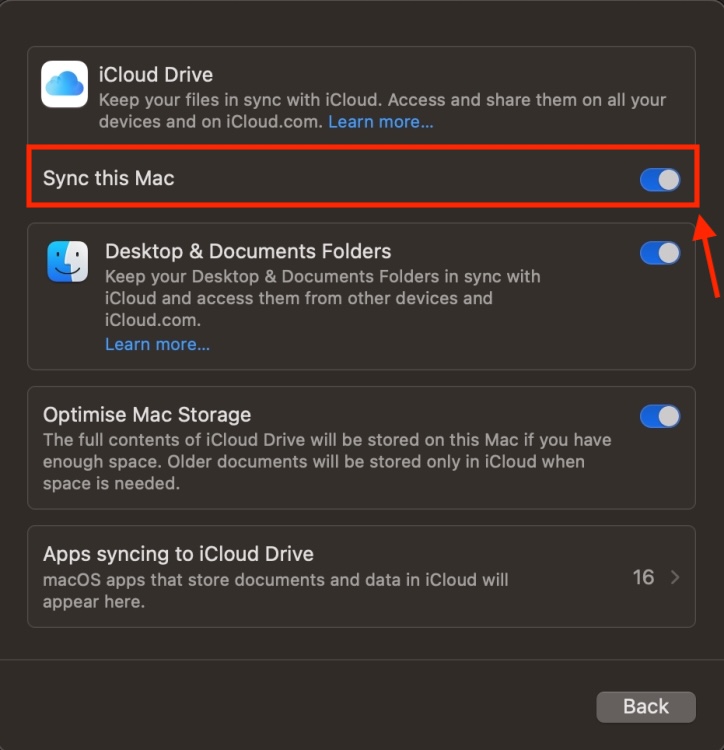
- On your Mac, open System Settings -> [Your Name] -> iCloud and click on See All. Here, click on iCloud Drive and turn on Sync this Mac. Make sure to turn on the Desktop & Documents Folders toggle as well. This will let you access the files on your Mac and in the Documents folder on any Apple device with iCloud Drive turned on.
2. Use your iPhone as a Web Cam on Mac with Continuity Camera
Love your Mac, but don’t like its old 720p camera? This feature can help you fix such problems. Introduced with macOS Ventura, Continuity Camera is a useful feature that allows you to use the powerful camera system of your iPhone as a webcam for your Mac. With Continuity Camera, your Mac can recognize a nearby iPhone (with the same Apple ID) without having to wake or select it, helping establish a wireless connection between an iPhone and a Mac. This can help video calls on a Mac with features like Center Stage, Portrait mode, Studio Light, and Desk View.
To use your iPhone as a webcam on a Mac, you have to mount your iPhone to your Mac using a compatible mount or stand. When mounted, your iPhone should be locked, in a stable landscape orientation, positioned with its rear cameras unobstructed facing you, and near your Mac.
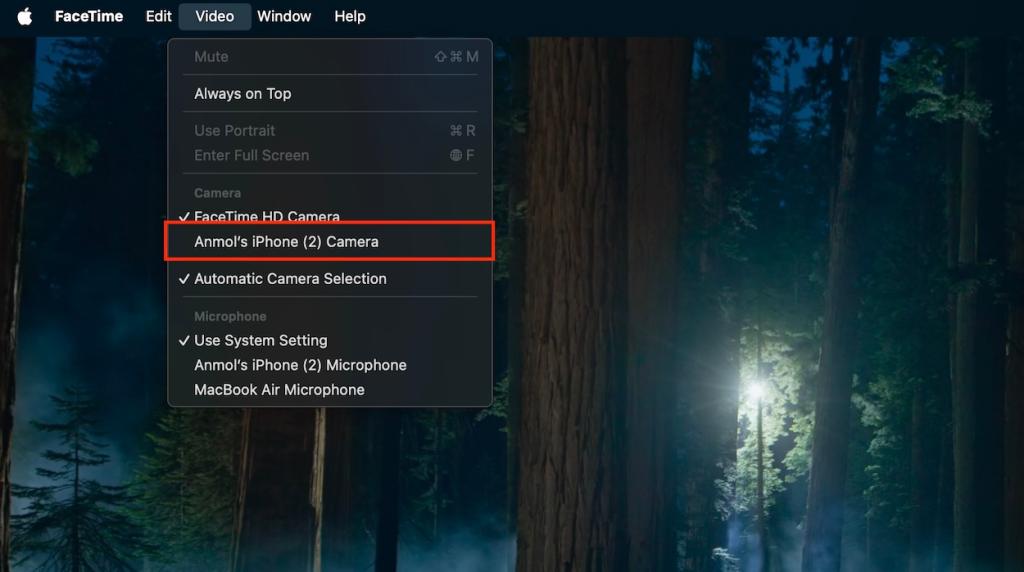
Once your iPhone is properly mounted, its camera and microphone should be available to use within the compatible apps. To use your iPhone’s camera on Mac, open FaceTime or any other supported app, and choose your iPhone camera from the app’s video menu, camera menu, or another setting. Unless your Mac has a built-in or external mic, your app should choose your iPhone’s mic automatically. If that doesn’t happen, open System Settings -> Sound and select your iPhone in the Input tab.
3. Use One Pair of AirPods Across Devices using Handoff
If you own a pair of AirPods, you would know how seamlessly they pair and work with an iPhone. But, did you know that your AirPods can become your go-to audio accessory with all your Apple devices, including your Mac? Well, Apple offers a clever Handoff feature that lets you seamlessly switch between your iPhone, iPad, and Mac. This feature is enabled by default on your devices. So, if you’ve connected AirPods to your iPhone and you then switch to your Mac, a notification will pop up automatically asking if you wish to connect. Besides, you can also use Handoff to swap FaceTime calls between your iPhone and Mac.
With the Handoff feature, you don’t have to go to settings and manually switch between the devices. Any pair of earbuds or headphones with Apple’s H1 or W1 chip supports the HandOff feature. This includes all AirPods and most of the wireless headphones from Beats.
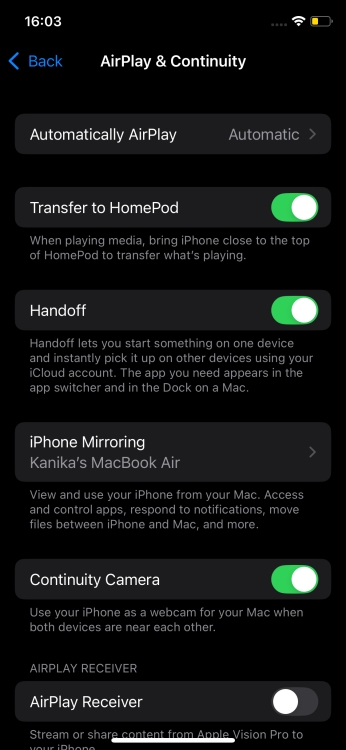
That’s not all. Apple’s Handoff feature also gives you the freedom to start something on one device and finish it on another. This is an absolute convenience. When you’ve signed in with the same iCloud account on your devices, any changes you make to Notes, Reminders, Messages, Contacts, Mail, etc will be synced across your devices. You can easily start a task on one device and continue it on your other device. For instance, you can prepare notes for your upcoming meeting/vacation on your iPhone, you can pick it up later on your MacBook. With Apple’s Continuity features, you’re always in sync, no matter which device you’re using.
4. Ditch Cables and Transfer Files via AirDrop
Gone are the days when you would have to pull out a cable to transfer some files or photos between your phone and computer. If you’ve invested in the Apple ecosystem, you can easily exchange files via Bluetooth. AirDrop is one of the most valuable features of the Apple ecosystem that simplifies file sharing across your Apple devices. This feature is available on all Apple devices by default and doesn’t require any dedicated setup. It uses Bluetooth and Wi-Fi to transfer files, photos, videos, contacts, map locations, websites, and more between nearby Apple devices. It’s a fast, secure, and reliable way to send and receive files between your iPhone and Mac, or other gear.
Thanks to AirDrop, these everyday transfers don’t feel like a task. I can quickly transfer files between my Apple devices without any hassle. Unarguably, AirDrop is one of the best features that can help you make the most out of the Apple Ecosystem.
If you’re a beginner, you can check out our guide on how to turn on AirDrop on iPhone, iPad, and Mac.
5. Drag and Drop Wirelessly between iPhone and Mac
Here’s another interesting Apple ecosystem that can boost your productivity. The latest iOS 18 and macOS Sequoia brings a super-useful iPhone Mirroring feature that lets you use your iPhone, check out iPhone notifications, use iPhone apps, and do a lot more, from your Mac’s display. For many users, iPhone Mirroring is their favorite Apple feature that brings a ton of convenience.
With iPhone Mirroring, you can move your files, photos, videos, and files between your iPhone and Mac wirelessly. The drag-and-drop works even if your iPhone is locked and charging. To transfer photos from your Mac to your iPhone, drag a photo from the Finder window or Photos app and drop it to the Photos app on your iPhone. You can also do vice-versa. Similarly, to move a PDF or document, drag it from your Mac to the Files app on your iPhone.
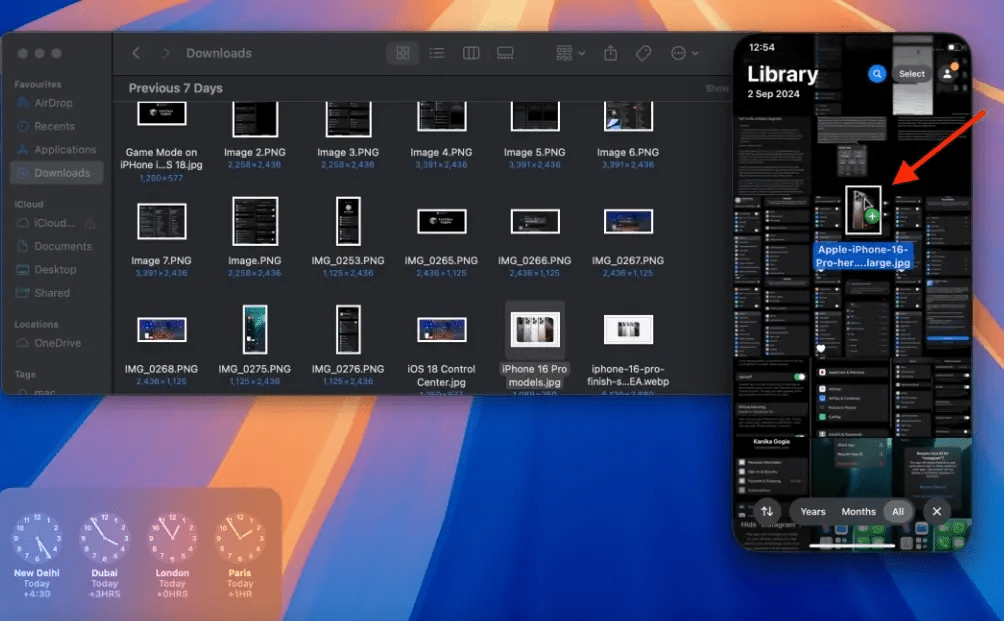
To transfer files, your iPhone and Mac should be running the latest developer beta of iOS 18.1 and macOS Sequoia, respectively. The stable version of this feature will be available with iOS 18.1 and macOS Sequoia 15.1 arriving on October 28.
Besides drag & drop, iPhone Mirroring lets you access your iPhone’s Home Screen, use Spotlight search on your iPhone, and use your Mac’s keyboard to type messages, emails, and other documents on your iPhone. For more details, you can check out our detailed guide on how to set up and use iPhone Mirroring on Mac.
6. Use iPad as a Second Display for Mac
If you’ve got an iPad, you don’t need to invest in another external display for your Mac. Thanks to the amazingly connected Apple ecosystem, you can use your iPad as a second display for your Mac wirelessly. Sidecar is an incredible feature for anyone who wishes to boost their workflow with a multi-monitor setup that can be moved anywhere. The best thing about the Sidecar feature is that you can use it wired or wirelessly. Therefore, it’s super easy to set up and get going, no matter where you are.
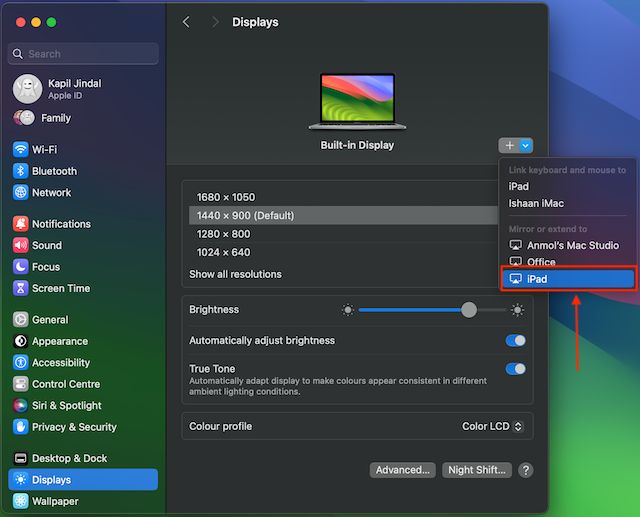
The Sidebar also puts commonly used Mac controls on the side of your iPad screen. It includes Shift, Command, and other essential commands that you can choose with your finger or Apple Pencil instead of a keyboard. That means, you can see your main work window on your Mac and access tools from your iPad. Also, you can mirror your iPad screen on your Mac to see the same content. So whether you’re a student, a creative on a work trip, or a full-time digital nomad, Sidecar can help you unleash the true capability of your Apple devices.
To know prerequisites, compatible devices, and set-up details, you can check out our guide on how to use an iPad as a second display for Mac.
7. Use Universal Clipboard to Copy Content between Apple devices
There can be instances when you discover something interesting while browsing on your Mac and wish to share it on your social media using your iPhone or iPad. In such situations, the Universal Clipboard comes in really handy it lets you copy content like text, photos, and videos from one Apple device and paste it onto another device with the same Apple ID. This feature is available on all devices running macOS Sierra or later, iOS 10 or later, and visionOS.
To copy content between your Apple devices, you must enable Bluetooth, Wi-Fi, and HandOff on both devices.
Once your prerequisites are sorted, copy the text or photo on one device as you would normally do. The content will be automatically added to the clipboard of your other nearby device and will remain there until you replace it by copying something else. Finally, paste the copied content on the intended device as normal.
8. Route your iPhone Calls to iPad and Mac
Another useful feature of the Apple ecosystem is the ability to route your iPhone calls to your iPad or Mac. Also, you can make calls from your iPad or Mac if your iPhone is in another room. Besides phone calls, you can also route your text messages from iPhone to iPad or Mac so you can stay connected no matter which device you’re using.
For this, you must enable Wi-Fi, Bluetooth, and FaceTime on your devices. Of course, you must sign in with the same Apple ID on your devices.
Once you’ve done this, follow the below steps to set up iPhone calls on other devices:
- On your iPhone, go to Settings -> Cellular -> Calls on Other Devices and turn on Allow Calls on Other Devices. You can now choose which devices are allowed to make and receive calls.

- On your iPad, go to Settings -> FaceTime and turn on Allow Calls on Other Devices toggle.
- On your Mac, open FaceTime -> Settings and enable Calls from iPhone.
9. Access iCloud Photos Across Apple Devices
Being a long-time Apple user, I absolutely love how easily I can access my photos and videos across my devices. Apple’s iCloud is an incredibly powerful tool that automatically backs up important data on your device. When you’ve enabled iCloud Photos sync, any photo or video you capture on your iPhone will be automatically uploaded to iCloud. Therefore, it will be available on all your other Apple devices, including your iPad, Mac, or the iCloud website. In short, iCloud Photos helps you access your iPhone photo library on every device you own.
We all know there isn’t a way to expand storage on our iPhones or other Apple devices. Thankfully, iCloud photo syncing also helps you manage storage on your Apple devices. You can free up precious storage space on your devices while keeping your entire photo library within your reach.
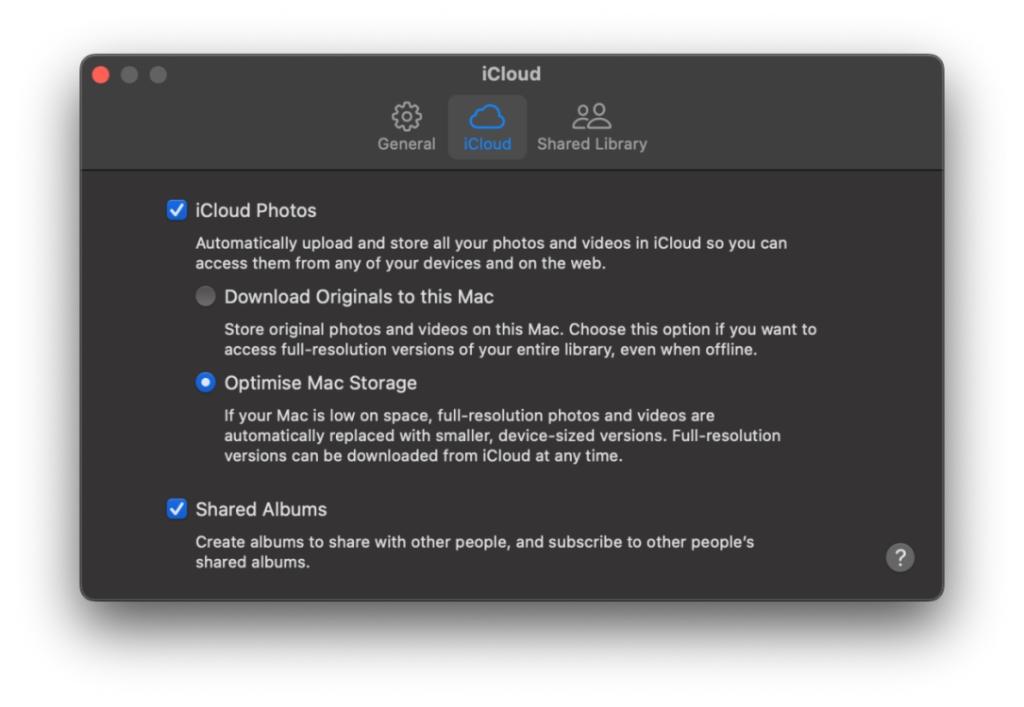
To enable iCloud Photos syncing on your iPhone or iPad, open Settings -> Apps -> Photos -> iCloud Photos and turn the toggle on.
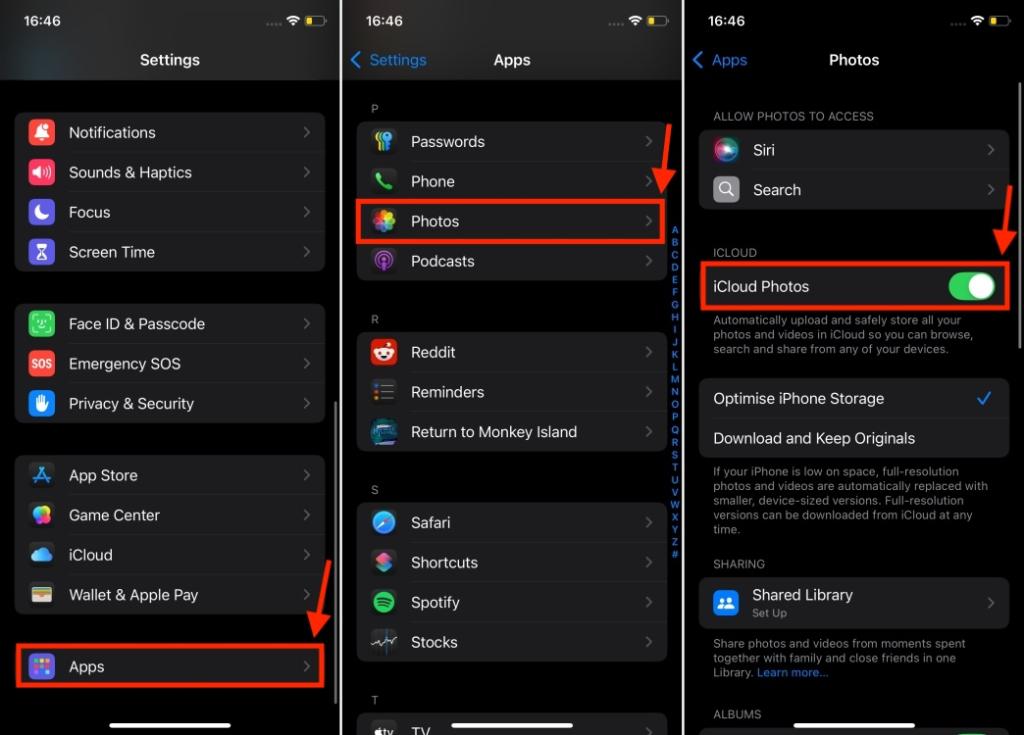
On your Mac, open the Photos app, click on Photos from the top Menu bar, and choose Settings. From the iCloud tab, make sure there’s a “Checkmark” against “iCloud Photos”.
10. Make use of Family Sharing
If you’ve subscribed to iCloud+ and have a lot of storage space, you can share it with up to 5 family members or friends using Apple Family Sharing. Depending on your subscription, you can share up to 12TB of iCloud storage space and other features like iCloud Private Relay, Hide My Email, and HomeKit Secure Video support.
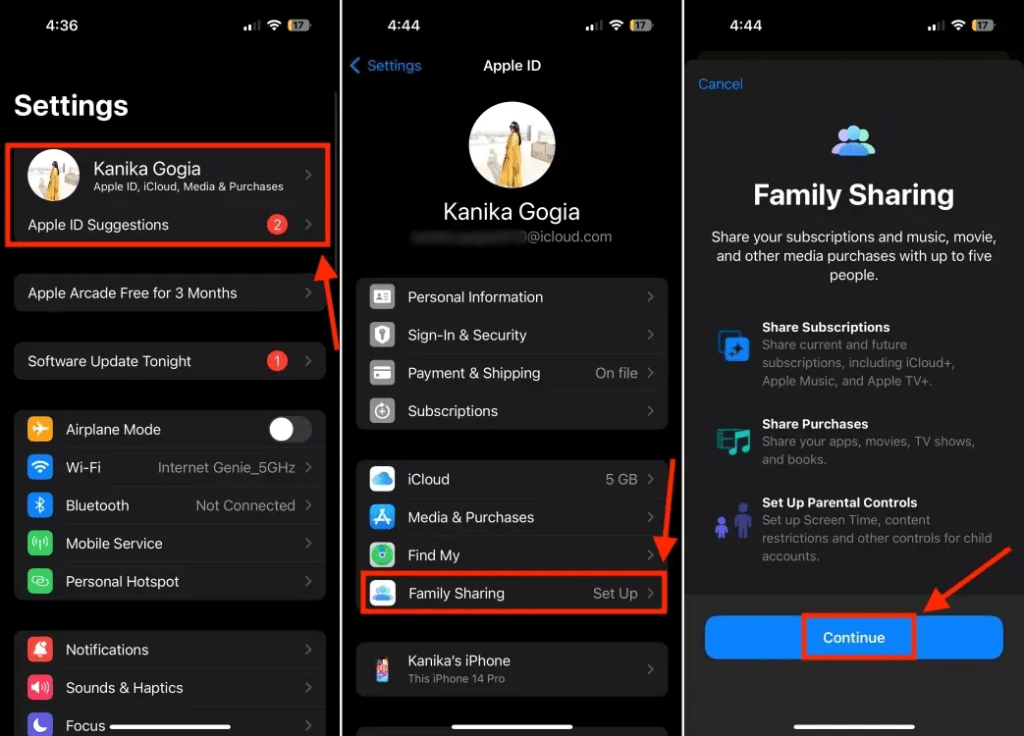
Bear in mind that only the iCloud storage space and features are shared. You can share family photo albums, but each member’s photos and other information will remain private. With Family Sharing, you can also share Apple Music, Apple Arcade, Apple TV+, Apple News+, and Apple Card.
For complete details, don’t forget to visit our guide on how to share iCloud storage on iPhone, iPad, and Mac.
11. Use Apple Watch for Smarter Integrations
If you’ve added an Apple Watch to your tech essentials, you can go beyond tracking your everyday health metrics and utilize your wearable for smarter integrations. First, just like your iPhone, you can use Apple Pay on your Apple Watch to make payments. You don’t have to take the iPhone out of your pocket, just bring your Apple Watch near the NFC-enabled card reader, and you’re done. When you set up Apple Pay on your iPhone, it offers an option to add the card to your Apple Watch. You can also do it later via the Watch app on your iPhone paired with Apple Watch.

In addition, you can also unlock your iPhone with your Apple Watch. It is super useful in situations when you’re wearing a mask or FaceID isn’t working on your iPhone. Besides the iPhone, you can also unlock your Mac with your Apple Watch. When you’re wearing your Apple Watch, your Mac can sense when you’re nearby and automatically logs you in. To make this work, make sure to enable Bluetooth and Wi-Fi on your devices. Now, go to System Settings -> Touch ID & Password and turn on the settings for your Apple Watch.
12. Track All Your Devices with Find My
Apple’s Find My app leverages the extensive Apple ecosystem, utilizing billions of devices to help you locate and track your belongings. With Apple’s Find My, you can locate your lost or misplaced iPhone, Apple Watch, keys with AirTag, AirPods, and other devices associated with your Apple ID. Turning on Find My will give you peace of mind that you can always know where your devices are. Previously, you could track only 16 items. Now, you can track up to 32 items on the Find My app.
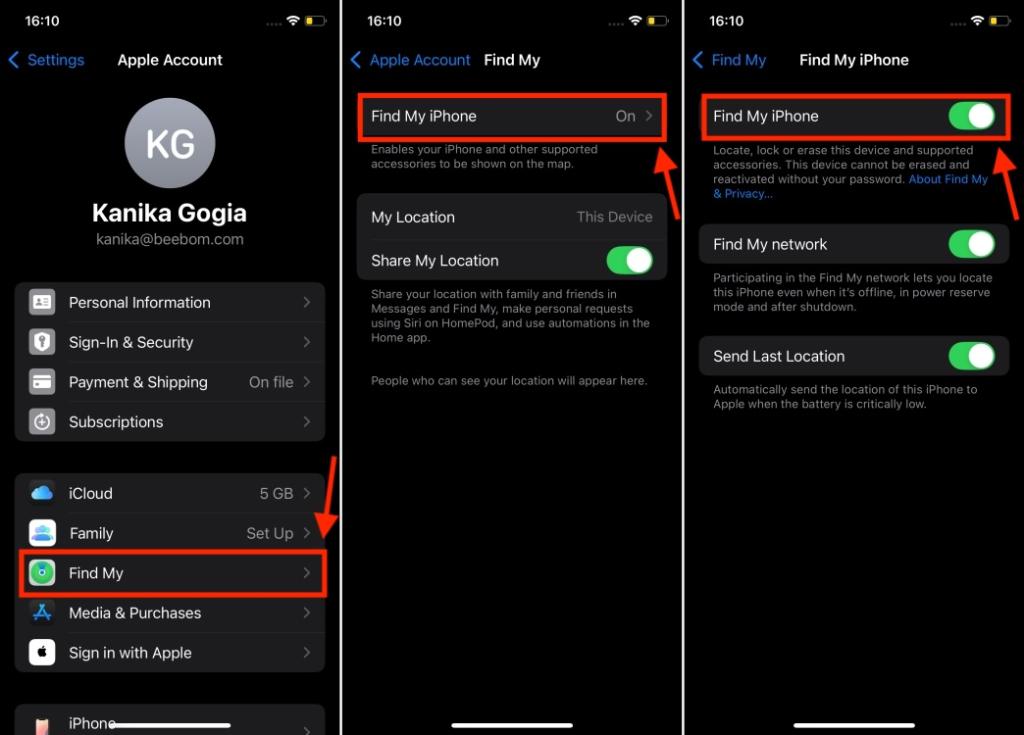
Bear in mind that you can track your device only if you’ve set up Find My. On your iPhone or iPad, go to Settings -> [Your Name] -> Find My and enable Find My iPhone or Find My iPad.
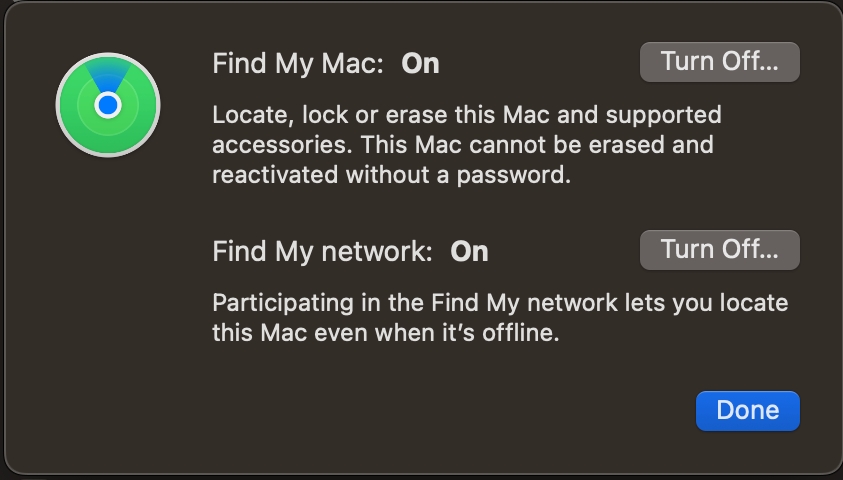
On your Mac, go to System Settings -> [Your Name] -> iCloud and tap on See All. Here, turn on Find My Mac.
13. Use AirPlay with Apple TV
Last, but definitely not the least, you can use AirPlay to stream or share content from your iPhone or iPad to a bigger screen like Apple TV, a Mac, or an AirPlay-compatible smart TV. You can stream a video to amp up your binge-watching experience, share photos to enjoy some special moments with your family, or simply mirror your iPhone screen to boost productivity.

You can use the Handoff feature to stream video from your iPhone/iPad screen automatically. Alternatively, while playing a video on your iPhone, tap on the AirPlay icon and choose your Mac or TV from the list of available devices. Watching your iPhone content seamlessly mirrored on the Apple TV or Mac is a pure delight.
That’s all for our side. The Apple ecosystem has been criticised for being a walled garden, but if you’re in it, you just can’t deny how beautiful and connected it is. Apple has built its entire ecosystem with the strong pillars of connectivity, simplicity, and security. It has revolutionised how seamlessly we can interact across different devices and different software.
Source link


