When you get a new Windows computer, it’s important to tweak a few things before you start doing anything productive with it. From personalization and optimization to storage management and data protection, let’s look at several settings you should change to enhance your experience. It shouldn’t take long to do.
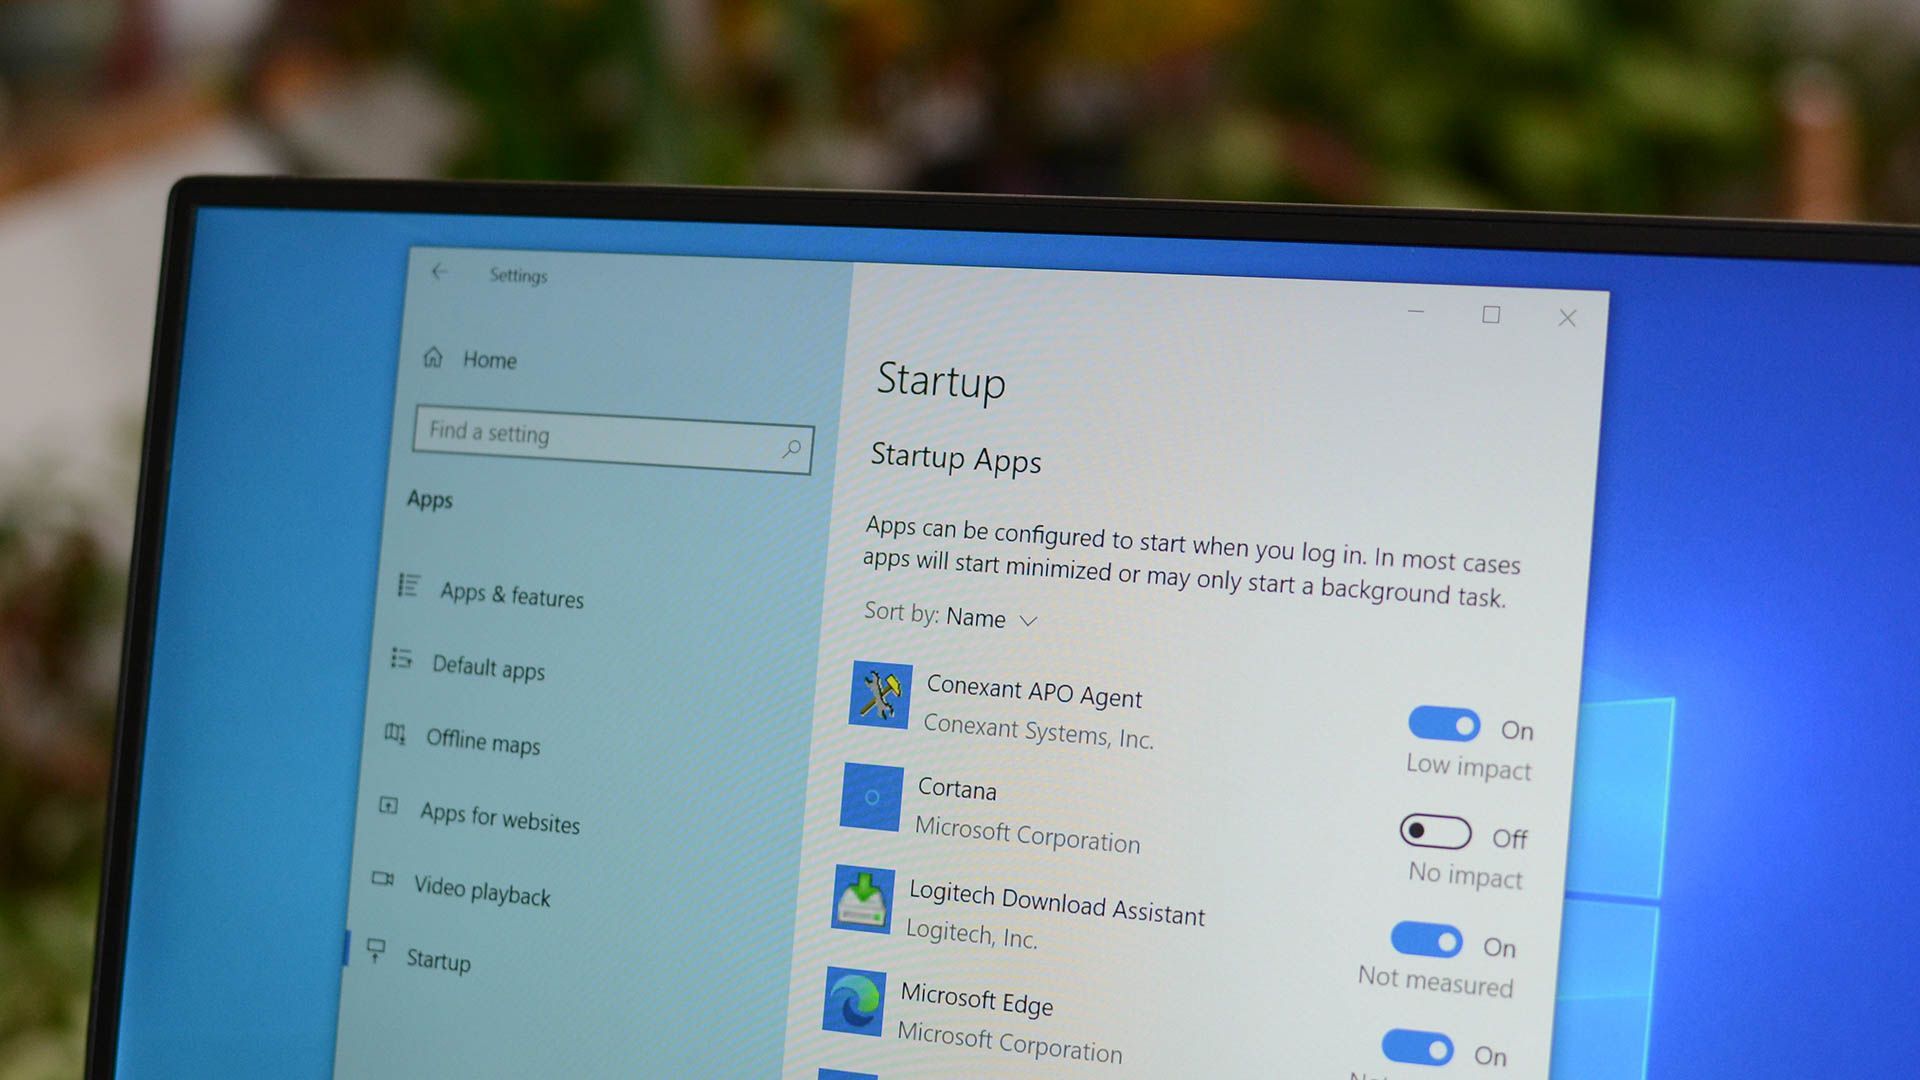
Disable Unnecessary Startup Apps
With startup apps enabled, your computer will dedicate some memory and processing power to them when booting up. This can sometimes slow down the process. If there are apps you don’t need to use immediately after starting your computer, removing them from the list is a good way for your computer to use resources elsewhere, so it focuses on booting up faster.
To disable startup apps, press Win+i to open the Settings app, and go to Apps > Startup. From there, toggle off any startup apps you don’t need.

Related
How to Find Hidden Startup Programs Slowing Down Your Windows PC
If your computer chugs at startup, you may have too many programs unnecessarily launching automatically.
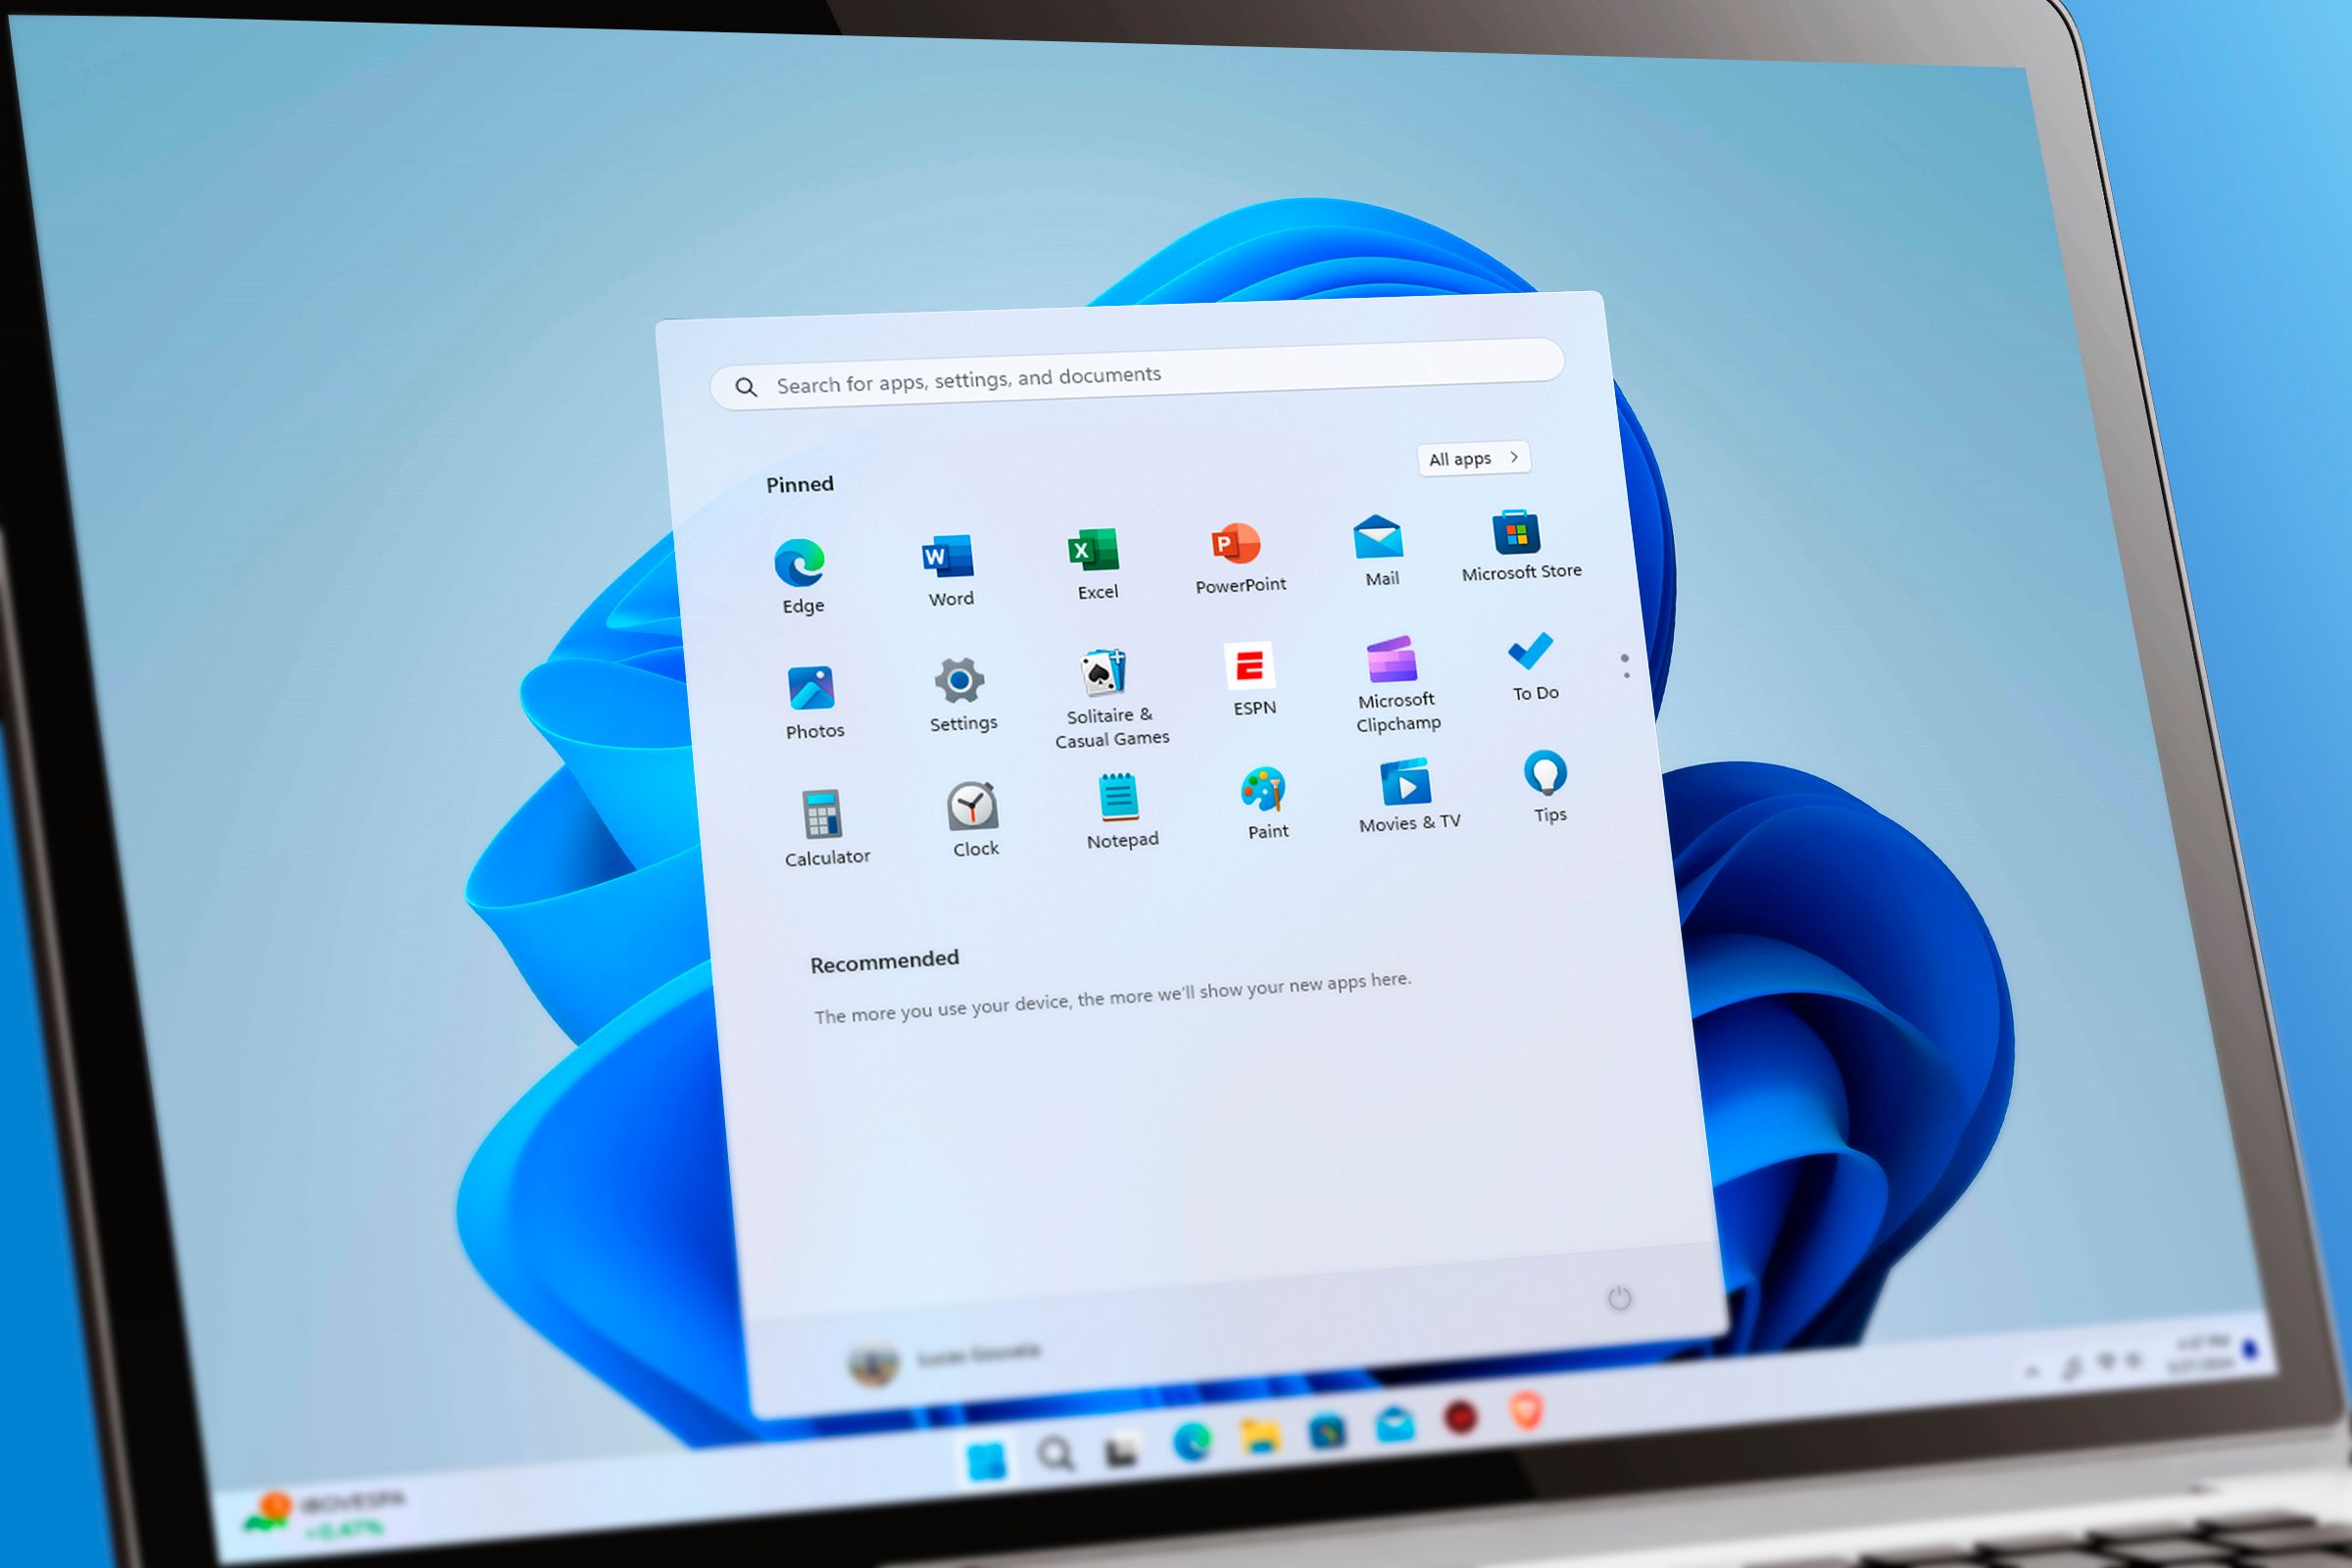
Personalize the Taskbar and Start Menu
The Taskbar and Start menu serve as your primary navigation hub when using Windows. Customizing them is great for improving your workflow and personalizing your PC. Let’s look at a few settings you should adjust.
Go to Settings > Personalization > Taskbar, expand the “Taskbar Behaviors” section, and adjust settings like “Taskbar Alignment,” “Automatically Hide the Taskbar,” and “Show Badges on Taskbar Apps.”


For the Start menu, go to Settings > Personalization > Start, and adjust the options under “Layout” if you don’t like the default. Also, toggle the various options on and off depending on your preferences. For instance, you might keep “Show Recently Used Apps” on to quickly access apps you have been using.

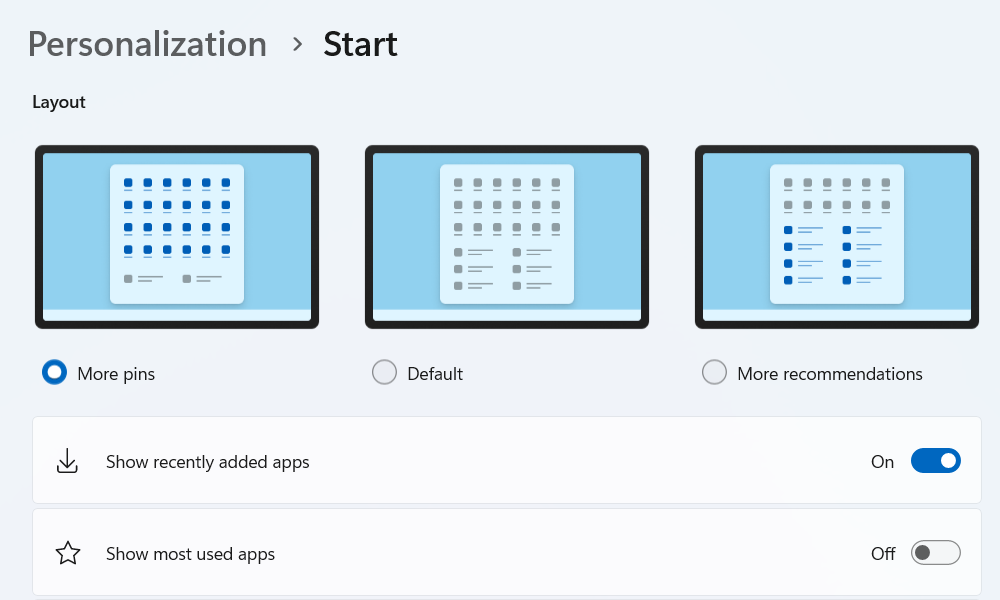
One setting I recommend keeping off here is “Show Recommendation for Tips, Shortcuts, New Apps, and More.” This will show ads in the Start menu if you keep it on, which can be intrusive.
Related
The 7 Most Annoying Windows 11 Default Settings I Always Change
Avoid unnecessary annoyances on Windows.
Maximize Storage Space With Storage Sense
Enabling Storage Sense allows you to maximize storage space on your Windows computer by automatically removing unnecessary files. These include files from the Downloads folder, Recycle Bin, or any temporary files your computer may have accumulated over time.
While Storage Sense is enabled by default, you can check if this is the case in the Settings app. To do that, go to Settings > System > Storage and see if “Storage Sense” is on in the Storage Management section. If not, turn it on.

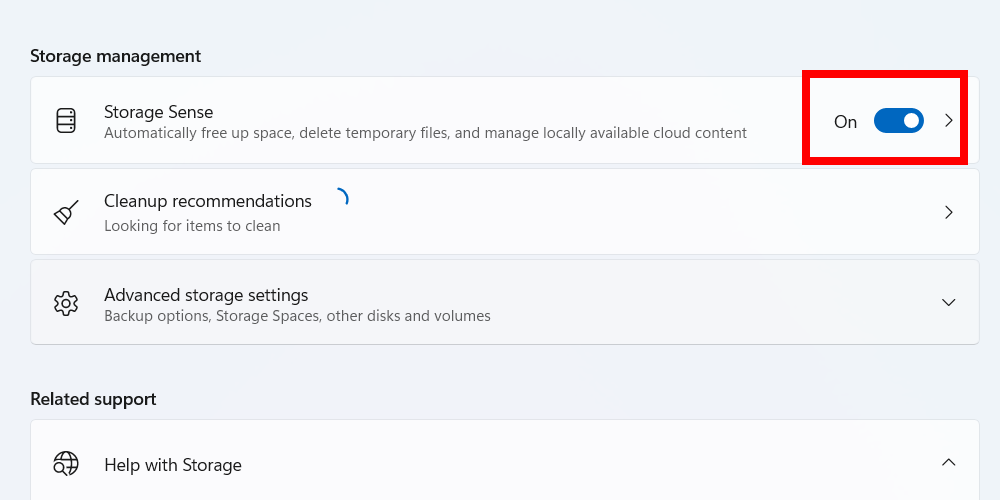
If you click “Storage Sense”, you will be able to tweak more Storage Sense settings and maximize storage space even more. For instance, you can set when certain files and folders should be deleted.
Link Your Microsoft Account
The advantages of using Windows with a Microsoft account include syncing your settings and preferences across devices, accessing OneDrive cloud storage for automatic file backup, and installing apps from the Microsoft Store. If you created a local user account on Windows, you’ll miss these helpful features.
To use Windows with your Microsoft account, go to Settings > Accounts > Your Info and click the “Sign in with Microsoft account” link. From there, follow the steps to link your Microsoft account. If you don’t have one, you will be able to create it during this process.
Enable Automatic Backup of Folders
Things happen—accidental deletions, hardware failures, and even ransomware attacks. Having regular backups ensures you can recover your files quickly if something goes wrong, preventing the loss of valuable documents, photos, and other precious data.
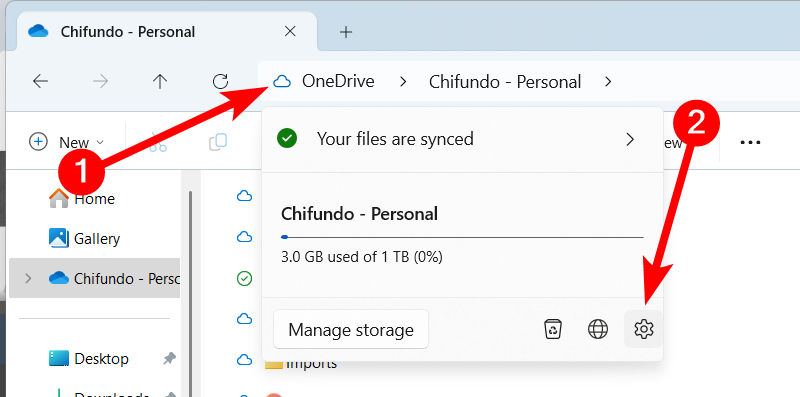
One of the easiest and best ways to automatically back up your files and folders while also saving space is to use OneDrive. But before proceeding, ensure you are using Windows with a Microsoft account as outlined in the previous section.
To enable automatic backups on OneDrive, press Win+E to open File Explorer and select your OneDrive Personal folder in the Navigation Pane. In the address bar, click OneDrive > Settings to open OneDrive Settings.

OneDrive backup will only back up specific files and folders on your PC. If you want a full backup, then consider creating a system image instead.
Select “Sync and Backup” in the left-side menu, and then click the “Manage Backup” button in the right panel.

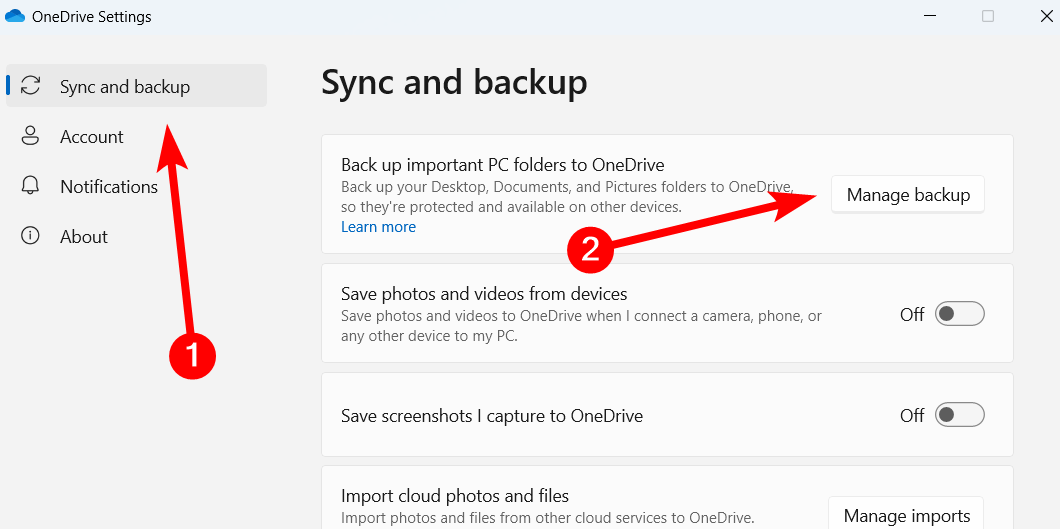
Turn on the toggle for the folders you want to back up, such as Documents, Pictures, and Videos. Make sure the files you want to back up are in these folders. Then, click the “Save Changes” button.

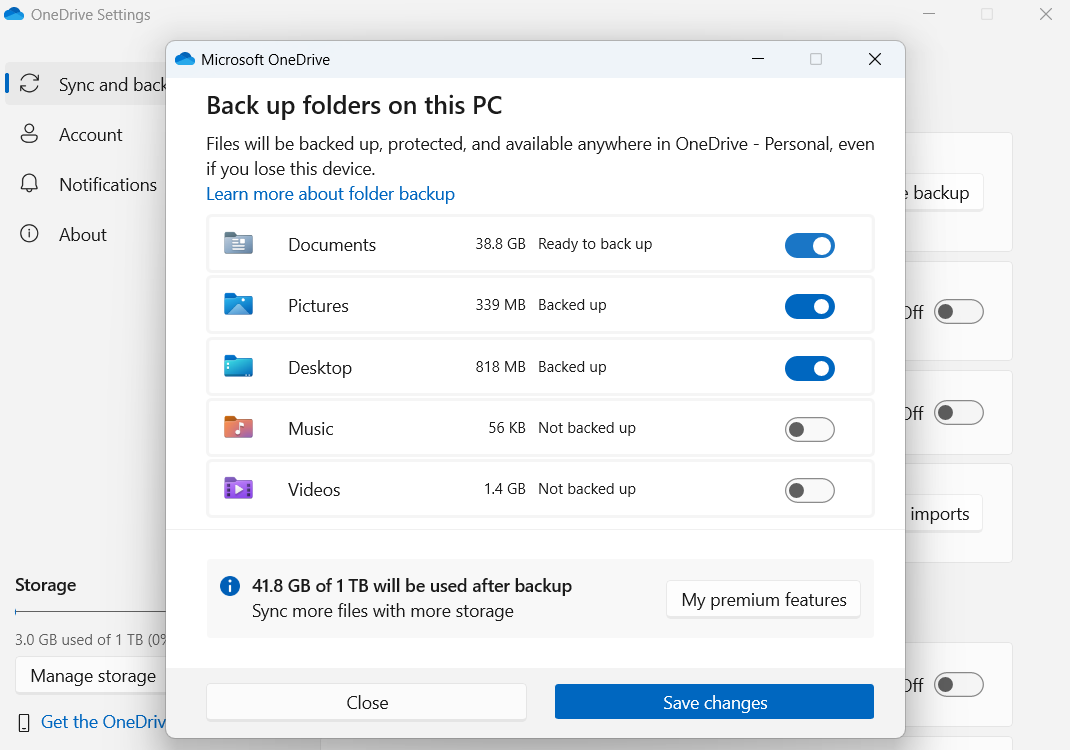
Depending on the size of the folders, the initial saving process may take some time. Afterward, files and folders you add will be automatically synced to OneDrive.
Related
3 Best Ways to Backup Windows to External Storage
Protect your data during BSOD or malware attacks.
Optimize Your Battery Life (Laptop Users Only)
Optimizing your laptop’s battery life is crucial as it ensures you can work or enjoy entertainment for longer periods without being tethered to a power outlet. Furthermore, it will extend your PC’s battery life in the long run.
These settings are crucial if you’re away from your computer for more than five minutes. They ensure Windows gradually shuts down the most power-hungry components and processes while also allowing you to quickly jump back in when you return.
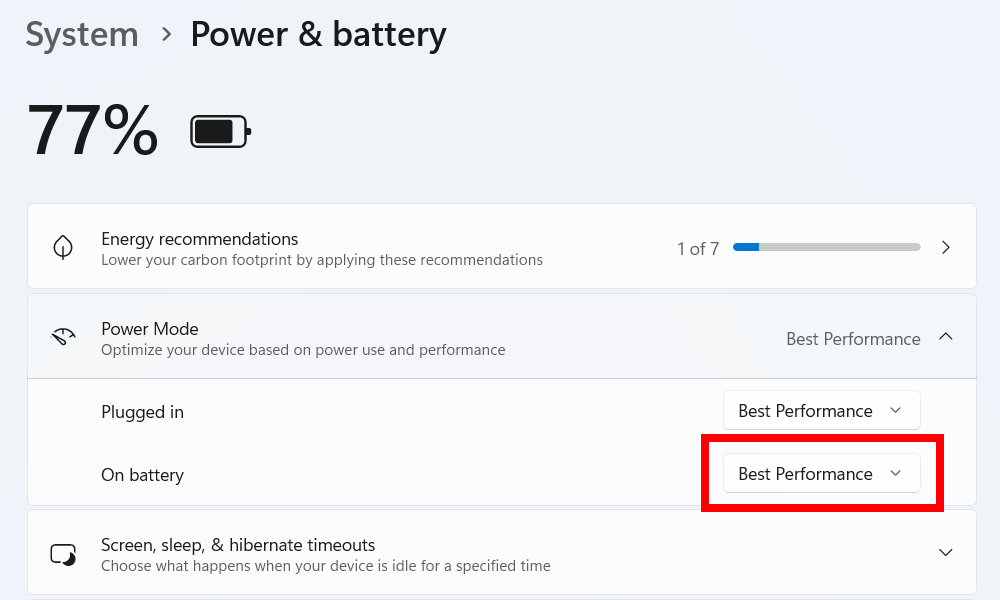
The first one you should change is the power mode. To do that, go to Settings > System > Power & Battery, expand “Power Mode,” and set On Battery to “Best Performance.” This will balance speed and responsiveness while running on battery power, allowing you to use your laptop longer before needing a charge.
Expand “Screen, Sleep, & Hibernation Timeouts” and, in the On Battery section, set “Turn Off My Screen After” to “5 Minutes,” “Make My Device Sleep After” to “10 Minutes,” and “Make My Device Hibernate After” to “30 Minutes.”
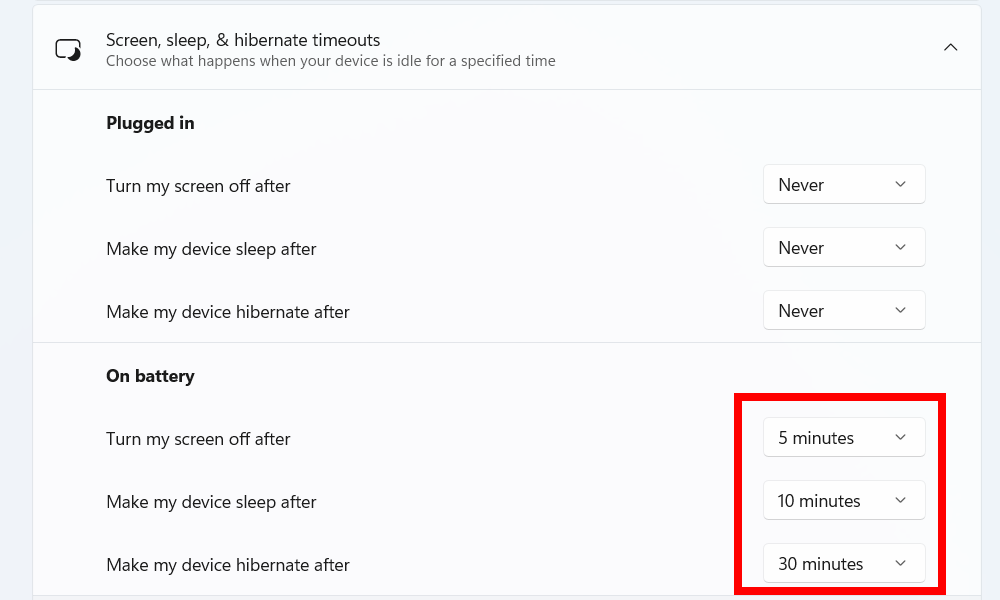
Keep everything in the Plugged In section set to “Never.”
Use Windows Security To Protect Your Computer
If you did a clean install of Windows, Microsoft Defender should be enabled by default with real-time protection turned on. But if your computer came with a trial version of an antivirus, then chances are it’s disabled. If you don’t plan on paying for it once it expires, and it’s your personal computer, you should uninstall it and use Windows Security instead. It’s built-in and 100% free.
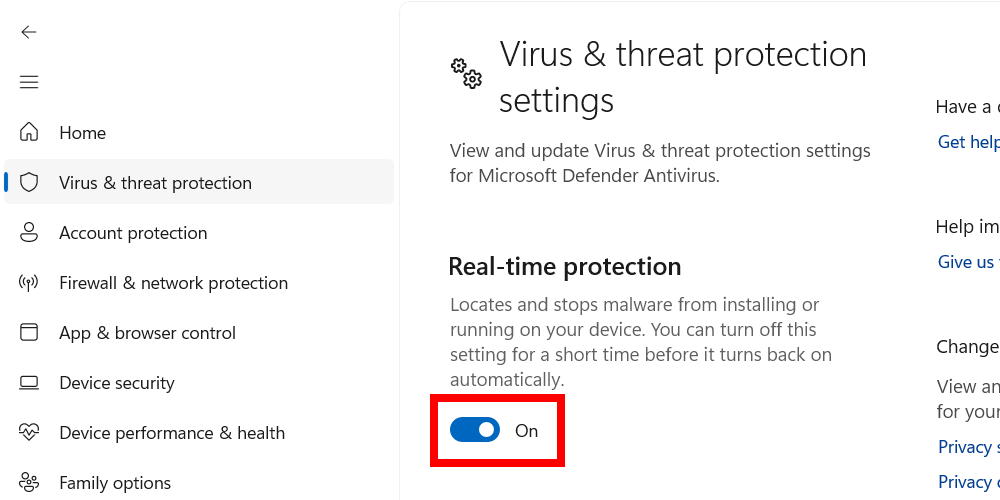
The most important thing you need to do in Windows Security is ensure the built-in antivirus, Microsoft Defender, is running. Go to Settings > Privacy & Security > Windows Security and click the “Open Windows Security” button. Next, select “Virus & Threat Protection” in the left-side menu, and then click “Manage Settings” link under Virus & Threat Protection Settings.
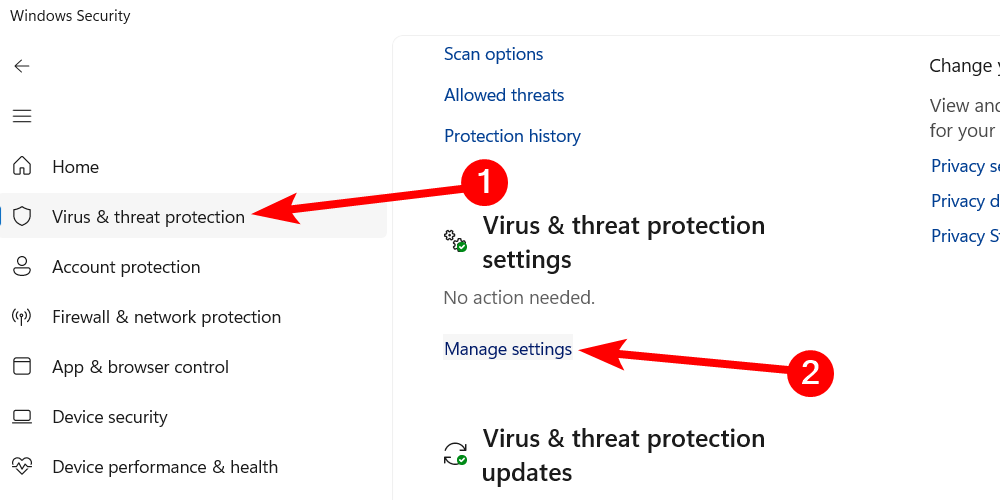
Ensure that the “Real-Time Protection” toggle is turned on.
Afterward, you can look into other Windows Security settings, such as the Firewall, App & Browser Control, and Device Security.
If you don’t know what to change when you get a new Windows PC, these suggestions should point you in the right direction. You will come across other options as you tweak them, so don’t be afraid to fiddle around to find the best ones. Remember to regularly check for Windows updates to ensure your PC stays secure and runs smoothly.
Source link
-

-

-

-

-
-

-

-