While Microsoft Excel’s comments and notes tools both let you annotate a cell, they serve different purposes, work in diverse ways, and vary in how they look on a printed Excel worksheet. In this guide, I’ll show you how to use them before summarizing their similarities and differences.
Comments in Microsoft Excel are individual-cell annotations that can be turned into a conversation-style thread of separate comments. As a result, they’re great for collaborative worksheets.
Related
Sharing Your Excel Spreadsheet With Others? Do These 8 Things First
Don’t share a file without these steps!
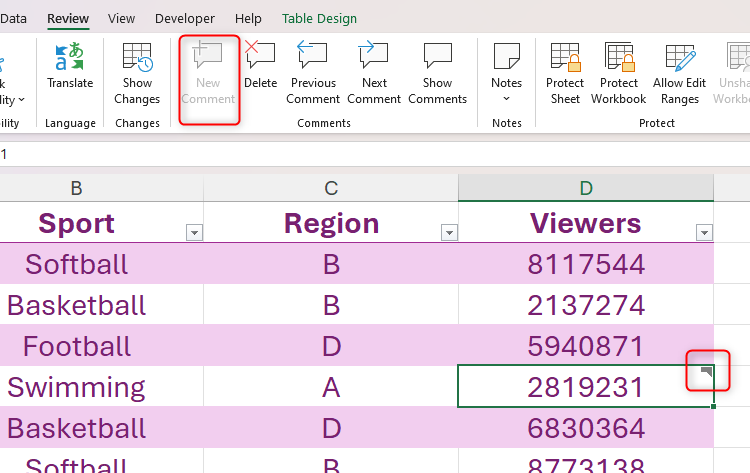
To add a comment to a cell that doesn’t already have one, right-click the relevant cell, and select “New Comment.”

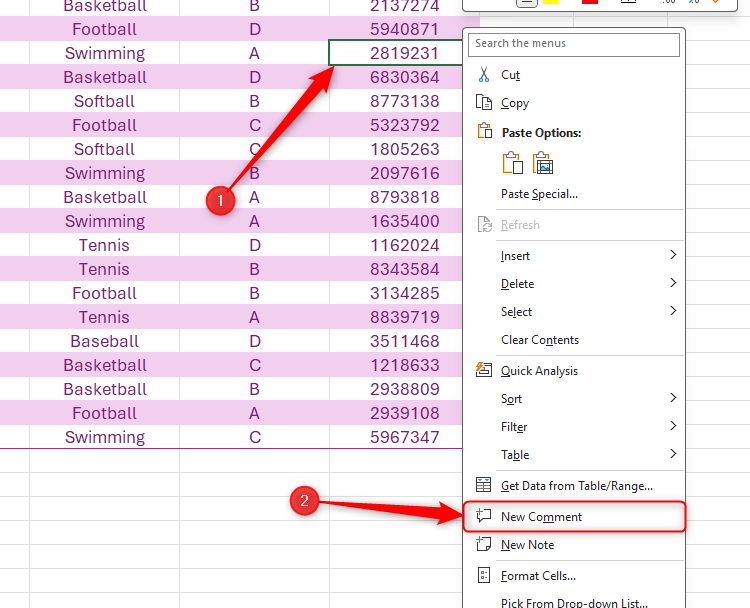
Alternatively, select the cell, and click “New Comment” in the Review tab on the ribbon.


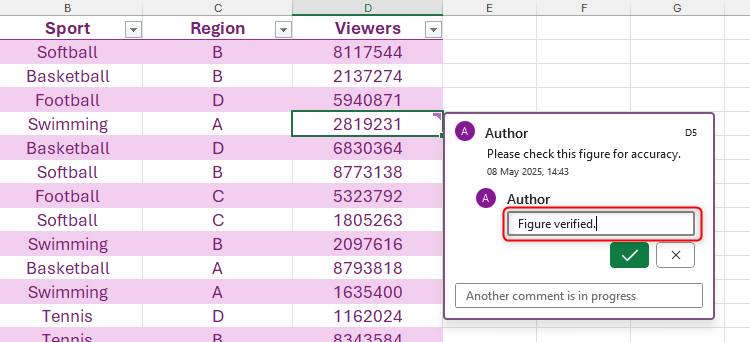
Whichever route you take, a floating comment box appears where you can type your annotation.

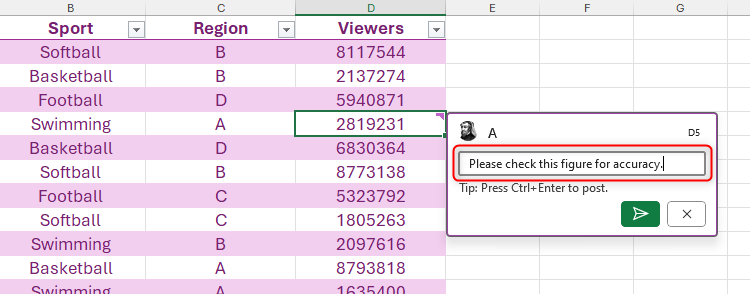
When you click the green arrow or press Ctrl+Enter, the comment saves beneath your username, and a purple tag is added to the top-right corner of the affected cell to indicate that a comment has been added.

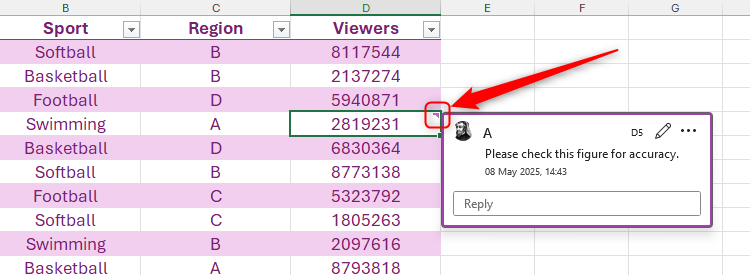
Hover your cursor over a tagged cell at any time to see its comments.
You’ll also notice that all comments are stamped with the date and time, making it easier to track when they were added.
To add a comment to a thread, select the “Reply” text field, insert your additional annotation, and press Ctrl+Enter. New comment threads cannot be created for a cell that already has a comment or thread. This prevents a cell from having conflicting annotations.

Anyone with editing permissions in the workbook can add comments. People with viewing permissions can read comments only.
If you’re signed in on your organization account, type @ in the comment box, and select a coworker or peer you want to tag in the comment and notify.
Once the thread is complete, and all related tasks have been actioned, click the three dots in the top-right corner of the first comment, and select “Resolve Thread.” Taking this step prevents any further comments from being added, though you and others can still view the conversation history by hovering over the cell.

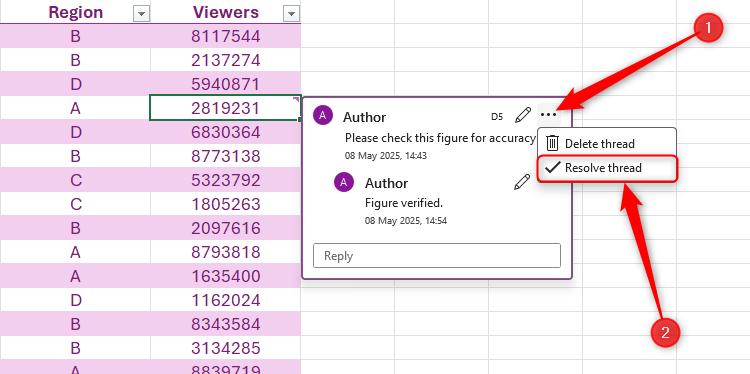
Alternatively, to remove the thread altogether, click “Delete Thread.” However, use this option with caution, as you can’t restore deleted threads once they’re gone! You can also edit a note by clicking the pencil icon.
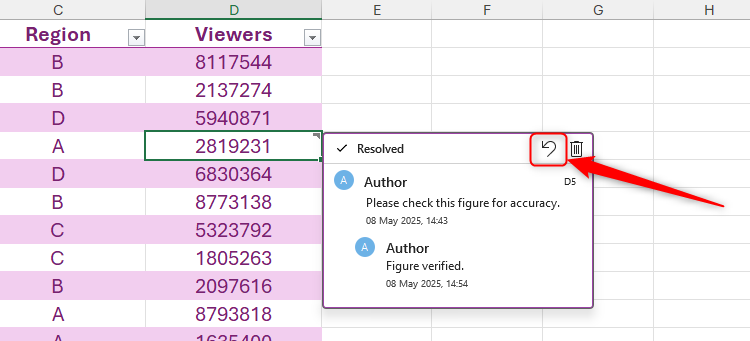
After you resolve a thread, the cell tag turns from purple to gray, and the New Comment button in the Review tab on the ribbon is grayed out, meaning you can’t start a new comment thread for this cell.

Instead, to reopen the thread to add further comments, hover over the cell, and click the “↺” arrow in the top-right corner.

To see all open and resolved comments on a worksheet, click “Show Comments” in the Review tab on the ribbon. Then, in the Comments pane, you can add further annotations to open threads, start a new thread for the selected cell, or click the filter icon in the top-right corner to show open or resolved threads only.


Only comments on cells in the active worksheet are displayed in the Comments pane. When you go to another worksheet via the tabs at the bottom of the Excel window, the Comments pane updates to show comments in that sheet.
If you want comments to show on printed versions of the worksheet, first, click the “Page Setup” dialog box launcher in the corner of the Page Setup group of the Page Layout tab. Then, in the Sheet tab of the Page Setup dialog box, select “At End Of Sheet,” and click “OK.”

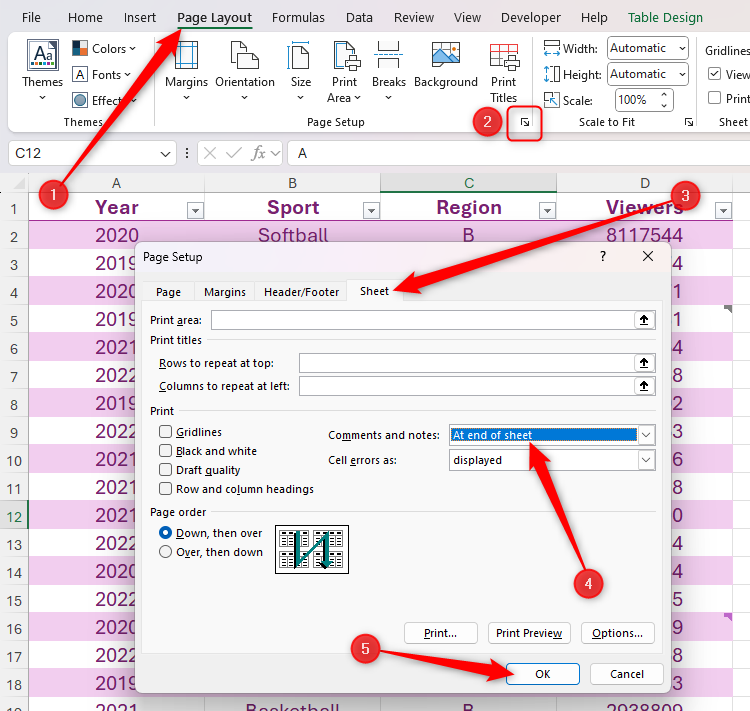
Any notes in the worksheet will also print when you select this option. It’s not possible to only print comments if the spreadsheet also contains notes.
Now, after pressing Ctrl+P, scroll to the end of the print preview to see how the threads will appear in the printout, and print the sheet when you’re ready!

Related
How to Search Through Comments and Notes in Excel
Excel’s Find And Replace dialog box is more versatile than you think!
How to Use Notes in Microsoft Excel
Notes in Microsoft Excel are simple annotations linked to individual cells. They are most commonly used to add context to a cell’s content, and they can also act as an overflow to save you from cramming too much information into a cell.
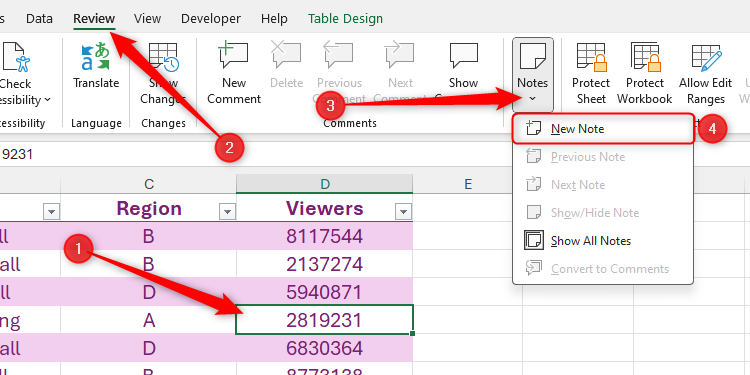
To add a note to a cell, right-click the relevant cell, and select “New Note.” You can’t add a note to a cell that already contains one.

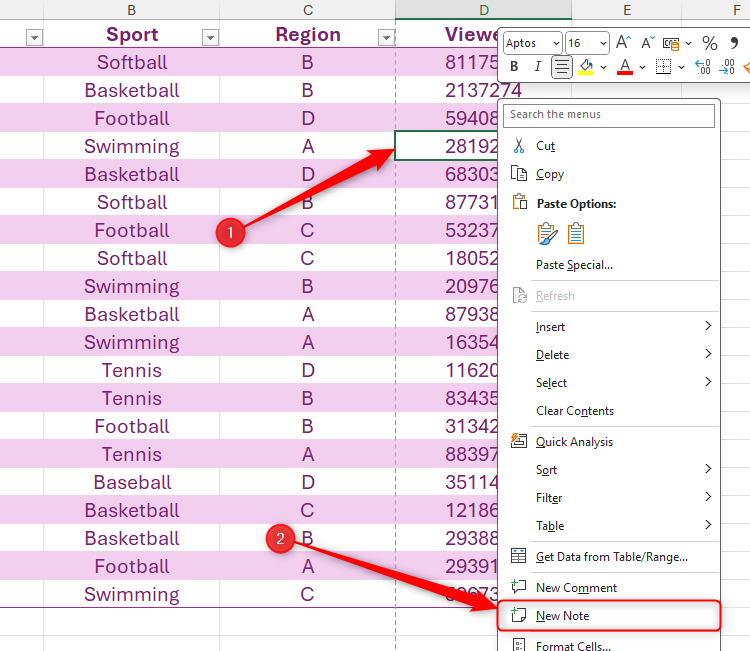
On the other hand, select the cell to which you want to add the note, and click Notes > New Note in the Review tab on the ribbon.

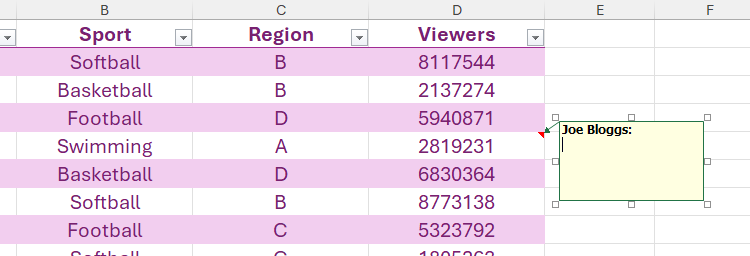
Then, a note box with a blinking cursor beneath your Microsoft username appears where you can type the annotation for that cell. Click any cell in the worksheet to exit the note edit mode once you’re done.

To anonymize your note, select your username and press Delete.
To format the font in a note, either select the text and use formatting keyboard shortcuts—like Ctrl+B for bold, and Ctrl+i for italics—or right-click anywhere within the note and select “Format Comment” to launch the Format Comment dialog box.

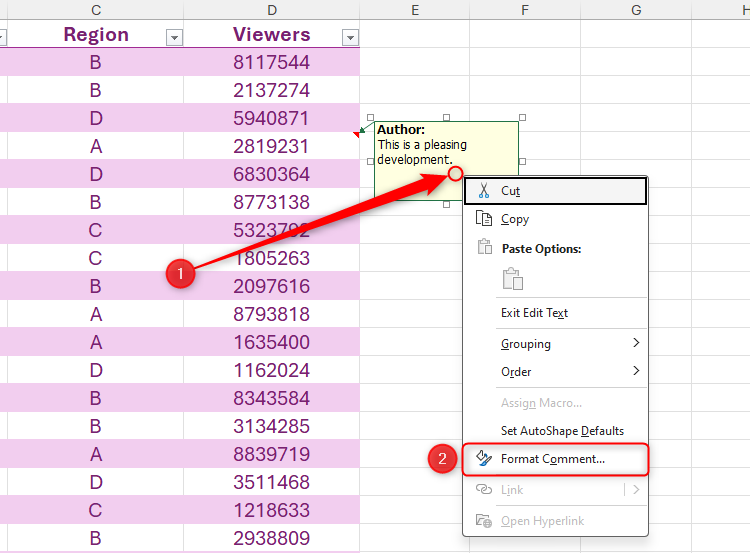
Right-click the edge of the note to make other formatting adjustments, like changing the background color, selecting a different border type, or changing the text direction.
Notes in Microsoft Excel are similar to the Windows Sticky Notes app in that you can resize the text box by clicking and dragging the handles, and you can move the note anywhere within the worksheet by clicking and dragging the edge of the shape.


Related
How I Use Windows Sticky Notes to Manage My Daily Tasks
Sometimes, Sticky Notes is all you need to get the job done.
Any cells with notes have a red tag in the corner, and you can hover over them at any time to see their content. When you do this, an arrow appears between the note and the cell to which it refers—a useful feature if you have lots of notes in one worksheet.
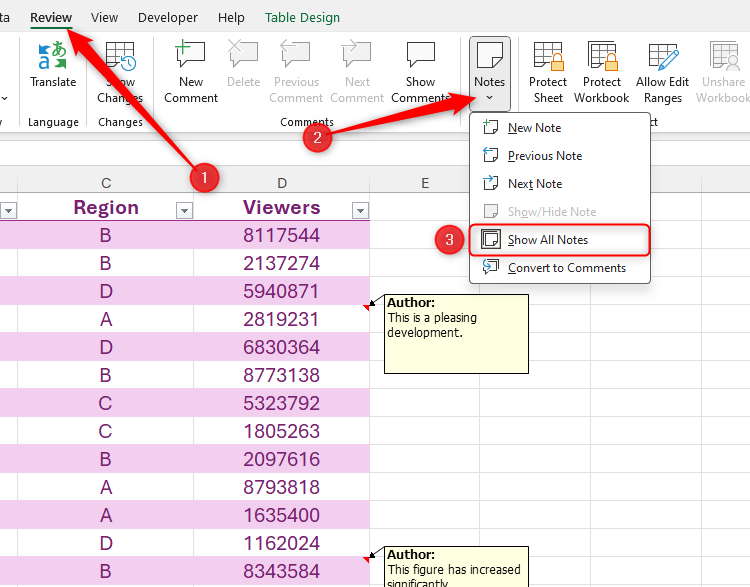
On the other hand, you can force Excel to display all cell notes at the same time. To do this, in the Notes drop-down menu of the Review tab on the ribbon, click “Show All Notes.” Click the same button to hide them again.

To amend a note, right-click the relevant cell, and click “Edit Note.”

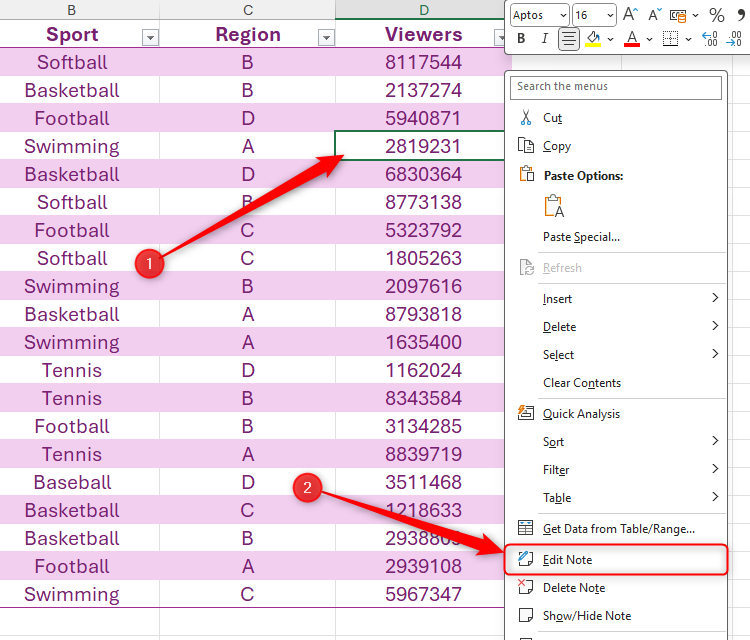
You can also remove a note in this right-click menu by selecting “Delete Note.” However, be aware that once you delete a note, you can’t get it back again!
If, after adding notes, you want to share your worksheet with others, you might choose to turn the notes into comments, so that the collaborators can add their thoughts and suggestions. To do this, in the Review tab on the ribbon, click Notes > Convert To Comments.

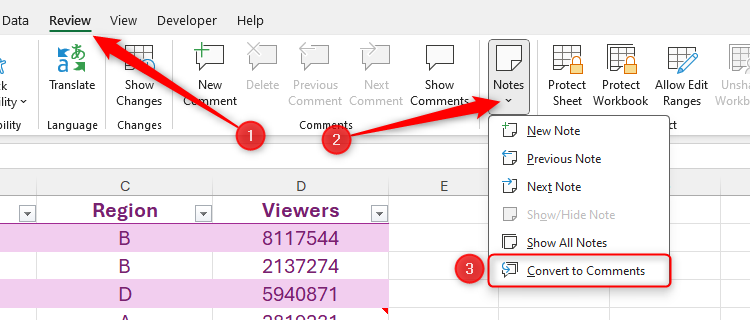
You’ll then see a warning that images and formatting will be removed in this process. If you’re fine with that, click “Convert All Notes.” It’s also worth pointing out that you can’t convert individual notes to comments—it’s a case of all or nothing!
Notes converted to comments are not time-stamped, since Excel didn’t track exactly when you added the original note.
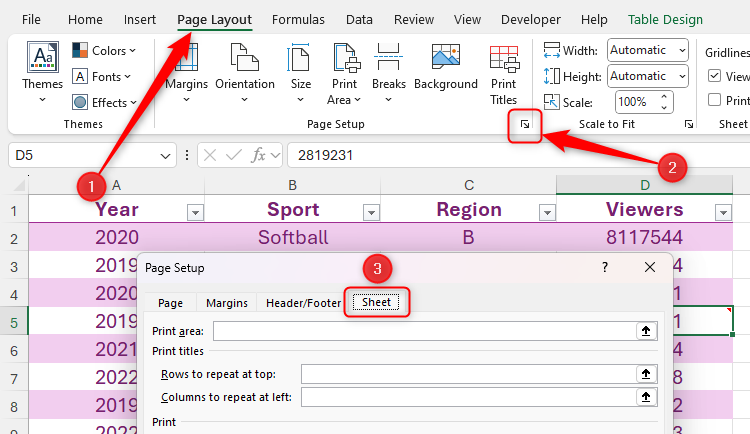
To display notes when you print your worksheet, click the “Page Setup” dialog box launcher in the corner of the Page Setup group of the Page Layout tab, before opening the “Sheet” tab of the Page Setup dialog box.


Related
9 Tips to Get Perfect Excel Printouts
Get the perfect print on the first try!
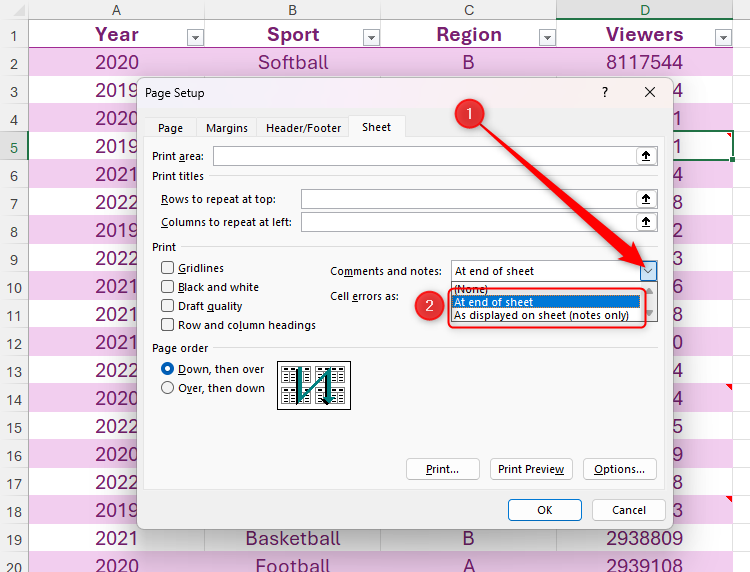
Then, in the Comments And Notes drop-down menu of the Print section, choose one of the following two options:
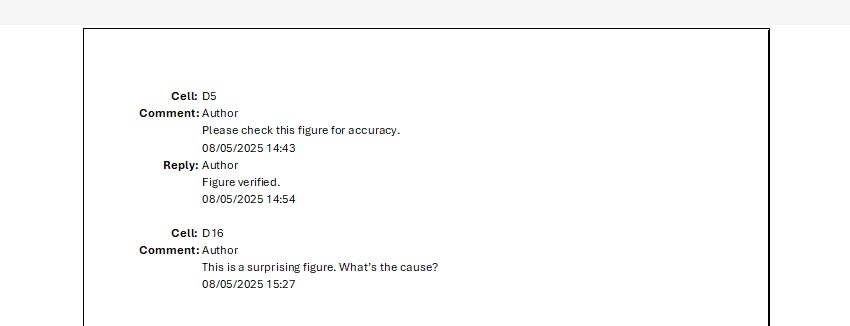
- At End Of Sheet: This displays all comments and notes at the end of the printout, including the cell to which they refer, the author (if available), and the annotation. Selecting this option also prints any comments in the worksheet.
- As Displayed On Sheet: If you have activated Show All Notes in the Notes drop-down of the Review tab, the notes will print exactly as they appear in your workbook on screen. Selecting this option prints notes only (not any comments).

Once you’re happy with your choice, click “OK,” then press Ctrl+P to print your worksheet.
Here’s a summary table that shows you the similarities and differences between Microsoft Excel’s comments and notes:
|
Property |
Microsoft Excel Comments |
Microsoft Excel Notes |
|---|---|---|
|
Definition |
Conversation-style, threaded annotations |
Straightforward annotations |
|
Capacity |
One comment thread per cell |
One note per cell |
|
Cell tag color |
Purple when active; gray when resolved |
Red |
|
Formatting |
Unavailable |
Available through keyboard shortcuts or “Format Comment” |
|
Date and time stamps |
Displayed by default |
Not displayed |
|
Editing and deleting |
Can be edited, resolved, and deleted |
Can be edited and deleted |
|
Positioning |
Next to the relevant cell or in the Comments pane |
Can be repositioned anywhere within the worksheet |
|
Behavior during sort and filter |
Stay in the fixed cell position |
Properties can be adjusted to move with cells (“Format Comment”) |
|
Size |
Adapt to text volume |
Can be resized manually |
|
Display |
Can be displayed individually (hover over cell) or collectively (“Show All Notes”) |
Can be displayed individually (hover over cell) or collectively (“Show Comments”) |
|
Anonymity |
Contain the author ID by default |
Author ID can be selected and deleted through the Delete key |
|
Conversion |
Cannot be converted into notes |
Can be converted into comments |
|
Editor assistance |
Spelling and grammar errors highlighted as you type |
Unavailable |
|
Printing |
Can be displayed with notes at the end of a printed worksheet |
Can be displayed with comments at the end of a printed worksheet or without comments in their position on the spreadsheet |
In this guide, I’ve discussed just two of the useful tools in the Review tab in Microsoft Excel—but there are many more! For example, it’s where you can check whether your workbook is accessible to everyone, protect an individual worksheet or the whole file with a password, and track any changes that have been made.
Source link
-

-

-

-

-

-

-

-