When you create a new user account in Windows 11, the operating system sets it as a Standard account without Administrator permissions. If you want to make that user an Administrator, you can, but only from another account with Administrator permissions. Does this sound complicated? Then, you’re in the right place, as this guide shares all the ways to change the Administrator in Windows 11, including using command-line tools like Command Prompt, PowerShell, or Windows Terminal:
IMPORTANT: If you use a laptop (made by Lenovo, HP, ASUS, or some other vendor) or a desktop computer with Windows 11, and you want to change the user that has Administrator permissions, you first need to create a new user account. New user accounts are set by default to have standard non-admin permissions. Then, you need to set this newly created user as Administrator by following the instructions shared in the next sections.
1. How to change the Administrator account in Windows 11 from the Settings app
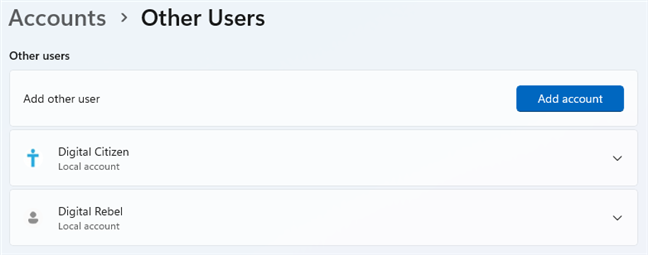
You can change the Administrator on your Windows 11 computer from the Settings app. However, first, you must log in to Windows 11 with another user account that has Administrator permissions. Once you do that, open Settings and go to Accounts. On the right side, scroll down to Other users and click or tap this entry.

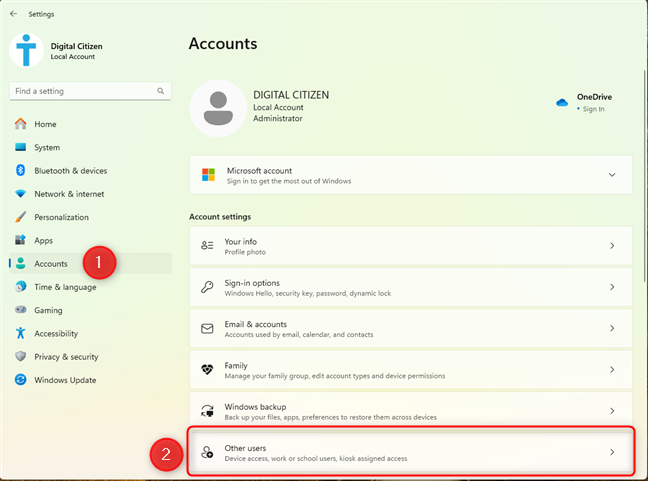
In Windows 11 Settings, go to Accounts > Other users
You see the list of active user accounts on your Windows 11 computer. The account you’re using right now is not displayed here. Click or tap the name of the user account you want to set as Administrator. This reveals more options, including a button named Change account type. Click or tap it.

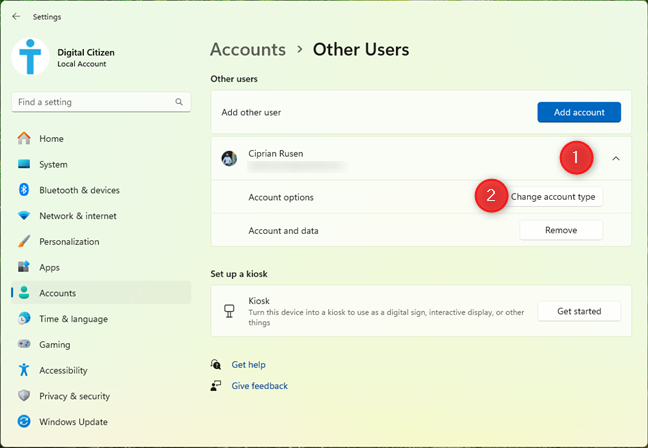
Select the user and click or tap Change account type
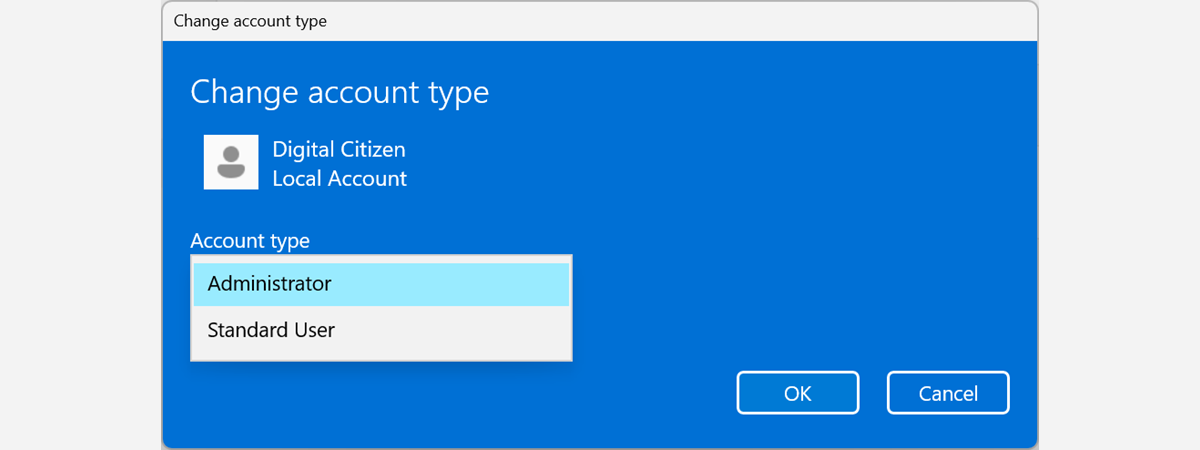
You see the Change account type pop-up window displaying the account’s name, picture, and type. Click or tap the Account type dropdown list.


Click or tap the Account type drop-down list
Select the type of account you want (Standard User to remove administrative privileges or Administrator to grant them), and then click or tap OK.

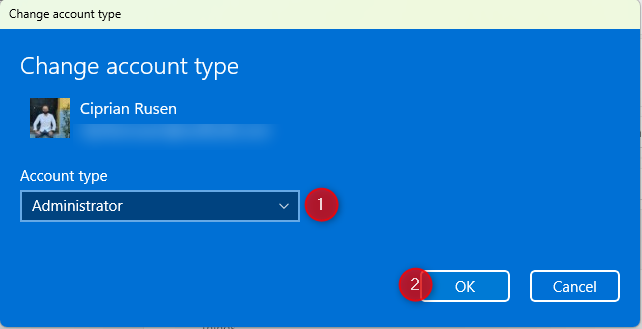
Change the account type to Administrator
You are returned to the Settings app, where the Account type has changed for the selected user.
IMPORTANT: This action doesn’t switch the Administrator in Windows 11 from one user to another. It only changes the type of account for the user you selected, and other accounts on your computer continue to be Administrators. If you want only one user to be the Administrator, then after you set that account as Administrator, sign in to it and set all the other accounts as a Standard User using the steps shared earlier in this section.
2. How to make a user an Administrator in Windows 11 using CMD or Windows Terminal
You can also use the Command Prompt or Windows Terminal to change a user account and set it as Administrator. First, open CMD as Administrator or launch Windows Terminal. Click or tap Yes in the UAC window that pops up.
To change a user from Standard to Administrator, run the following command, replacing NAME with the actual name of that user account:
net localgroup Administrators “NAME” /add
Don’t forget to press the Enter key to execute the command after you type it.

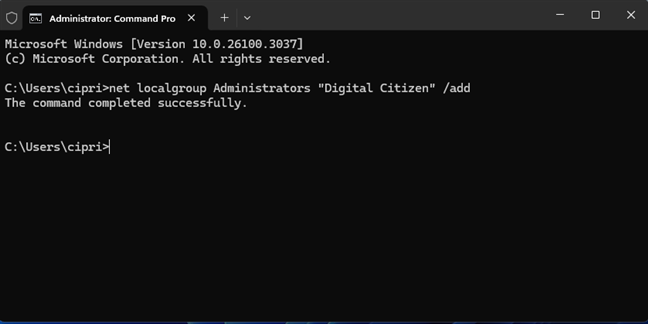
Making a user an Administrator using CMD
If you typed everything correctly, the command is completed successfully, and the account now has administrative privileges.
To demote an Administrator to Standard, copy and paste the following, remembering to replace NAME with the actual username:
net localgroup Administrators “NAME” /delete
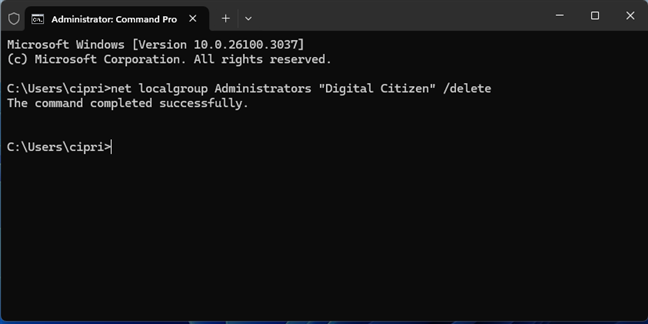
Removing a user from the Administrators group using CMD
Don’t forget to press Enter to execute the command after you’ve typed it.
IMPORTANT: If you want to change the type of a Microsoft account in any command-line environment, replace NAME with the first five letters of the associated email address.
3. How to set a user as Administrator on Windows 11 from Windows Terminal or PowerShell
You can also use PowerShell or a PowerShell tab inside Windows Terminal to change an account type. First, open PowerShell as Administrator and click or tap Yes when you see the UAC prompt. To change the type of an account to Administrator, enter the following command, where you replace NAME with the name of the user account you want to promote:
Add-LocalGroupMember -Group “Administrators” -Member “NAME”

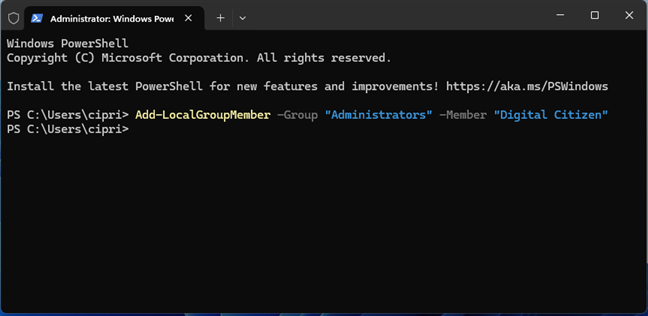
Setting a user as Administrator using PowerShell
To remove Administrator rights from an account and set it to Standard, the command you have to type is a bit different:
Remove-LocalGroupMember -Group “Administrators” -Member “NAME”

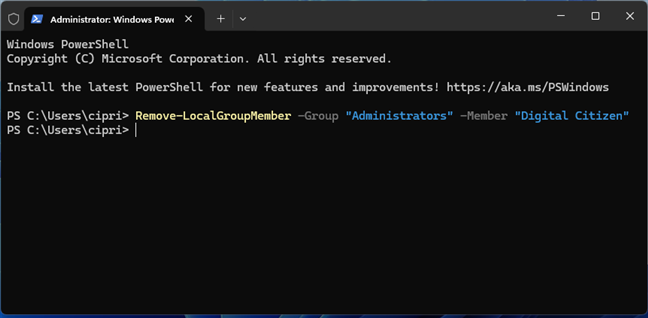
Removing a user from the Administrators group using PowerShell
Unlike the ones for Command Prompt, these PowerShell commands don’t give you any feedback. If you want to change the type of a Microsoft account, replace NAME with the first five letters of the email address associated with it.
4. How to change an account to Administrator or Standard from the Control Panel
If you like consistency, the Control Panel in Windows 11 helps you change an account’s type just like it did in previous operating systems. To begin, open the Control Panel and click on the Change account type link in the User Accounts section.


In the Control Panel, click or tap Change account type
This takes you to the Manage Accounts page, where you see the user accounts on your Windows 11 PC. Administrator accounts have their types displayed underneath, while Standard accounts don’t. Find the user account whose type you want to change and click or tap its name.

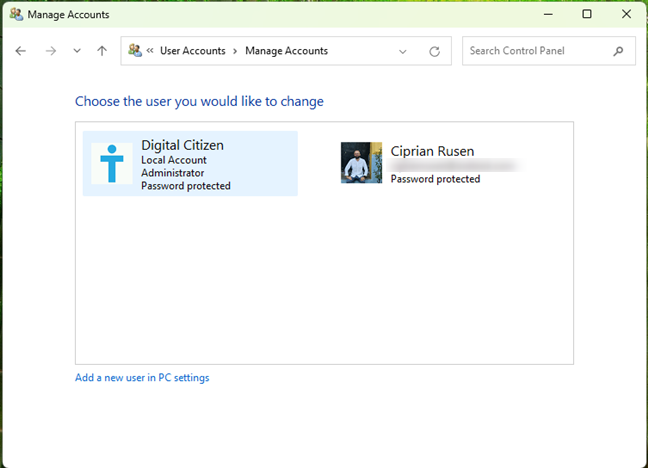
Select the user account you want to configure
Next, click or tap Change the account type.

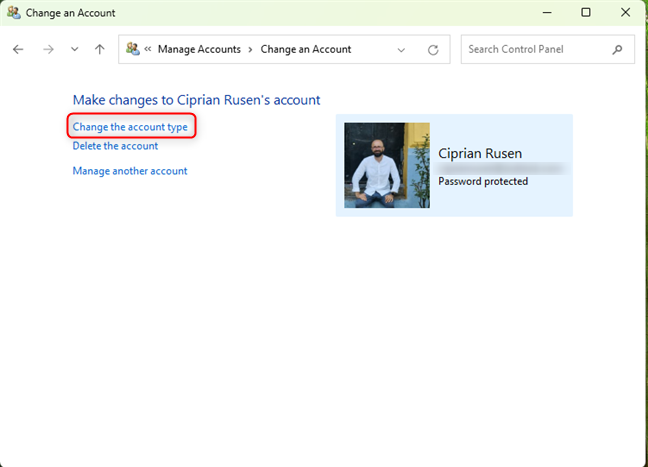
Click or tap Change the account type
Finally, select Administrator and click or tap the Change Account Type button.

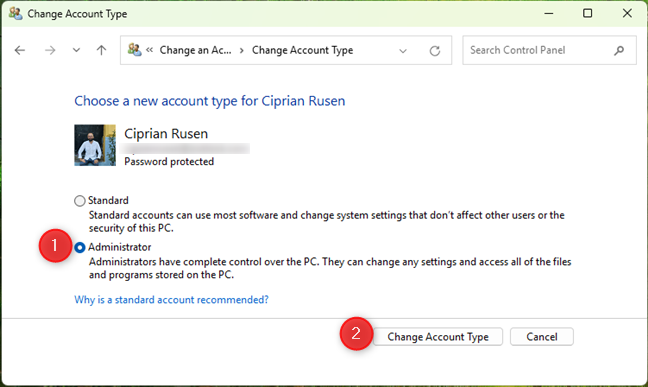
Set the user as Administrator
Your change is applied immediately. You can edit other user accounts or close the Change an Account window.
5. How to set an account as Administrator with netplwiz
Another tool you can use for this task is the User Accounts utility, otherwise known as netplwiz. First, open the Run window by pressing Win + R on your keyboard. Type netplwiz, and then press OK or Enter.

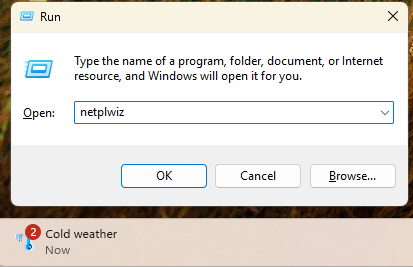
Run the netplwiz command
You see the Users tab of the User Accounts window, which lists all the “Users for this computer.” Select the user account whose type you want to change and click or tap Properties.

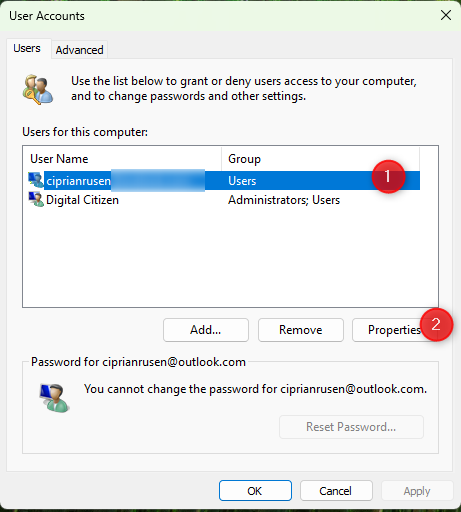
Select the user account and choose Properties
This opens the Properties window for the selected user. Open the Group Membership tab, select the level of access you want to grant (Administrator or Standard user) and click or tap OK.

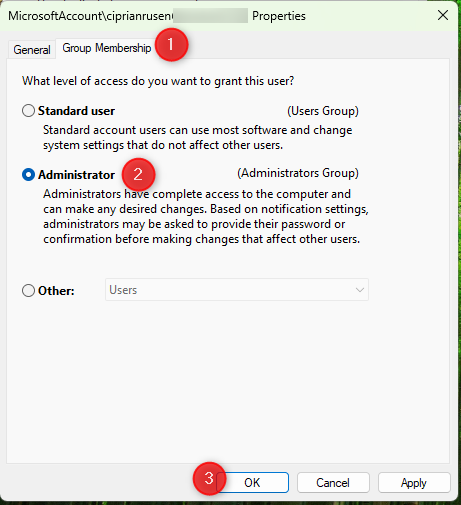
Select Administrator
Click or tap OK one more time to close the User Accounts window.
6. How to set a user as Administrator from Computer Management
One final method that works on all Windows 11 editions except Home requires opening Computer Management. You can do that by pressing Win + X on your keyboard and choosing Computer Management from the menu shown. Then, in the left panel, double-click Local Users and Groups, followed by Users. In the center of the Computer Management window, you see all the user accounts on your computer, including hidden or disabled accounts. Double-click the user account you want to set as Administrator.

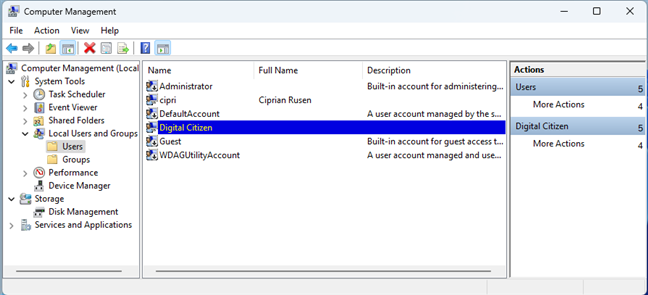
In Computer Management, go to Local Users and Groups > Users
The Properties window opens for the selected user. Go to the Member Of tab and click or tap the Add button.

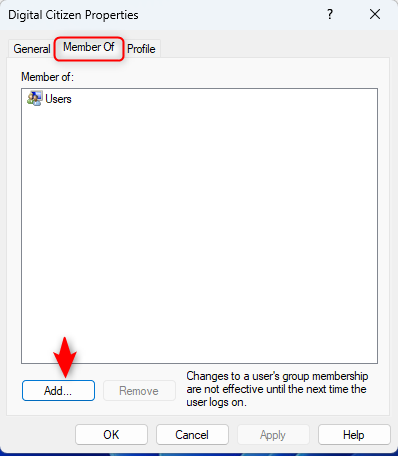
Click or tap Add
In the Select Groups window, type Administrators and click Check Names, followed by OK.

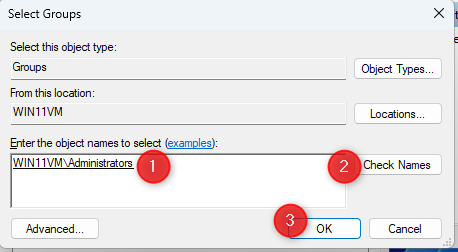
Type Administrators
You are back to the Properties window, where the user has been added as a member of the Administrators group. Click OK, and you’re done. If you want to remove the user account from this group and set it as a standard user, select Administrators and then click or tap Remove, followed by OK.

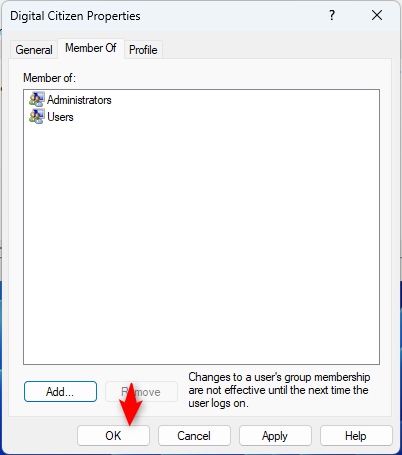
Click or tap OK
You can now edit other user accounts or close the Computer Management window.
BONUS: Things you should know about user accounts in Windows 11
When you want to change the Administrator on your Windows 11 laptop, PC or tablet, you need to have at least two user accounts, and one of them set as Administrator. You can’t use Windows 11 without an Administrator account. When you create a user account in Windows 11 after installing the operating system, all accounts are set as standard users, without Administrator permissions. But they can be set to Administrator, using any of the methods shared earlier in this guide.

New user accounts are set as standard accounts
In contrast, if you create a user account while installing Windows 11, that account is set as Administrator by default. That user account can then create as many other users as they want, and set them as standard users or Administrators.

When installing Windows 11, the user account you create is set as Administrator
Some people have asked me: “Can you give yourself Administrator privileges in Windows 11?”
That’s not possible because only an Administrator can set another user as Administrator. It’s the only type of account that has the permissions to do this. Therefore, an existing standard account can’t set itself as Administrator.
If you want to change the main Administrator on your Windows 11 computer, you first need to set another account as Administrator and then change the settings of the original Administrator to set it to Standard User. After you do that, you can even remove the old Administrator account. For a better understanding of user accounts and their properties, I highly recommend reading this article: What is a Windows user account?
How many Admin accounts do you have on your Windows 11 computer?
Now, you know all the ways to set a user account as Administrator on all Windows 11 devices, including laptops, PCs, 2-in-1s, and tablets. The steps involved are identical, no matter who manufactured your specific device. Before closing this tutorial, I’m curious how you have set up user accounts on your device: do you have one user set as Administrator or more? And why did you set up things the way you did? Comment using the options below and let me know.🙂
Source link
-

-

-

-

-

-
-

-